
The Cutest Bunny Butt Oreo Balls Recipe for Easter Joy
Sweet treats sometimes spark unexpected joy, and these bunny butt oreo balls capture pure whimsy with delightful charm.
Kids absolutely adore their playful design and hilarious shape.
Chocolate crumbs combine with cream cheese to create smooth, delectable centers.
Adorable pastel decorations transform ordinary cookies into something magical and memorable.
Simple ingredients come together quickly for a dessert that makes everyone smile.
Rolling and shaping these cute confections becomes a fun activity you can enjoy with little helpers.
Each bite promises giggles and deliciousness that will enchant both young and old.
Bunny Butt Oreo Balls That Delight All Ages

Ingredients for Cute and Tasty Oreo Balls
For the Base Mixture:For the Coating:For the Decorative Details:Step-by-Step to Make Bunny Butt Oreo Balls
Step 1: Blend Oreo Cookie Base
Grab your food processor and toss in the Oreo cookies. Pulse them until they transform into super fine crumbs.
Drop in softened cream cheese and blend until the mixture becomes a smooth, unified dough that sticks together perfectly.
Step 2: Create Cute Little Balls
Scoop out small portions of the Oreo mixture and roll them into cute 1-inch balls.
Gently place each ball onto a parchment-lined baking sheet. Pop the sheet into the refrigerator and chill for 20-30 minutes until they firm up nicely.
Step 3: Dunk in Creamy White Chocolate
Melt white chocolate until it’s silky smooth. Take each chilled Oreo ball and carefully dunk it into the melted chocolate.
Use a fork to ensure complete coverage, letting excess chocolate drip off elegantly. Return the coated balls back to the parchment sheet.
Step 4: Design Bunny Details
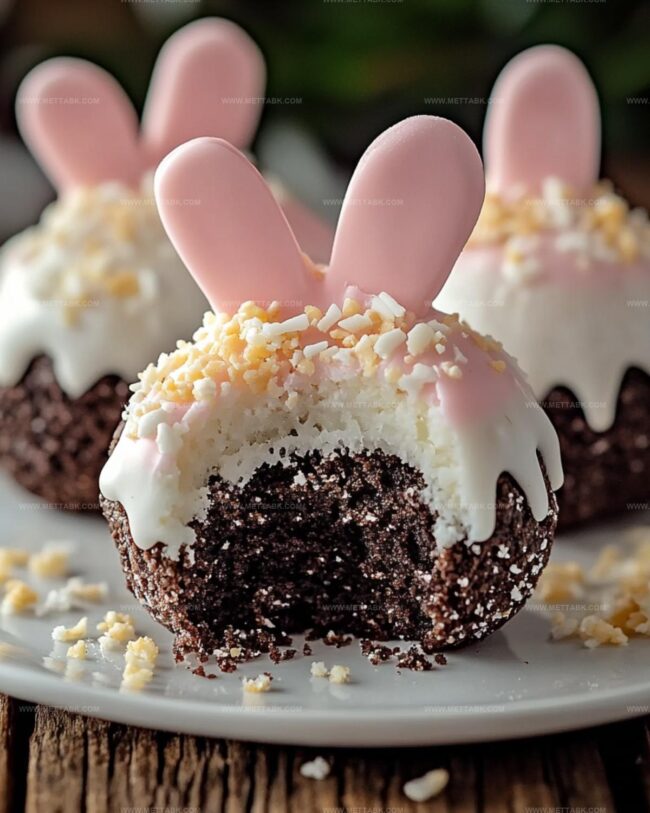
Work quickly while the chocolate is still wet. Sprinkle or roll the balls in shredded coconut to create a fluffy fur-like texture.
Add cute details:Step 5: Set and Serve
Allow the bunny treats to set at room temperature or speed up the process by placing them in the refrigerator for about 15 minutes. Once firm, arrange these adorable bunny butt Oreo balls on a decorative platter and get ready to delight everyone!
Tips for Perfect Shape and Flavor

Fun Variations on Oreo Balls
Pairing Suggestions for Sweet Treats
Storing Oreo Balls to Keep Them Fresh
Store Oreo balls in an airtight container in the refrigerator for up to 7 days. Keep them separated by parchment paper to prevent sticking.
Place balls in a freezer-safe container, separating layers with wax paper. Freeze for up to 3 months. Thaw in the refrigerator overnight before serving.
Remove from refrigerator 15-20 minutes before serving to soften slightly and bring to room temperature. Avoid microwaving to prevent chocolate from melting.
Pack in a cooler with ice packs when transporting to maintain shape and prevent melting during warm weather.
FAQs
Absolutely! Kids can help roll the Oreo balls and decorate them with coconut and candy melt details. Adult supervision is recommended for melting chocolate and handling hot surfaces.
Not at all! These treats are beginner-friendly and require basic mixing and rolling skills. The decorating process is fun and forgiving, so even novice bakers can succeed.
Yes, you can prepare these treats 2-3 days in advance. Store them in an airtight container in the refrigerator until ready to serve. They’ll stay fresh and maintain their cute bunny shape.
Print
Bunny Butt Oreo Balls Recipe
- Total Time: 35 minutes
- Yield: 24 1x
Description
Playful bunny butt oreo balls bring whimsy to dessert tables with their adorable design. Sweet cream cheese, crushed oreos, and pastel decorations create a charming treat that delights both children and adults at spring gatherings.
Ingredients
Main Ingredients:
- 36 Oreo cookies (classic, not double-stuffed)
- 8 ounces (226 grams) cream cheese, softened
- 12 ounces (340 grams) white chocolate, melted
Decoration Ingredients:
- 1 cup (80 grams) shredded coconut
- Pink candy melts (for bunny feet and ears)
Instructions
- Crush Oreo cookies in a food processor until they transform into fine, powdery crumbs, creating a uniform texture.
- Incorporate softened cream cheese into the Oreo crumbs, blending thoroughly until a cohesive, moldable dough emerges.
- Gently form the mixture into compact, uniform 1-inch spheres, arranging them carefully on a parchment-lined tray.
- Chill the formed balls in the refrigerator for 20-30 minutes, allowing them to firm up and maintain their shape during coating.
- Melt white chocolate using a double boiler or microwave, ensuring a smooth, glossy consistency.
- Delicately immerse each chilled ball into the melted white chocolate, using a fork to ensure complete, even coverage.
- Allow excess chocolate to drip off, then return the coated balls to the parchment-lined surface.
- Quickly sprinkle or roll the wet chocolate surface with shredded coconut, creating a soft, furry bunny-like texture.
- While the chocolate remains tacky, strategically place pink candy melts to represent bunny feet.
- Cut small oval-shaped pieces to simulate bunny ears, positioning them precisely on the coconut-covered balls.
- Let the decorated treats set at room temperature for 10-15 minutes or refrigerate briefly until the chocolate hardens completely.
- Arrange the whimsical bunny Oreo balls on a decorative platter, ready to delight and surprise guests.
Notes
- Chill the Oreo mixture thoroughly before shaping to prevent sticky, messy hands and ensure clean, smooth ball formation.
- Use white chocolate with a higher cocoa butter content for smoother, more even coating that sets beautifully and provides a professional finish.
- Toast coconut shreds lightly for enhanced flavor and a more golden, textured appearance that adds depth to the bunny butt design.
- Keep candy melts and decorative elements at room temperature to prevent cracking or uneven attachment when creating adorable bunny details.
- Prep Time: 20 minutes
- Cook Time: 15 minutes
- Category: Snacks, Desserts
- Method: Blending
- Cuisine: American
Nutrition
- Serving Size: 24
- Calories: 149
- Sugar: 12 g
- Sodium: 52 mg
- Fat: 8 g
- Saturated Fat: 5 g
- Unsaturated Fat: 2 g
- Trans Fat: 0.1 g
- Carbohydrates: 18 g
- Fiber: 1 g
- Protein: 2 g
- Cholesterol: 13 mg
Nate Harper
Founder & Recipe Curator
Expertise
Single-Recipe Development, Farm-to-Table Cooking, Seasonal Menu Planning, Culinary Storytelling, Home Kitchen Innovation
Education
Cascade Culinary Institute – Central Oregon Community College
Certificate in Culinary Arts
Focus: Farm-to-table cuisine, sustainable cooking practices, and seasonal recipe creation.
Nate studied under experienced chefs who emphasized local sourcing, minimal waste, and building recipes from fresh, simple ingredients.
Nate Harper is the founder and creative force behind Make, Take, Bake. Raised in the wild beauty of Oregon’s high desert, Nate grew up surrounded by family gardens, farmers’ markets, and home kitchens that celebrated the seasons.
His early love for simple, honest food evolved into a professional passion when he attended Cascade Culinary Institute, where he sharpened his skills in creating recipes that are sustainable, satisfying, and made for everyday life.
Nate’s goal is to make cooking feel accessible, free of fuss, and full of flavor. He believes a single, thoughtfully built dish can stand alone, and sometimes even steal the show.