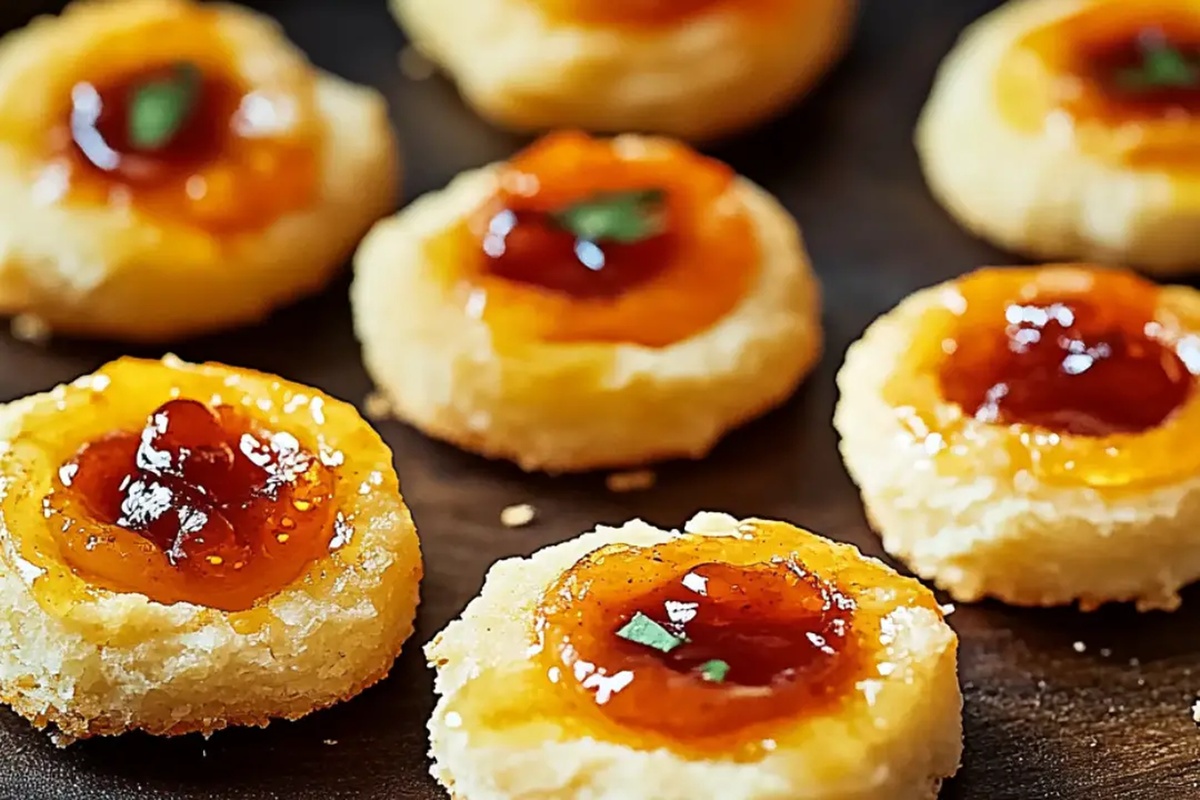
Zingy Cheesy Thumbprint Appetizers With Hot Pepper Jelly Recipe
Crafting delightful cheesy thumbprint appetizers with hot pepper jelly promises a zesty twist on classic party fare.
Small circular indentations cradle melted cheese and vibrant crimson preserves.
Guests will adore these bite-sized delicacies that balance creamy richness with spicy notes.
Each morsel delivers a surprising burst of flavor that tingles taste buds.
Perfect for game day gatherings or elegant cocktail parties, these appetizers shine with minimal effort.
Compact and colorful, they transform simple ingredients into sophisticated bites.
Come create something spectacular that will have everyone asking for the recipe.
Why These Cheesy Thumbprint Appetizers Are Crowd-Pleasers

Ingredients Needed to Make Cheesy Thumbprint Appetizers
For the Base:For the Dry Ingredients:For the Topping:How to Make Cheesy Thumbprint Appetizers
Step 1: Warm Up the Oven
Crank your oven to a toasty 375F (190C). Cover a baking sheet with parchment paper or a silicone mat to prevent sticking.
Step 2: Whip Together the Dough
Grab a mixing bowl and blend these ingredients smoothly:Fold in the dry ingredients gently:Mix until the dough feels soft and combines perfectly.
Step 3: Roll and Prepare Bite-Sized Treats
Shape the dough into adorable one-inch balls.
Place them on the prepared baking sheet, giving each ball some breathing room about an inch apart.
Step 4: Create Delightful Indentations
Using your thumb or a spoon’s back, press a gentle dimple into the center of each dough ball.
These little wells will cradle the spicy jelly.
Step 5: Bake to Golden Perfection
Slide the baking sheet into the oven.
Bake for 10-12 minutes until the edges turn a beautiful golden color.
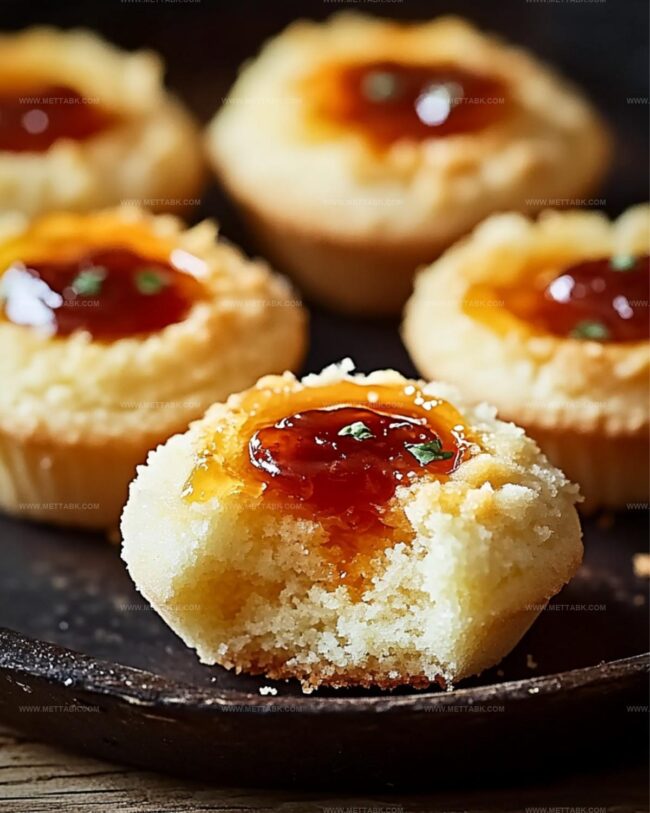
Step 6: Add Spicy Sweet Finishing Touch
Pull the baking sheet out and let the appetizers cool for 2-3 minutes.
Carefully spoon a dollop of hot pepper jelly into each thumbprint.
Step 7: Serve and Enjoy
Present these zesty bites warm or at room temperature.
Watch your guests devour these irresistible cheesy treats.
Secrets to Perfect Cheesy Thumbprint Appetizers

Unique Twists to Try on Thumbprint Appetizers
Ideal Food and Drink Matches for Thumbprint Appetizers
Tips to Preserve Cheesy Thumbprint Appetizers
Place cooled appetizers in an airtight container, separating layers with parchment paper. Keep refrigerated for up to 3-4 days.
Carefully arrange appetizers in a freezer-safe container, avoiding jelly-filled ones. Freeze for maximum 2 months. Wrap each piece individually for best protection.
Warm appetizers in a preheated 350F oven for 5-7 minutes until heated through. Avoid microwave to maintain crispy texture.
Let frozen appetizers thaw naturally at room temperature for 30-45 minutes before serving. Refresh in oven for 3-4 minutes to restore crispness.
FAQs
Yes, you can prepare the dough balls and refrigerate them for up to 24 hours before baking. Just let them come to room temperature before making the thumbprints and baking.
Sharp Cheddar cheese provides the most flavor, but you can also use mild Cheddar or a blend of cheeses like Parmesan and Cheddar for extra depth.
The heat level depends on the specific hot pepper jelly you use. You can choose mild, medium, or hot varieties to control the spice intensity to your preference.
Print
Cheesy Thumbprint Appetizers With Hot Pepper Jelly Recipe
- Total Time: 27 minutes
- Yield: 24 1x
Description
Cheesy thumbprint appetizers with hot pepper jelly bring spicy excitement to party snacking. Small cheese pastry cups filled with zesty pepper jelly create perfect bite-sized delights you will savor at gatherings.
Ingredients
Main Ingredients:
- 2 cups shredded sharp Cheddar cheese
- 1 cup all-purpose flour
- 1/2 cup unsalted butter, softened (113 grams)
Seasoning:
- 1/4 teaspoon salt
- 1/4 teaspoon cayenne pepper (optional, for extra spice)
Filling:
- 1/2 cup hot pepper jelly
Instructions
- Preheat the oven to 375°F (190°C) and prepare a baking sheet with parchment paper or silicone mat for optimal non-stick performance.
- Combine softened butter and shredded Cheddar cheese in a mixing bowl, blending until achieving a uniform, creamy consistency.
- Gradually incorporate flour, salt, and cayenne pepper into the butter-cheese mixture, gently working until a cohesive, soft dough forms.
- Craft uniform 1-inch dough spheres, strategically positioning them across the prepared baking sheet with approximately 1-inch spacing between each ball.
- Create distinct indentations in the center of each dough ball using your thumb or the curved back of a measuring spoon, ensuring a consistent well for jelly placement.
- Transfer the baking sheet to the preheated oven and bake for 10-12 minutes, monitoring until edges turn a delicate golden hue.
- After removing from the oven, allow appetizers to rest and slightly cool for 2-3 minutes to stabilize their structure.
- Carefully dollop a small portion of hot pepper jelly into the center thumbprint of each appetizer, ensuring even distribution.
- Serve immediately while warm or allow to cool to room temperature for a versatile appetizer option.
Notes
- Adjust the heat level by selecting different pepper jellies, ranging from mild to fiery hot versions for varied taste preferences.
- Gluten-free adaptation works perfectly by substituting regular flour with almond or gluten-free all-purpose flour blend.
- Chilling the dough for 15-20 minutes before shaping helps prevent spreading and maintains crisp appetizer edges during baking.
- Experiment with cheese varieties like Gruyère or pepper jack to create unique flavor profiles while maintaining the recipe’s creamy texture.
- Prep Time: 15 minutes
- Cook Time: 12 minutes
- Category: Appetizer, Snacks
- Method: Baking
- Cuisine: American
Nutrition
- Serving Size: 24
- Calories: 138 kcal
- Sugar: 3 g
- Sodium: 157 mg
- Fat: 11 g
- Saturated Fat: 6 g
- Unsaturated Fat: 4 g
- Trans Fat: 0.2 g
- Carbohydrates: 5 g
- Fiber: 0.2 g
- Protein: 5 g
- Cholesterol: 23 mg
Nate Harper
Founder & Recipe Curator
Expertise
Single-Recipe Development, Farm-to-Table Cooking, Seasonal Menu Planning, Culinary Storytelling, Home Kitchen Innovation
Education
Cascade Culinary Institute – Central Oregon Community College
Certificate in Culinary Arts
Focus: Farm-to-table cuisine, sustainable cooking practices, and seasonal recipe creation.
Nate studied under experienced chefs who emphasized local sourcing, minimal waste, and building recipes from fresh, simple ingredients.
Nate Harper is the founder and creative force behind Make, Take, Bake. Raised in the wild beauty of Oregon’s high desert, Nate grew up surrounded by family gardens, farmers’ markets, and home kitchens that celebrated the seasons.
His early love for simple, honest food evolved into a professional passion when he attended Cascade Culinary Institute, where he sharpened his skills in creating recipes that are sustainable, satisfying, and made for everyday life.
Nate’s goal is to make cooking feel accessible, free of fuss, and full of flavor. He believes a single, thoughtfully built dish can stand alone, and sometimes even steal the show.