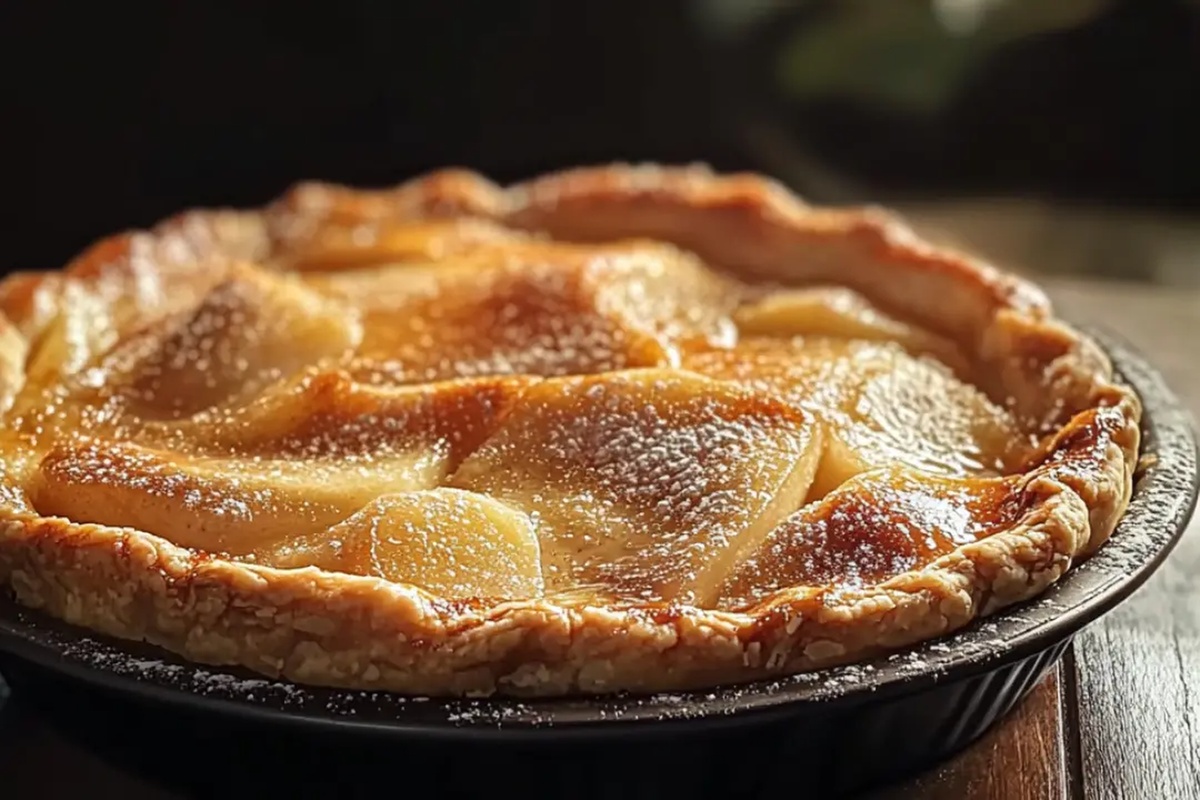
Timeless Classic: Homemade Apple Pie Recipe to Warm Hearts
Crafting a delectable classic homemade apple pie recipe transports you straight to grandma’s warm kitchen.
Sweet aromas of cinnamon and buttery pastry will instantly flood memories.
Crisp autumn apples become the star of this comforting dessert.
Flaky crusts promise golden-brown perfection with every carefully rolled inch.
Baking skills matter less than passion when creating this timeless treat.
Seasonal ingredients dance together, creating magic in a simple pie pan.
Let’s embark on a delicious journey that celebrates pure, wholesome baking.
Classic Homemade Apple Pie That Feels Like Home
Ingredients to Bake Classic Apple Pie
For the Crust:For the Apple Filling:For the Finishing Touches:How to Make Perfect Homemade Apple Pie
Step 1: Create the Flaky Pie Crust
Mix flour, sugar, and salt in a spacious mixing bowl. Incorporate cold butter using a pastry cutter or fork until the mixture transforms into crumbly texture.
Gradually introduce ice water, blending until the dough barely holds together. Separate the dough into two round disks, envelop with plastic wrap, and refrigerate for a minimum of one hour to develop optimal texture.
Step 2: Prepare Scrumptious Apple Filling
Ingredients:Combine all ingredients in a bowl, gently tossing to ensure even coating. Allow the mixture to rest for 10-15 minutes while preparing the crust, enabling flavors to meld and apples to release their natural juices.
Step 3: Assemble the Pie with Care
Roll out the first dough disk into a circular shape approximately 12 inches wide. Carefully transfer the dough into a 9-inch pie pan, ensuring smooth placement.
Pour the apple filling into the crust, strategically dotting small butter pieces across the surface. Unroll the second dough disk and place it atop the filling.
Seal the edges by pressing and creating a decorative crimp. Create several slits on the top crust to allow steam escape, or design an intricate lattice pattern for added visual appeal.
Step 4: Bake to Golden Perfection
Brush the pie crust with egg wash to achieve a beautiful golden sheen. Preheat the oven to 425°F (220°C) and bake for 15 minutes.
Reduce the temperature to 375°F (190°C) and continue baking for an additional 35-40 minutes until the crust turns a rich, appetizing brown. Allow the pie to cool for a minimum of two hours, enabling the filling to set and develop a luscious, cohesive texture before slicing and serving.
Tips to Get That Flaky Crust and Juicy Filling
Variations to Put Your Spin on Apple Pie
Pairings That Compliment Apple Pie Beautifully
Best Storage Practices for Apple Pie
FAQs
Granny Smith, Honeycrisp, or Braeburn apples are ideal because they hold their shape and provide a perfect balance of tartness and sweetness during baking.
Sprinkle a thin layer of breadcrumbs or crushed graham crackers on the bottom crust before adding filling. This helps absorb excess moisture and keeps the crust crisp.
Yes, you can prepare the pie dough up to 3 days in advance. Wrap it tightly in plastic wrap and store in the refrigerator. When ready to use, let it sit at room temperature for 10-15 minutes to soften slightly.
Print
Classic Homemade Apple Pie Recipe
- Total Time: 2 hours 25 minutes
- Yield: 8 1x
Description
Warm kitchen aromas embrace comfort with this classic homemade apple pie recipe that whispers memories of grandmother’s baking. Buttery pastry cradles caramelized cinnamon-spiced apples, promising sweet nostalgia with each golden slice you’ll savor.
Ingredients
Main Ingredients:
- 6 cups apples, peeled, cored, and sliced
- 2 1/2 cups all-purpose flour
- 1 cup (2 sticks) cold unsalted butter
Spices and Sweeteners:
- 3/4 cup sugar
- 1 teaspoon cinnamon
- 1/4 teaspoon nutmeg
- 1 tablespoon sugar
- 1 teaspoon salt
- 1 teaspoon vanilla extract
Binding and Liquid Ingredients:
- 6–8 tablespoons ice water
- 1 tablespoon lemon juice
- 2 tablespoons cornstarch
- 1 tablespoon butter
- 1 egg
- 1 tablespoon milk
Instructions
- Craft the foundation of the pie by combining flour, sugar, and salt in a spacious mixing vessel. Incorporate frigid butter using a pastry cutter until the texture resembles rugged breadcrumbs.
- Gradually introduce glacial water, blending minimally until the dough coheres. Partition the mixture into twin circular disks, encase in plastic film, and refrigerate for 60 minutes to stabilize.
- Create the apple medley by amalgamating sliced fruit with aromatic spices, citrus essence, thickening agent, and sweet extract. Allow the mixture to macerate and release its natural juices for 15 minutes.
- Unfurl one dough disk into a circular canvas spanning 12 inches, draping it gracefully into a 9-inch pie vessel. Transfer the spiced apple composition, strategically positioning small butter fragments across the surface.
- Transform the second dough disk into a protective canopy, sealing the edges with decorative crimping. Carve strategic ventilation slits to permit steam escape.
- Embellish the pastry surface with a lustrous egg wash, promising a burnished golden complexion. Position in a preheated oven at 425F for initial 15 minutes, then reduce temperature to 375F and continue baking for 40 minutes until achieving rich amber coloration.
- Exercise patience, allowing the pie to cool and solidify for minimum 2 hours before slicing, ensuring a perfectly structured filling.
Notes
- Select apples with a balance of tartness and sweetness like Granny Smith and Honeycrisp for the best flavor complexity.
- Slice apples uniformly to ensure even cooking and consistent texture throughout the pie.
- Prevent soggy bottom crust by sprinkling ground almonds or breadcrumbs before adding apple filling to absorb excess moisture.
- Create beautiful lattice design by cutting strips carefully and weaving them alternately for a professional bakery-style presentation.
- Prep Time: 1 hour 30 minutes
- Cook Time: 55 minutes
- Category: Desserts
- Method: Baking
- Cuisine: American
Nutrition
- Serving Size: 8
- Calories: 330 kcal
- Sugar: 22 g
- Sodium: 180 mg
- Fat: 15 g
- Saturated Fat: 9 g
- Unsaturated Fat: 6 g
- Trans Fat: 0.3 g
- Carbohydrates: 43 g
- Fiber: 3 g
- Protein: 3 g
- Cholesterol: 40 mg
Nate Harper
Founder & Recipe Curator
Expertise
Single-Recipe Development, Farm-to-Table Cooking, Seasonal Menu Planning, Culinary Storytelling, Home Kitchen Innovation
Education
Cascade Culinary Institute – Central Oregon Community College
Certificate in Culinary Arts
Focus: Farm-to-table cuisine, sustainable cooking practices, and seasonal recipe creation.
Nate studied under experienced chefs who emphasized local sourcing, minimal waste, and building recipes from fresh, simple ingredients.
Nate Harper is the founder and creative force behind Make, Take, Bake. Raised in the wild beauty of Oregon’s high desert, Nate grew up surrounded by family gardens, farmers’ markets, and home kitchens that celebrated the seasons.
His early love for simple, honest food evolved into a professional passion when he attended Cascade Culinary Institute, where he sharpened his skills in creating recipes that are sustainable, satisfying, and made for everyday life.
Nate’s goal is to make cooking feel accessible, free of fuss, and full of flavor. He believes a single, thoughtfully built dish can stand alone, and sometimes even steal the show.