
Magical Cookies Made From Brownie Mix Recipe For Dessert Lovers
Crafting delectable brownie mix cookies opens a world of sweet possibilities for quick dessert lovers.
Simple ingredients transform an ordinary box mix into something extraordinary.
Bakers can whip up these treats in minutes with minimal effort.
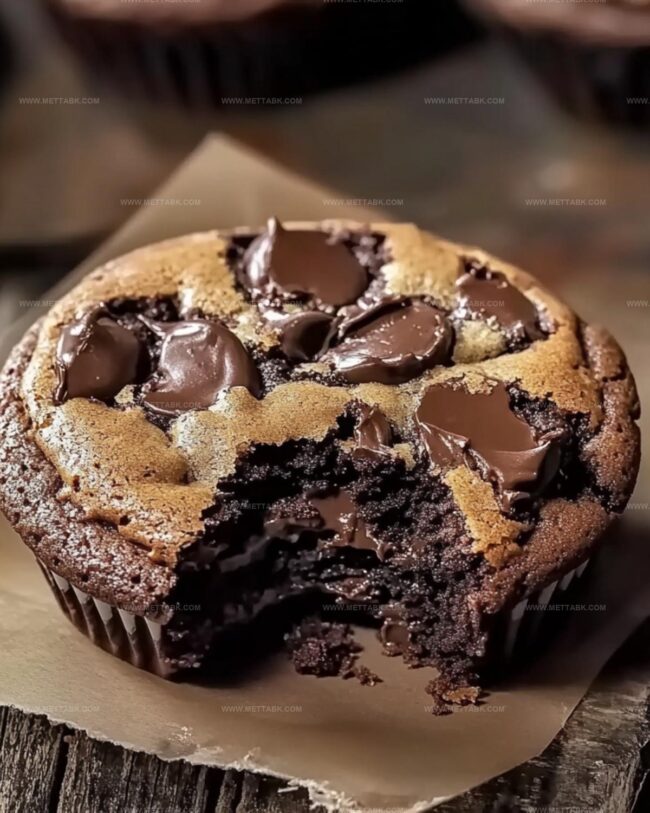
Chocolatey, chewy, and irresistibly soft, these cookies promise a delightful twist on classic brownies.
Mixing becomes an adventure when you experiment with different add-ins like nuts or chocolate chips.
Everyone from novice bakers to seasoned pros will adore this effortless recipe.
Prepare to surprise yourself with how incredibly easy and delicious these cookies can be.
What Makes Cookies Made From Brownie Mix Special

Ingredients Needed for Brownie Mix Cookie
For the Base:For the Wet Ingredients:For the Add-Ins:Step-by-Step Directions for Brownie Mix Cookies
Step 1: Prepare Baking Setup
Preheat your oven to 350°F (175°C). Line a baking sheet with parchment paper to prevent sticking and ensure easy cookie removal.
Step 2: Create Cookie Base
In a large mixing bowl, blend brownie mix with all-purpose flour. This combination helps create a perfect cookie texture that’s crispy on the edges and soft in the center.
Step 3: Combine Wet Ingredients
Crack eggs into the dry mixture and pour in vegetable oil. Stir thoroughly until the ingredients form a smooth, consistent dough.
The eggs will help bind the mixture while the oil adds moisture.
Step 4: Add Optional Chocolate Boost
If you’re a chocolate lover, gently fold chocolate chips into the dough.
This step adds extra bursts of chocolatey goodness throughout your cookies.
Step 5: Shape Cookie Portions
Use a tablespoon to scoop out uniform dough portions.
Place each scoop onto the prepared baking sheet, keeping about 2 inches of space between cookies to allow for spreading during baking.
Step 6: Bake to Perfection
Slide the baking sheet into the preheated oven.
Bake for 8-10 minutes. You’ll know they’re ready when the edges look set but the centers remain slightly soft and gooey.
Step 7: Cool and Enjoy
Let the cookies rest on the baking sheet for 5 minutes. This allows them to firm up slightly.
Transfer to a wire cooling rack to cool completely. Enjoy your quick and easy brownie mix cookies with a glass of cold milk or coffee.
Helpful Tips for Baking Brownie Mix Cookies
Flavorful Twists for Brownie Mix Cookies
Pairings That Go Well With Brownie Mix Cookies
How to Store Cookies Made From Brownie Mix

Store cookies in an airtight container lined with parchment paper between layers, keeping them fresh for up to 5 days in the refrigerator.
Place cooled cookies in a freezer-safe container or ziplock bag, separating layers with wax paper. Freeze for up to 3 months for maximum flavor and texture.
Remove frozen cookies and let them sit at room temperature for 15-20 minutes before serving, restoring their soft, chewy consistency.
Warm cookies in the microwave for 10-15 seconds or in a preheated oven at 300F for 2-3 minutes to enjoy them like freshly baked.
FAQs
Yes, you can use any brand or flavor of brownie mix. Just ensure it’s a standard box mix for best results.
No, brownie mixes already contain sufficient sugar, so no additional sugar is needed in this recipe.
These cookies are soft and chewy, similar to a traditional brownie texture with a slightly crisp edge.
Yes, use a gluten-free brownie mix and gluten-free flour to create a gluten-free version of these cookies.
Print
Cookies Made From Brownie Mix Recipe
- Total Time: 25 minutes
- Yield: 24 1x
Description
Brownie mix cookies blend rich chocolate indulgence with effortless baking magic. Chewy, fudgy delights emerge from simple ingredients, promising sweet satisfaction that will tempt dessert enthusiasts with minimal kitchen effort.
Ingredients
Chocolate Base:
- 1 box (18 ounces / 510 grams) brownie mix
- 1 cup chocolate chips
Liquid Ingredients:
- 2 large eggs
- 1/4 cup (60 milliliters) vegetable oil
Dry Ingredients:
- 1/4 cup (30 grams) all-purpose flour
Instructions
- Prepare the oven environment by heating to 350F (175C) and lining a baking sheet with parchment paper for optimal cookie performance.
- Create a foundational mixture by blending brownie mix with flour in a large mixing bowl, ensuring thorough incorporation.
- Introduce moisture and binding agents by whisking eggs and vegetable oil into the dry ingredients until a cohesive dough forms.
- Enhance the texture and flavor profile by gently folding chocolate chips throughout the mixture if desired.
- Portion the dough into uniform tablespoon-sized rounds, strategically positioning them approximately 2 inches apart on the prepared baking sheet to allow proper spreading.
- Bake the cookies for 8-10 minutes, watching for distinctive visual cues: set edges with centers maintaining a slight softness, indicating perfect doneness.
- Implement a cooling protocol by allowing cookies to rest on the baking sheet for 5 minutes, which helps them stabilize, then transfer to a wire rack for complete cooling and final texture development.
Notes
- less flour creates chewier cookies, more flour makes them crisper and more structured.
- Experiment with mix-ins like chopped nuts, dried fruit, or different chocolate varieties to transform the basic recipe into unique flavor profiles.
- Chill the dough for 15-20 minutes before baking to prevent excessive spreading and create thicker, more uniform cookies with concentrated flavor.
- Store cooled cookies in an airtight container at room temperature for up to 5 days, separating layers with parchment paper to maintain optimal freshness and prevent sticking.
- Prep Time: 15 minutes
- Cook Time: 10 minutes
- Category: Snacks, Desserts
- Method: Baking
- Cuisine: American
Nutrition
- Serving Size: 24
- Calories: 162 kcal
- Sugar: 12 g
- Sodium: 80 mg
- Fat: 8 g
- Saturated Fat: 2.5 g
- Unsaturated Fat: 5.5 g
- Trans Fat: 0 g
- Carbohydrates: 22 g
- Fiber: 1 g
- Protein: 2.4 g
- Cholesterol: 30 mg
Clara Bennett
Contributing Recipe Developer & Food Writer
Expertise
Baking and Pastry Development, Gluten-Free and Allergy-Friendly Recipe Creation, Culinary Storytelling and Food Journalism, Recipe Testing and Standardization, Southern Comfort Foods and Modern Twists
Education
Sullivan University – National Center for Hospitality Studies
Associate Degree in Culinary Arts
Focus: Baking and Pastry Arts, Recipe Testing, and Culinary Journalism.
Clara specialized in crafting desserts that blend classic Southern comfort with modern techniques, while developing strong writing skills to tell the story behind every dish.
Lane Community College (Certificate Program)
Certificate in Food Writing and Photography
Focus: Culinary storytelling, recipe formatting, food styling, and visual presentation.
Clara’s love of baking started young, powered by homemade pies, biscuits, and stories passed around the family table.
After earning her degree at Sullivan University and a food writing certificate at Lane Community College, she turned her passion into a craft: sharing recipes that are simple, soulful, and always full of heart.
She’s big on bold flavors, flexible ideas, and creating sweets that fit any table (yes, even if you’re gluten-free). When she’s not baking, you’ll find her wandering farmers’ markets, styling food for the next photo shoot, or working on her ever-growing recipe journal.