Easy Crazy Crust Pie Recipe for Dessert Lovers
Baking a crazy crust pie can surprise even seasoned home chefs with its unexpected simplicity.
Ingredients magically settle into perfect layers during cooking, creating a delightful culinary trick.
Flour, butter, and eggs form the foundation of this clever dish.
Remarkably, no complicated crust-rolling techniques interrupt your cooking flow.
Mixing becomes effortless with just a few quick stirs.
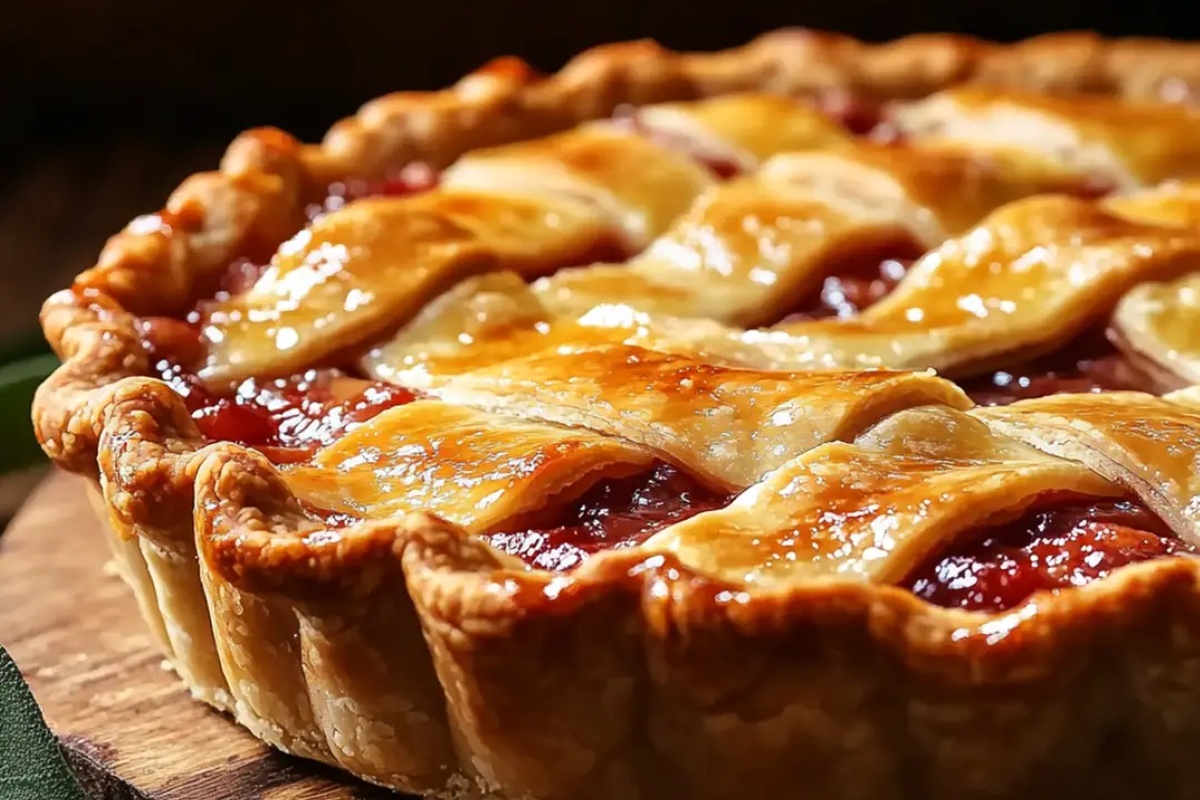
Each slice promises a delectable combination of tender crust and rich filling.
Why Everyone Loves Crazy Crust Pie
What You Need for Crazy Crust Pie
For the Dry Ingredients:For the Wet Ingredients:For the Topping and Filling:Steps to Make a Crazy Crust Pie

Step 1: Prep Baking Space
Warm up your oven to 375F (190C) and generously coat a 9-inch pie plate with cooking spray or butter to prevent sticking.
Step 2: Whip Together Dry Ingredients
Grab a large mixing bowl and combine flour, sugar, baking powder, and salt.
Whisk these ingredients until they’re perfectly blended and free of lumps.
Step 3: Create Magical Batter
Pour in melted butter, milk, and egg into the dry ingredient mixture.
Gently stir everything until just combined. Don’t overmix – your batter should look thick and slightly sticky.
Step 4: Build Incredible Crust Foundation
Carefully spread the batter across the pie plate, making sure it covers the bottom and climbs up the sides. The goal is to create a rustic, uneven crust that looks homemade and delicious.
Step 5: Add Fruity Goodness
Spoon your favorite fruit pie filling into the center of the crust. Leave a small border around the edges to allow the crust to peek through and get crispy.
Step 6: Sprinkle Sweet Magic
Dust the top with a generous sprinkle of cinnamon-sugar mixture, which will create a sparkling, caramelized finish when baked.
Step 7: Bake to Golden Perfection
Slide the pie into the preheated oven and bake for 35-40 minutes.
Watch for a beautiful golden-brown crust that looks crispy and inviting.
Step 8: Cool and Serve
Remove the pie and let it rest for 10 minutes.
This allows the filling to set and the crust to become perfectly crisp. Slice and serve warm or at room temperature.
Tips for the Perfect Crazy Crust Pie
Creative Ideas for Crazy Crust Pie Filling
Tasty Pairings with Crazy Crust Pie
How to Store Your Crazy Crust Pie
Store leftover pie in an airtight container for up to 3 days, keeping it fresh and preventing moisture loss.
Wrap the entire pie tightly in plastic wrap and aluminum foil, storing in the freezer for up to 2 months without losing quality.
Separate and wrap each slice in plastic wrap, then place in a freezer-safe container for convenient single-serving portions.
Warm refrigerated slices in the oven at 325F for 10-15 minutes, or microwave individual pieces for 20-30 seconds until heated through.
FAQs
The crust forms magically during baking, creating a unique self-forming border without pre-rolling or complicated pastry techniques. The batter rises and creates a crust around the fruit filling automatically.
Yes, you can substitute fresh fruit by preparing it first. Cut fruits into small pieces, mix with a little sugar and cornstarch to help thicken, and then use as your filling. Just ensure fruits are not too watery.
Absolutely! It’s incredibly simple with basic ingredients and minimal preparation. The batter is forgiving, and you don’t need advanced baking skills to create a delicious pie. Even novice bakers can successfully make this recipe.
Print
Crazy Crust Pie Recipe
- Total Time: 55 minutes
- Yield: 8 1x
Description
Crazy Crust Pie delights with its unexpected simplicity and rustic charm. Homemade comfort emerges through a unique batter that creates a crispy, golden crust while cradling your favorite fruit filling, promising a delightful slice you’ll savor to the last crumb.
Ingredients
Main Ingredients:
- 1 can (21 ounces) fruit pie filling (cherry, apple, or blueberry)
- 1 egg
- 1/2 cup milk
- 1/4 cup butter, melted
Dry Ingredients:
- 1 cup all-purpose flour
- 1/2 cup sugar
- 1 teaspoon baking powder
- 1/4 teaspoon salt
Seasoning:
- 1 teaspoon cinnamon-sugar mixture
Instructions
- Prepare the oven at 375F (190C) and coat a 9-inch pie plate with cooking spray or butter.
- Combine flour, sugar, baking powder, and salt in a mixing bowl, whisking thoroughly to eliminate any lumps.
- Incorporate melted butter, milk, and egg into the dry ingredients, mixing until the batter achieves a thick, slightly lumpy consistency.
- Transfer the batter into the greased pie plate, using a spatula to distribute evenly and create a complete coverage along the bottom and sides.
- Carefully pour the fruit filling into the center of the prepared crust, maintaining a small border around the edges to prevent overflow during baking.
- Generously dust the surface with a mixture of cinnamon and sugar, ensuring an even distribution for enhanced flavor and visual appeal.
- Place the pie in the preheated oven and bake for 35-40 minutes, watching for a golden-brown crust and bubbling fruit filling.
- Remove from the oven and allow the pie to rest for 10 minutes, which helps the filling set and makes serving easier.
- Slice and serve the pie warm or at room temperature, optionally accompanied by a scoop of vanilla ice cream.
Notes
- Experiment with different fruit fillings like apple, peach, or berry to customize the pie to your taste preferences.
- Swap all-purpose flour with gluten-free flour blend for a celiac-friendly version of the dessert.
- Add a handful of chopped nuts like almonds or pecans to the batter for extra crunch and texture.
- Reduce sugar content by using natural sweeteners like honey or maple syrup for a healthier alternative.
- Prep Time: 15 minutes
- Cook Time: 40 minutes
- Category: Desserts
- Method: Baking
- Cuisine: American
Nutrition
- Serving Size: 8
- Calories: 232 kcal
- Sugar: 18 g
- Sodium: 157 mg
- Fat: 10 g
- Saturated Fat: 6 g
- Unsaturated Fat: 4 g
- Trans Fat: 0.3 g
- Carbohydrates: 33 g
- Fiber: 1 g
- Protein: 3 g
- Cholesterol: 40 mg
Nate Harper
Founder & Recipe Curator
Expertise
Single-Recipe Development, Farm-to-Table Cooking, Seasonal Menu Planning, Culinary Storytelling, Home Kitchen Innovation
Education
Cascade Culinary Institute – Central Oregon Community College
Certificate in Culinary Arts
Focus: Farm-to-table cuisine, sustainable cooking practices, and seasonal recipe creation.
Nate studied under experienced chefs who emphasized local sourcing, minimal waste, and building recipes from fresh, simple ingredients.
Nate Harper is the founder and creative force behind Make, Take, Bake. Raised in the wild beauty of Oregon’s high desert, Nate grew up surrounded by family gardens, farmers’ markets, and home kitchens that celebrated the seasons.
His early love for simple, honest food evolved into a professional passion when he attended Cascade Culinary Institute, where he sharpened his skills in creating recipes that are sustainable, satisfying, and made for everyday life.
Nate’s goal is to make cooking feel accessible, free of fuss, and full of flavor. He believes a single, thoughtfully built dish can stand alone, and sometimes even steal the show.