Heavenly Easter Egg Cheesecake Recipe That’s Too Good to Miss
Crafting an easter egg cheesecake brings pure delight to any dessert lover’s afternoon.
Sweet memories of childhood chocolate hunts flood back with each creamy bite.
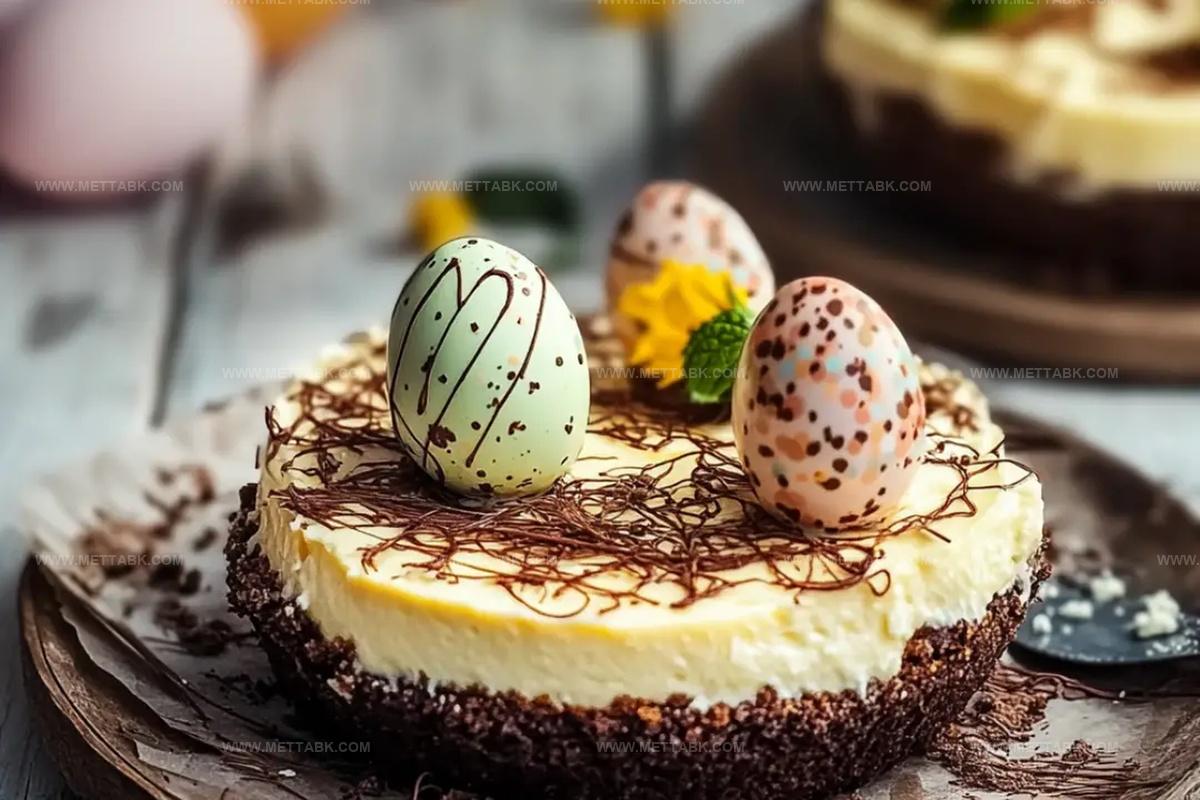
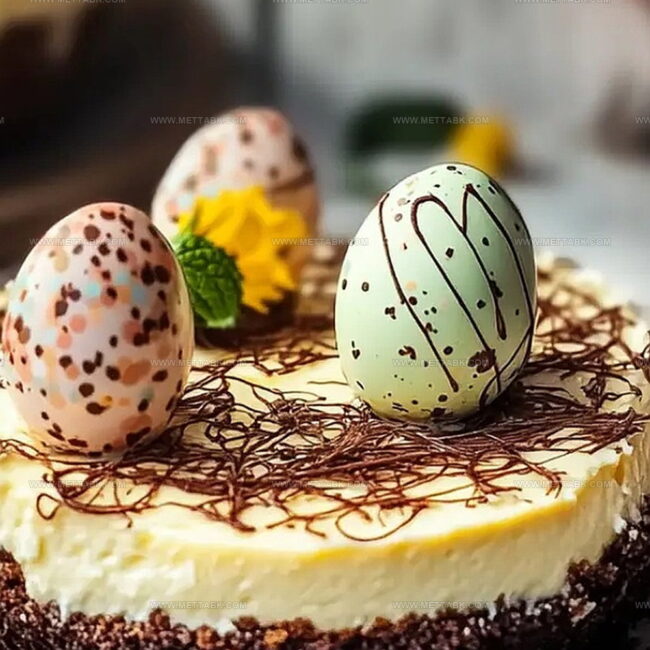
Decadent chocolate shells crumble gently against silky smooth cream cheese layers.
Pastel-colored decorations add a whimsical touch to this playful dessert.
Springtime celebrations feel magical when you slice into this indulgent treat.
Rich ganache and speckled chocolate create a stunning visual masterpiece.
Prepare to wow everyone at your gathering with this irresistible confection.
Easter Egg Cheesecake That Steals the Show
Ingredients for Easter Egg Cheesecake
For the Chocolate Shell:For the Cheesecake Filling:For the Decoration and Coloring:Step-by-Step Easter Egg Cheesecake Guide
Step 1: Slice Chocolate Eggs
Grab a sharp knife and run it under hot water. Dry the knife carefully.
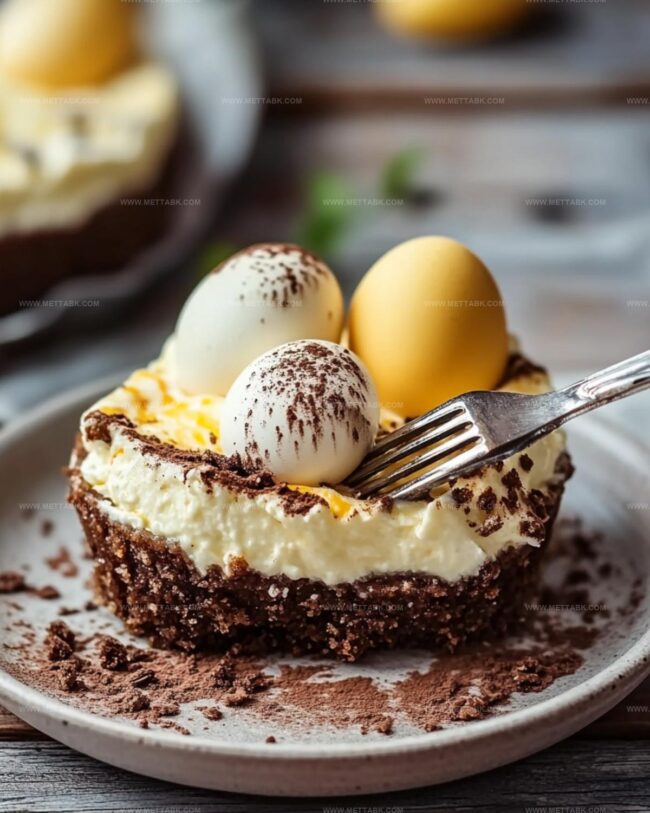
Gently cut the chocolate eggs along their seam, creating two perfect halves. Place the egg halves in a muffin tin or on a flat tray to keep them steady and prevent rolling.
Step 2: Whip Creamy Filling
Grab your mixing bowl and combine:Beat these ingredients until they become silky smooth. Add vanilla extract and melted white chocolate, mixing thoroughly.
In a separate bowl, whip the heavy cream until soft peaks form. Tenderly fold the whipped cream into the cream cheese mixture, creating a light and fluffy texture.
Want colorful filling? Divide the mixture into small bowls and stir in soft pastel food coloring.
Step 3: Stuff Chocolate Shells
Using a spoon or piping bag, carefully fill each chocolate egg half with the creamy cheesecake mixture. Smooth the tops using a spatula to create a clean, elegant finish.
Step 4: Embellish and Chill
Decorate the filled egg halves with delightful toppings:Place the decorated eggs in the refrigerator for at least two hours. This allows the cheesecake to set and develop a perfect, creamy consistency.
Tips for Perfect Easter Egg Cheesecake

Flavor Variations for Cheesecake
Pairing Ideas for Easter Egg Cheesecake
Storing Easter Egg Cheesecake Properly
Seal chocolate egg halves in an airtight container, keeping them flat to prevent filling from shifting. Store up to 3-4 days in the refrigerator’s coldest section.
Wrap individual chocolate egg halves separately in plastic wrap, then place in a freezer-safe container. Freeze for maximum 2 weeks to maintain texture and flavor.
Remove from refrigerator 15-20 minutes before serving to soften filling. Avoid microwaving, which can melt chocolate and ruin delicate texture.
Transfer frozen cheesecake eggs from freezer to refrigerator overnight. Let them slowly defrost to preserve original creamy consistency and prevent condensation.
FAQs
Print
Easter Egg Cheesecake Recipe
- Total Time: 2 hours 30 minutes
- Yield: 6 1x
Description
Indulgent Easter Egg Cheesecake delights with creamy layers of chocolate and smooth cream cheese, nestled in a graham cracker crust. Sweet chocolate eggs crown this festive dessert, promising pure bliss with each heavenly bite you’ll savor.
Ingredients
Main Ingredients:
- 4 packages (8 ounces/226 grams) cream cheese, softened
- 1 cup (200 grams) granulated sugar
- 4 large eggs
- 1 cup (240 milliliters) sour cream
Chocolate Components:
- 6 large hollow chocolate Easter eggs (Cadbury or similar)
- 1/2 cup (85 grams) mini chocolate eggs
- 1/4 cup (30 grams) chocolate cookie crumbs
Stabilizing and Flavoring Ingredients:
- 2 tablespoons all-purpose flour
- 1 tablespoon vanilla extract
- 1/4 teaspoon salt
- Whipped cream (optional for garnish)
- Sprinkles (optional for topping)
Instructions
- Prepare chocolate eggs by carefully slicing them in half using a knife heated under hot water. Gently wipe the knife dry and cut along the seam to create two precise halves. Arrange the egg shells in a muffin tin or tray to maintain stability.
- Create the cheesecake filling by blending cream cheese and powdered sugar until achieving a silky consistency. Incorporate vanilla extract and melted white chocolate, mixing thoroughly. In a separate vessel, whip heavy cream until soft peaks develop. Delicately fold the whipped cream into the cream cheese mixture, ensuring a light and airy texture. Optional: Divide the filling and introduce pastel food coloring for visual appeal.
- Carefully fill each chocolate egg half with the prepared cheesecake mixture, using a spoon or piping bag for precision. Smooth the surface of the filling to create an even appearance.
- Enhance the presentation by garnishing with miniature chocolate eggs, colorful sprinkles, crushed cookies, or dollops of additional whipped cream. Refrigerate the decorated eggs for a minimum of 2 hours, allowing the filling to completely set and firm up.
Notes
- Slice chocolate eggs carefully with a warm knife to prevent cracking and ensure clean, smooth edges for a professional presentation.
- Use room temperature cream cheese to achieve a smoother, lump-free filling that blends easily and creates a silky texture.
- Fold whipped cream gently into the cream cheese mixture to maintain airiness and prevent deflating the delicate volume.
- Experiment with different chocolate egg varieties like milk, dark, or white chocolate to customize flavors and create unique dessert experiences.
- Prep Time: 30 minutes
- Cook Time: 2 hours
- Category: Desserts
- Method: Chilling
- Cuisine: American
Nutrition
- Serving Size: 6
- Calories: 220
- Sugar: 25 g
- Sodium: 30 mg
- Fat: 12 g
- Saturated Fat: 7 g
- Unsaturated Fat: 4 g
- Trans Fat: 0.2 g
- Carbohydrates: 26 g
- Fiber: 1 g
- Protein: 3 g
- Cholesterol: 40 mg
Nate Harper
Founder & Recipe Curator
Expertise
Single-Recipe Development, Farm-to-Table Cooking, Seasonal Menu Planning, Culinary Storytelling, Home Kitchen Innovation
Education
Cascade Culinary Institute – Central Oregon Community College
Certificate in Culinary Arts
Focus: Farm-to-table cuisine, sustainable cooking practices, and seasonal recipe creation.
Nate studied under experienced chefs who emphasized local sourcing, minimal waste, and building recipes from fresh, simple ingredients.
Nate Harper is the founder and creative force behind Make, Take, Bake. Raised in the wild beauty of Oregon’s high desert, Nate grew up surrounded by family gardens, farmers’ markets, and home kitchens that celebrated the seasons.
His early love for simple, honest food evolved into a professional passion when he attended Cascade Culinary Institute, where he sharpened his skills in creating recipes that are sustainable, satisfying, and made for everyday life.
Nate’s goal is to make cooking feel accessible, free of fuss, and full of flavor. He believes a single, thoughtfully built dish can stand alone, and sometimes even steal the show.