
Whip Up Adorable Easter Egg Oreo Balls Recipe Today
Sweet tooths go crazy for these delightful easter egg oreo balls that combine creamy chocolate with playful seasonal charm.
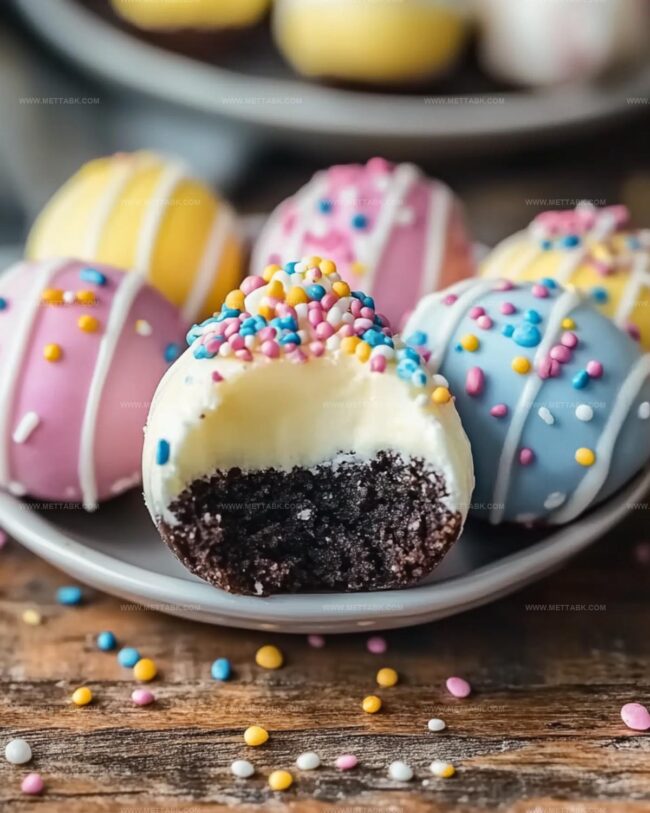
Crushing cookies into fine crumbs creates the perfect base for these irresistible treats.
Cream cheese helps bind the mixture, ensuring each bite melts smoothly in your mouth.
Kids and adults alike will adore the festive appearance of these bite-sized delights.
Decorating with pastel sprinkles or colorful drizzles adds a whimsical touch to these no-bake desserts.
Rolling the mixture into egg shapes makes them extra special for spring celebrations.
You won’t be able to resist these delectable morsels that blend simplicity with pure indulgence.
Easter Egg Oreo Balls That Impress Everyone

Ingredients for Festive Easter Oreo Balls
For the Base:For the Coating:For the Decorations:How to Make Easter Egg Oreo Balls
Step 1: Crush Oreo Cookies
Grab your food processor and transform the Oreo cookies into super fine, powdery crumbs. Pulse until they become a consistent, sandy texture that will help create a smooth mixture.
Step 2: Create Creamy Oreo Mixture
In a spacious mixing bowl, combine the cookie crumbs with softened cream cheese. Blend thoroughly using a spatula or electric mixer until the ingredients merge into a uniform dough that holds together perfectly.
Step 3: Shape Egg-Inspired Treats
Gently mold the mixture into charming egg-like shapes using your hands. Place each delicate creation onto a parchment-lined baking sheet.
Pop the tray into the freezer for 20 minutes to help them firm up and maintain their shape.
Step 4: Prepare Chocolate Coating
Select white chocolate or candy melts and melt them in a microwave-safe bowl.
Heat in short 30-second bursts, stirring between each interval until the chocolate becomes silky smooth and fully liquefied.
Step 5: Dunk and Coat
Carefully dip each frozen Oreo egg into the melted chocolate, ensuring complete coverage.
Allow excess chocolate to gently drip off, creating an elegant, even coating.
Step 6: Decorate with Flair
Return the chocolate-covered eggs to the baking sheet.
While the chocolate is still wet, sprinkle with colorful decorations or drizzle with additional colored chocolate for a festive touch.
Step 7: Set and Chill
Let the Oreo balls rest at room temperature or place them in the refrigerator for about 10 minutes.
This will help the chocolate harden and set, creating a perfect sweet treat ready to enjoy.
Tips for Perfect Oreo Balls Every Time

Variations to Try with Oreo Balls
Pairings That Complement Oreo Balls
Pair Creamy Easter Oreo Balls with:Storing Easter Egg Oreo Balls Correctly
Store Oreo egg balls in an airtight container, layered between parchment paper, for up to 5 days. Keep refrigerated to maintain texture and prevent melting.
Wrap individual Oreo egg balls in plastic wrap, place in freezer-safe container, and freeze for 2-3 months. Thaw in refrigerator overnight before serving.
Let Oreo egg balls sit at room temperature for 10-15 minutes before serving to soften slightly and enhance flavor.
These treats are best enjoyed cold. Avoid microwaving as chocolate coating may melt or become grainy. Serve directly from refrigerator for optimal taste and texture.
FAQs
Keep the Oreo eggs very cold before dipping. Use room temperature chocolate and work quickly. If the chocolate is too hot, it can cause cracking.
Yes, you can prepare them up to 3 days in advance. Store in an airtight container in the refrigerator. For best texture, let them sit at room temperature for 10 minutes before serving.
Use high-quality white chocolate or candy melts. Melt slowly in short intervals, stirring between each. Use a dipping fork or spoon to ensure even coverage and tap off excess chocolate.
Print
Easter Egg Oreo Balls Recipe
- Total Time: 25 minutes
- Yield: 24 1x
Description
Creamy chocolate-coated Easter egg oreo balls bring sweet magic to holiday dessert tables. Rich cookie crumbs blended with cream cheese create irresistible bite-sized treats you will devour with pure delight.
Ingredients
Main Ingredients:
- 1 package (14 ounces / 397 grams) Oreo cookies
- 8 ounces (226 grams) cream cheese, softened
Coating Ingredients:
- 2 cups (340 grams) white chocolate or candy melts (assorted colors)
Decoration Ingredients:
- Sprinkles
- Colored drizzle
Instructions
- Pulverize Oreo cookies into a fine, sandy texture using a food processor, ensuring no large chunks remain.
- Integrate softened cream cheese with the cookie crumbs, kneading thoroughly until a cohesive, moldable dough develops.
- Craft the mixture into petite egg-shaped formations, arranging them on a parchment-lined tray.
- Chill the proto-confections in the freezer for approximately 20 minutes to stabilize their structure.
- Liquify white chocolate or candy melts in a microwave-safe vessel, heating in brief 30-second bursts and stirring between intervals until achieving a silky, uniform consistency.
- Delicately immerse each frozen Oreo egg into the molten chocolate, ensuring complete and even coverage, allowing excess to cascade back into the bowl.
- Return chocolate-enrobed eggs to the lined tray, promptly embellishing with festive sprinkles or executing decorative chocolate drizzles while the coating remains glossy and wet.
- Allow the decorated treats to solidify at ambient temperature or expedite the process by refrigerating for roughly 10 minutes until perfectly set and firm.
Notes
- Customize the texture by adjusting the amount of cream cheese for a softer or firmer consistency.
- Experiment with different Oreo flavors like mint, peanut butter, or birthday cake to create unique variations.
- Use silicone egg-shaped molds for perfectly shaped Oreo eggs with minimal effort.
- Freeze the Oreo balls before dipping to prevent crumbling and ensure a smoother chocolate coating.
- For gluten-free options, substitute regular Oreos with gluten-free chocolate sandwich cookies.
- Create a dairy-free version by using vegan cream cheese and dairy-free white chocolate.
- Add food coloring to the melted chocolate for pastel Easter-themed decorations.
- Prevent chocolate from seizing by ensuring no water touches the melting process.
- Prep Time: 25 minutes
- Cook Time: 0 minutes
- Category: Snacks, Desserts
- Method: Freezing
- Cuisine: American
Nutrition
- Serving Size: 24
- Calories: 130 kcal
- Sugar: 11 g
- Sodium: 55 mg
- Fat: 7 g
- Saturated Fat: 4.5 g
- Unsaturated Fat: 2 g
- Trans Fat: 0.1 g
- Carbohydrates: 16 g
- Fiber: 0.5 g
- Protein: 1.5 g
- Cholesterol: 10 mg
Nate Harper
Founder & Recipe Curator
Expertise
Single-Recipe Development, Farm-to-Table Cooking, Seasonal Menu Planning, Culinary Storytelling, Home Kitchen Innovation
Education
Cascade Culinary Institute – Central Oregon Community College
Certificate in Culinary Arts
Focus: Farm-to-table cuisine, sustainable cooking practices, and seasonal recipe creation.
Nate studied under experienced chefs who emphasized local sourcing, minimal waste, and building recipes from fresh, simple ingredients.
Nate Harper is the founder and creative force behind Make, Take, Bake. Raised in the wild beauty of Oregon’s high desert, Nate grew up surrounded by family gardens, farmers’ markets, and home kitchens that celebrated the seasons.
His early love for simple, honest food evolved into a professional passion when he attended Cascade Culinary Institute, where he sharpened his skills in creating recipes that are sustainable, satisfying, and made for everyday life.
Nate’s goal is to make cooking feel accessible, free of fuss, and full of flavor. He believes a single, thoughtfully built dish can stand alone, and sometimes even steal the show.