
Heavenly Easter Egg Sugar Cookies Recipe: Sweet Spring Treats
Sweet memories often spark from simple easter egg sugar cookies that capture childhood wonder in every delicate bite.
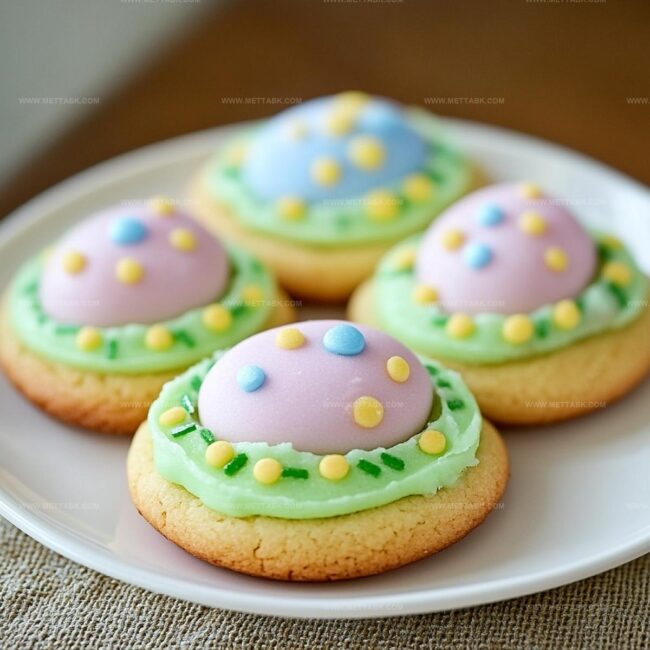
Colorful decorations transform ordinary cookies into miniature art pieces bursting with festive charm.
Childhood nostalgia mingles with sugary delight, creating moments of pure happiness.
Delicate designs and pastel hues invite playful creativity in the kitchen.
Baking becomes a joyful experience when you connect with traditional treats that spark imagination.
Soft, buttery textures and intricate decorations promise a delightful adventure for anyone who loves celebrating spring’s magic.
Whip up these charming cookies and watch smiles bloom like springtime blossoms.
Easter Egg Sugar Cookies as a Classic Treat
Ingredients for Sweet and Chewy Easter Egg Sugar Cookies
Base Ingredients:Dry Ingredients:Decorative Ingredients:How to Bake Easter Egg Sugar Cookies Perfectly

Step 1: Warm Up the Oven
Fire up your oven to 350°F, creating the perfect toasty environment for your sweet treats.
Step 2: Create a Creamy Base
Grab a large mixing bowl and blend softened butter with granulated sugar.
Whip these ingredients together until they become light and fluffy, which should take about 3-4 minutes of passionate mixing.
Step 3: Introduce Liquid Ingredients
Gently add eggs one by one, incorporating vanilla extract to bring depth and richness to your cookie dough.
Mix until the texture becomes silky smooth.
Step 4: Combine Dry Ingredients
In a separate bowl, sift together flour and baking powder.
Slowly fold these dry ingredients into your wet mixture, stirring carefully until everything just comes together.
Step 5: Add Vibrant Colors
Separate your dough into different portions and unleash your creativity by adding food coloring.
Mix each portion to achieve your desired rainbow-like shades.
Step 6: Shape Your Cookies
Dust your work surface with flour and roll out the colored dough to about ¼ inch thickness.
Use egg-shaped cookie cutters to transform the dough into adorable Easter-themed shapes.
Step 7: Bake to Perfection
Arrange your cookie shapes on parchment-lined baking sheets.
Slide them into the preheated oven and bake for 8-10 minutes, watching for golden brown edges that signal they’re ready.
Step 8: Cool and Decorate
Remove cookies from the oven and let them cool completely.
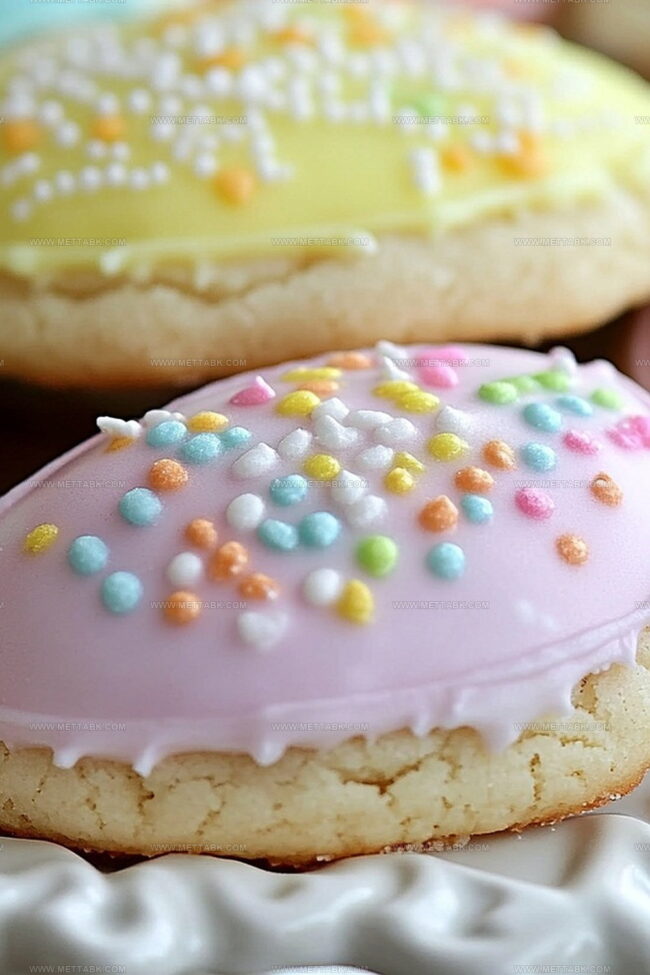
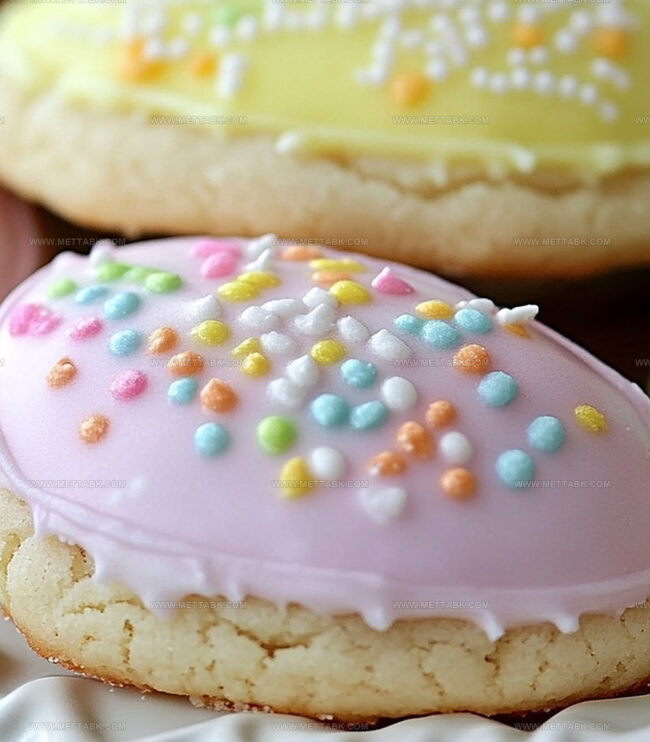
Once cooled, unleash your decorating skills with icing, sprinkles, or any festive embellishments you desire.
Tips to Make Flavorful and Soft Easter Egg Sugar Cookies
Creative Variations on Easter Egg Sugar Cookies
Pairings That Complement Easter Egg Sugar Cookies
Storage Tips for Easter Egg Sugar Cookies
FAQs
Yes, you can skip food coloring and keep the cookies classic white or use natural food dyes like beet or spinach powder for color.
Always dust your work surface and rolling pin with flour, and chill the dough for 30 minutes before rolling to reduce stickiness.
All-purpose flour is perfect for these sugar cookies, providing the right texture and structure for crisp, delicate Easter egg shapes.
Absolutely! Children can help roll dough, cut egg shapes, and decorate cookies, making it a fun family Easter activity.
Print
Easter Egg Sugar Cookies
- Total Time: 35 minutes
- Yield: 24 1x
Description
Delightful Easter Egg Sugar Cookies showcase festive charm from classic American baking traditions. Colorful decorations and sweet royal icing make these treats perfect for springtime celebrations you’ll love sharing with family and friends.
Ingredients
- 1 cup unsalted butter, softened
- 2 large eggs
- 2 3/4 cups all-purpose flour
- 1 cup granulated sugar
- 2 tsp vanilla extract
- 1 tsp baking powder
- 2 cups icing sugar (powdered sugar)
- Food coloring (various colors)
- Milk or water (as needed for icing consistency)
Instructions
- Heat oven to 350°F, preparing parchment-lined baking sheets for crisp, delicate Easter egg cookies.
- Whip softened butter and granulated sugar until light and airy, creating a smooth, creamy base for approximately 3-4 minutes.
- Incorporate eggs individually, blending with vanilla extract until the mixture achieves a silky, uniform consistency.
- Sift flour and baking powder together, then gently fold into wet ingredients, mixing until just combined to maintain tender cookie texture.
- Separate dough into distinct portions, introducing vibrant food coloring to create a festive palette of pastel or bright Easter-inspired hues.
- Dust work surface with flour, then carefully roll colored dough to ¼ inch thickness, using egg-shaped cookie cutters to craft delicate designs.
- Arrange cookie shapes onto prepared baking sheets, ensuring slight separation between each piece.
- Bake for 8-10 minutes, watching for golden-brown edges that signal perfect doneness.
- Remove from oven and transfer to cooling rack, allowing cookies to set completely before decorative embellishment.
Notes
- Chill dough for at least 30 minutes before rolling to prevent spreading and maintain crisp egg shapes during baking.
- Use gel food coloring for vibrant, even colors without altering cookie dough consistency.
- For gluten-free options, substitute all-purpose flour with a 1:1 gluten-free baking blend to maintain texture.
- Royal icing or buttercream works perfectly for decorating, allowing creativity with pastel spring-themed designs.
- Prep Time: 25 minutes
- Cook Time: 10 minutes
- Category: Desserts, Snacks
- Method: Baking
- Cuisine: American
Nutrition
- Serving Size: 24
- Calories: 174
- Sugar: 14 g
- Sodium: 48 mg
- Fat: 9 g
- Saturated Fat: 5 g
- Unsaturated Fat: 4 g
- Trans Fat: 0.2 g
- Carbohydrates: 22 g
- Fiber: 0.4 g
- Protein: 2 g
- Cholesterol: 31 mg
Clara Bennett
Contributing Recipe Developer & Food Writer
Expertise
Baking and Pastry Development, Gluten-Free and Allergy-Friendly Recipe Creation, Culinary Storytelling and Food Journalism, Recipe Testing and Standardization, Southern Comfort Foods and Modern Twists
Education
Sullivan University – National Center for Hospitality Studies
Associate Degree in Culinary Arts
Focus: Baking and Pastry Arts, Recipe Testing, and Culinary Journalism.
Clara specialized in crafting desserts that blend classic Southern comfort with modern techniques, while developing strong writing skills to tell the story behind every dish.
Lane Community College (Certificate Program)
Certificate in Food Writing and Photography
Focus: Culinary storytelling, recipe formatting, food styling, and visual presentation.
Clara’s love of baking started young, powered by homemade pies, biscuits, and stories passed around the family table.
After earning her degree at Sullivan University and a food writing certificate at Lane Community College, she turned her passion into a craft: sharing recipes that are simple, soulful, and always full of heart.
She’s big on bold flavors, flexible ideas, and creating sweets that fit any table (yes, even if you’re gluten-free). When she’s not baking, you’ll find her wandering farmers’ markets, styling food for the next photo shoot, or working on her ever-growing recipe journal.