
The Festive Easter Swirl Pie Recipe: A Whimsical Spring Delight
Sweet memories flood back whenever I whip up this delightful easter swirl pie that dances between classic comfort and modern creativity.
Layers of creamy filling promise a delectable journey through texture and taste.
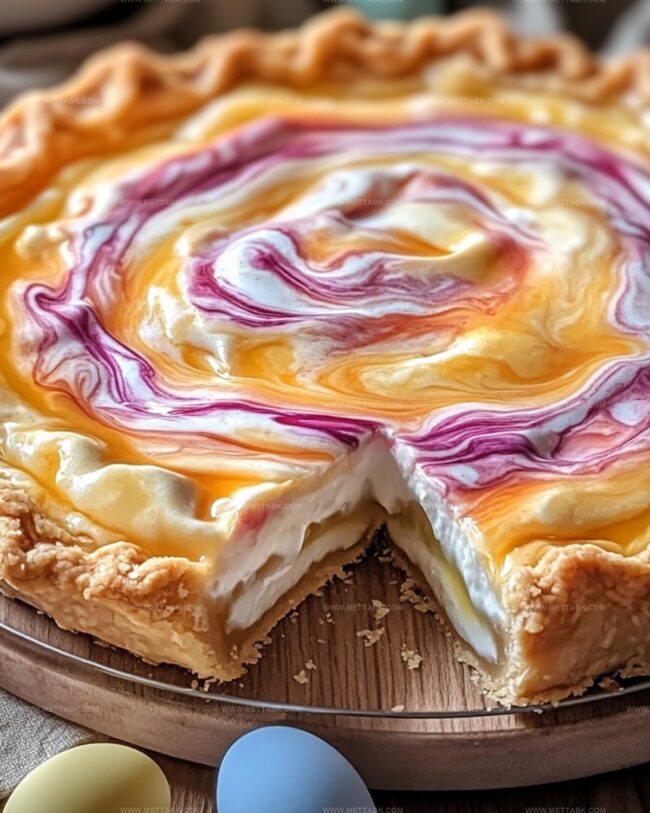
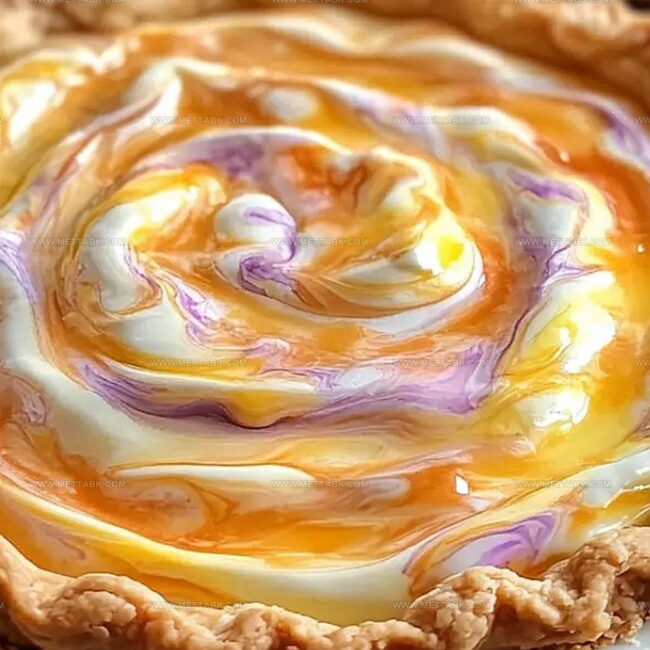
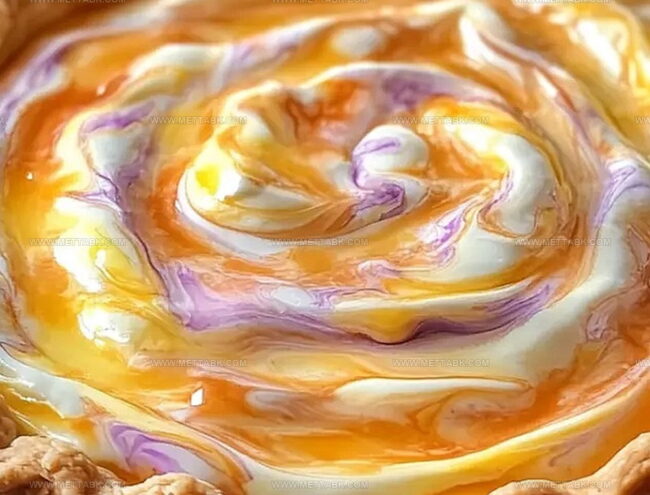
Delicate swirls create a mesmerizing visual feast that beckons you to slice into its dreamy surface.
Pastel colors weave through each bite, telling a story of spring celebrations.
Crafted with simple ingredients, this dessert feels like a warm hug from grandma’s kitchen.
Soft meringue and silky custard intertwine in a ballet of flavors that will make your gathering unforgettable.
Come savor a slice of pure happiness.
Easter Swirl Pie: A Festive Treat
Ingredients for Baking Easter Swirl Pie
For the Base:For the Creamy Filling:For the Decoration and Color:Baking Instructions for Easter Swirl Pie
Step 1: Whip Creamy Base
Beat softened cream cheese with powdered sugar until the mixture becomes silky smooth and free of lumps. The cream cheese should transform into a light, fluffy texture that sets the foundation for your delightful dessert.
Step 2: Enhance Flavor
Stir in vanilla extract and gently fold whipped topping into the cream cheese mixture. The goal is to create a delicate, airy consistency that blends seamlessly without deflating the whipped cream.
Step 3: Create Colorful Palette
Divide the creamy mixture into separate bowls. Add pastel food coloring to each bowl, selecting soft spring-inspired shades like pale pink, lavender, mint green, and baby blue.
Stir each bowl carefully to distribute color evenly.
Step 4: Build Swirled Layers
Spoon different colored mixtures into graham cracker crust, alternating colors to create a playful pattern.
Drop dollops strategically to ensure visual interest and color distribution.
Step 5: Design Marbled Pattern
Take a toothpick or butter knife and gently drag it through the colored layers.
Create soft, sweeping motions to blend colors without completely mixing them, producing a beautiful marble-like effect.
Step 6: Chill and Set
Place pie in refrigerator for minimum 4 hours.
The cooling process will help the pie firm up and allow flavors to meld together perfectly.
Step 7: Decorate and Serve
Garnish pie with festive Easter sprinkles, chocolate candy eggs, or cute marshmallow bunnies.
Slice and serve chilled, revealing the stunning swirled interior.
Tips to Perfect Easter Swirl Pie Texture
Creative Takes on Easter Swirl Pie
Ideal Pairings to Serve with Easter Swirl Pie
How to Store Easter Swirl Pie Correctly
Store the Easter Swirl Pie in an airtight container in the refrigerator for up to 3-4 days. Cover with plastic wrap or aluminum foil to prevent drying out and absorbing other food odors.
Wrap the pie tightly in plastic wrap, then in aluminum foil. Freeze for up to 2 months. Thaw overnight in the refrigerator before serving.
Cut remaining pie into slices, wrap each separately in plastic wrap, and store in an airtight container in the refrigerator for quick grab-and-go treats.
Best enjoyed cold. If desired, let the slice sit at room temperature for 10-15 minutes before serving to soften slightly and enhance flavors.
FAQs
Yes, you can prepare the Easter Swirl Pie up to 2 days in advance and keep it refrigerated until ready to serve.
No, you only need a simple toothpick or butter knife to create the beautiful marbled swirl pattern in the pie.
Absolutely! Homemade whipped cream works perfectly and can give the pie an even richer flavor.
Gel food coloring is recommended as it provides vibrant pastel shades without adding extra liquid to the mixture.
Print
Easter Swirl Pie Recipe
- Total Time: 4 hours 15 minutes
- Yield: 8 1x
Description
Springtime whispers delightfully through this Easter Swirl Pie, blending creamy cheesecake layers with pastel-hued swirls of pure joy. Delicate flavors and playful colors make this dessert a festive centerpiece you’ll want to share with loved ones.
Ingredients
Main Ingredients:
- 1 (9-inch) graham cracker crust
- 8 ounces (226 grams) cream cheese, softened
- 1 cup powdered sugar
- 1 tub (8 ounces / 226 grams) whipped topping, thawed
Flavoring and Coloring:
- 1 teaspoon vanilla extract
- 3–4 food coloring colors (pastel shades)
Garnish (Optional):
- Easter sprinkles
- Candy eggs
- Marshmallow bunnies
Instructions
- Whip cream cheese and powdered sugar in a mixing bowl until silky and uniform in texture.
- Incorporate vanilla extract and tenderly blend whipped topping throughout the mixture.
- Partition the cream mixture into separate containers, infusing each section with delicate pastel food colorings.
- Artfully deposit colorful dollops across the graham cracker crust, creating a playful color pattern.
- Delicately maneuver a toothpick or slender knife through the colored layers, generating an elegant marbled design.
- Chill the pie in the refrigerator for a minimum of 4 hours, allowing the filling to completely solidify and set.
- Prior to serving, embellish the surface with festive Easter-themed sprinkles, decorative candy eggs, or whimsical marshmallow bunnies for a celebratory presentation.
Notes
- Adjust the food coloring gradually to achieve delicate pastel shades without overwhelming the creamy texture.
- Soften cream cheese at room temperature for at least 30 minutes to ensure a silky smooth consistency without lumps.
- Experiment with natural food colorings like beetroot powder or matcha for a healthier alternative to artificial colors.
- Opt for gluten-free graham cracker crust to make the dessert suitable for those with dietary restrictions, maintaining the same delightful swirled effect.
- Prep Time: 15 minutes
- Cook Time: 4 hours
- Category: Desserts
- Method: Refrigerating
- Cuisine: American
Nutrition
- Serving Size: 8
- Calories: 260
- Sugar: 20 g
- Sodium: 150 mg
- Fat: 18 g
- Saturated Fat: 10 g
- Unsaturated Fat: 7 g
- Trans Fat: 0.5 g
- Carbohydrates: 22 g
- Fiber: 0.5 g
- Protein: 3 g
- Cholesterol: 45 mg
Nate Harper
Founder & Recipe Curator
Expertise
Single-Recipe Development, Farm-to-Table Cooking, Seasonal Menu Planning, Culinary Storytelling, Home Kitchen Innovation
Education
Cascade Culinary Institute – Central Oregon Community College
Certificate in Culinary Arts
Focus: Farm-to-table cuisine, sustainable cooking practices, and seasonal recipe creation.
Nate studied under experienced chefs who emphasized local sourcing, minimal waste, and building recipes from fresh, simple ingredients.
Nate Harper is the founder and creative force behind Make, Take, Bake. Raised in the wild beauty of Oregon’s high desert, Nate grew up surrounded by family gardens, farmers’ markets, and home kitchens that celebrated the seasons.
His early love for simple, honest food evolved into a professional passion when he attended Cascade Culinary Institute, where he sharpened his skills in creating recipes that are sustainable, satisfying, and made for everyday life.
Nate’s goal is to make cooking feel accessible, free of fuss, and full of flavor. He believes a single, thoughtfully built dish can stand alone, and sometimes even steal the show.