Zesty Garlic Chicken with Asiago Gravy Recipe: Dinner Delight
Aromatic garlic chicken with asiago gravy promises a culinary adventure that’ll make taste buds dance.
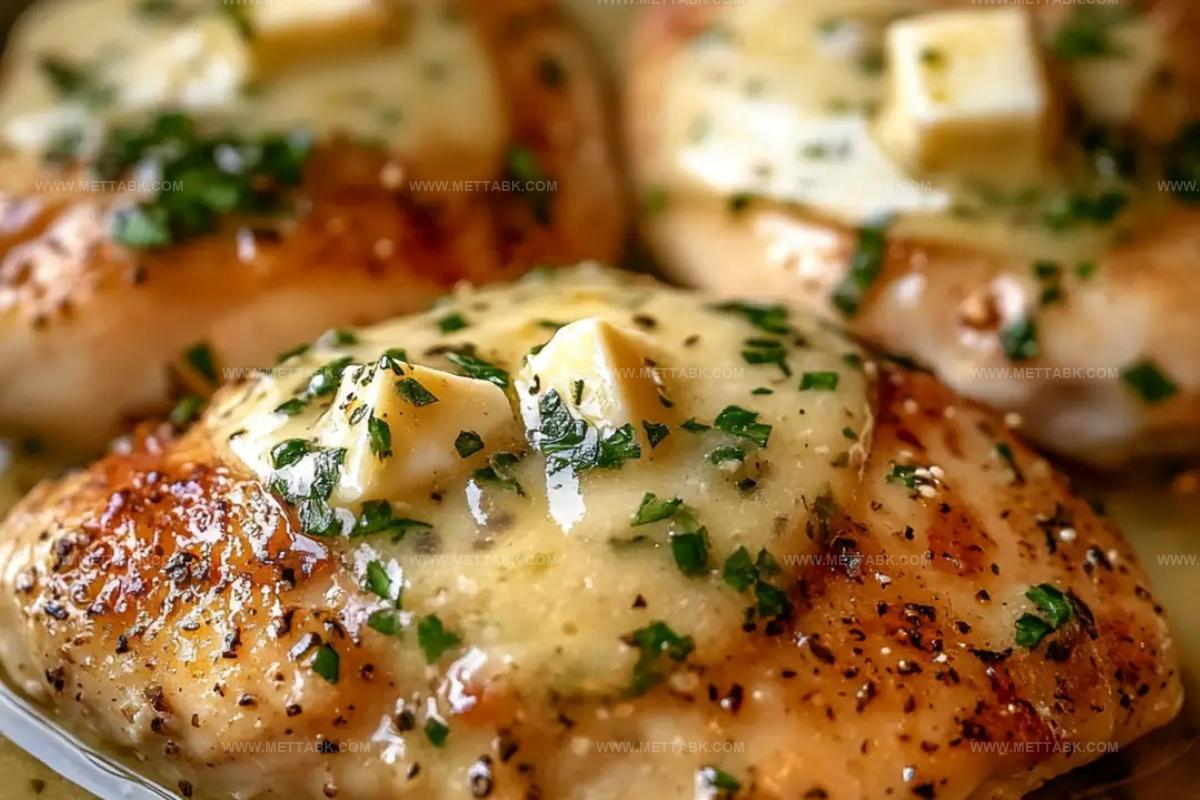
Creamy cheese and tender meat create an irresistible combination.
My kitchen always fills with excitement when this dish starts simmering.
Subtle herb notes complement the rich, velvety sauce perfectly.
Bold flavors meld together in a symphony of deliciousness.
Weeknight dinners just got a serious upgrade with this elegant yet approachable recipe.
Reasons to Love Garlic Chicken with Asiago Gravy
Ingredients for Garlic Chicken with Asiago Gravy
For the Protein:For the Aromatics:For the Seasonings and Thickeners:For the Liquid and Flavor Enhancers:For the Cooking Medium:How to Make Garlic Chicken with Asiago Gravy
Step 1: Prepare Chicken
Select chicken pieces and season generously with salt and pepper. Heat oil in a large skillet over medium-high heat until shimmering.
Step 2: Sear Chicken
Place seasoned chicken in hot skillet. Cook for 3-5 minutes on each side until golden brown and crispy.
Transfer chicken to a clean plate and set aside.
Step 3: Create Flavor Base
Add to the same skillet:Sauté until onions become translucent and slightly caramelized, about 3-4 minutes.
Step 4: Build Sauce Foundation
Sprinkle fresh thyme and flour into the skillet. Stir continuously for one minute to cook out raw flour taste and create a roux.
Step 5: Develop Liquid Component
Pour chicken broth into skillet. Use a wooden spoon to scrape up delicious browned bits from pan bottom, incorporating deep flavor into sauce.
Step 6: Incorporate Cheese
Gradually add asiago cheese, stirring until completely melted and sauce becomes smooth and creamy. Taste and adjust seasoning with salt and pepper.
Step 7: Final Cooking Method
Return seared chicken to skillet. Choose one cooking method:
Option A: Cover and bake in preheated oven at 400F for 15 minutes
Option B: Cover and simmer on stovetop over medium-low heat for 15 minutes
Step 8: Plate and Enjoy
Serve hot alongside mashed potatoes, fluffy rice, or crusty bread.
Drizzle extra sauce over chicken for maximum flavor.
Tips for Garlic Chicken with Asiago Gravy
Variations of Garlic Chicken with Asiago Gravy
Pairings for Garlic Chicken with Asiago Gravy
Storing Garlic Chicken with Asiago Gravy
FAQs
Asiago is ideal, but you can substitute with parmesan or romano for similar sharp, nutty flavors that complement the chicken perfectly.
Yes, chicken breasts work great. Just ensure they’re similar in thickness for even cooking and adjust cooking time slightly to prevent drying out.
To make it gluten-free, replace regular flour with cornstarch or gluten-free flour blend when thickening the sauce. Always check your broth for gluten content.
Fresh thyme is excellent, but you can also use rosemary or oregano to add depth and complexity to the dish’s overall taste profile.
Print
Garlic Chicken With Asiago Gravy Recipe
- Total Time: 38 minutes
- Yield: 4 1x
Description
Succulent garlic chicken with asiago gravy delivers a luxurious Italian-inspired comfort meal that elevates weeknight dinners. Rich, creamy asiago sauce and perfectly seasoned chicken create a memorable dining experience you’ll savor with pure culinary delight.
Ingredients
Protein:
- 1.5 pounds (680 grams) bone-in, skin-on chicken thighs
Aromatics and Herbs:
- 1 onion, diced
- 20 cloves garlic, peeled
- 2 teaspoons fresh thyme (or 1 teaspoon dry thyme), chopped
Liquids, Seasonings, and Cheese:
- 1 tablespoon oil
- 2 tablespoons flour
- 1 cup chicken broth
- 1/2 cup asiago cheese (or parmesan), grated
- Salt to taste
- Pepper to taste
Instructions
- Prepare the chicken by patting it dry with paper towels, then generously season with salt and freshly ground black pepper.
- Heat olive oil in a large skillet over medium-high heat until shimmering and nearly smoking.
- Carefully place seasoned chicken into the hot skillet, allowing each side to develop a golden-brown crust, approximately 4 minutes per side.
- Transfer the seared chicken to a clean plate, keeping it warm and preserving its crispy exterior.
- Reduce heat to medium and add finely chopped onions to the same skillet, allowing them to become translucent and lightly caramelized.
- Mince fresh garlic and introduce it to the onions, stirring continuously to prevent burning and release its aromatic essence.
- Sprinkle dried thyme and flour over the onion-garlic mixture, creating a light roux and cooking for 60 seconds to eliminate raw flour taste.
- Slowly pour chicken broth into the skillet, using a wooden spoon to scrape up the flavorful browned bits from the pan’s bottom.
- Gradually whisk in asiago cheese until the sauce becomes smooth and creamy, adjusting seasoning with salt and pepper.
- Gently nestle the seared chicken back into the sauce, covering the skillet.
- Choose cooking method: either bake in a preheated 400°F oven for 15 minutes or simmer on stovetop over medium-low heat for 15 minutes.
- Verify chicken’s internal temperature reaches 165°F using a meat thermometer.
- Serve immediately alongside creamy mashed potatoes, fluffy rice, or crusty artisan bread to soak up the luxurious asiago gravy.
Notes
- Ensure chicken is at room temperature before cooking to promote even searing and prevent tough meat.
- Use a cast-iron skillet for superior heat distribution and deeper flavor development during browning.
- Pat chicken dry with paper towels before seasoning to achieve a crispy, golden-brown exterior that seals in moisture.
- Select freshly grated asiago cheese for more robust flavor and smoother sauce consistency compared to pre-packaged options.
- Reduce heat when adding cheese to prevent separation and maintain a silky, creamy gravy texture.
- Consider substituting gluten-free flour for a celiac-friendly version without compromising sauce thickness.
- Low-sodium chicken broth helps control salt levels, allowing you to season gradually and precisely.
- Prep Time: 15 minutes
- Cook Time: 23 minutes
- Category: Lunch, Dinner
- Method: Baking
- Cuisine: American
Nutrition
- Serving Size: 4
- Calories: 462 kcal
- Sugar: 3 g
- Sodium: 720 mg
- Fat: 28 g
- Saturated Fat: 9 g
- Unsaturated Fat: 17 g
- Trans Fat: 0.2 g
- Carbohydrates: 8 g
- Fiber: 1 g
- Protein: 42 g
- Cholesterol: 140 mg
Nate Harper
Founder & Recipe Curator
Expertise
Single-Recipe Development, Farm-to-Table Cooking, Seasonal Menu Planning, Culinary Storytelling, Home Kitchen Innovation
Education
Cascade Culinary Institute – Central Oregon Community College
Certificate in Culinary Arts
Focus: Farm-to-table cuisine, sustainable cooking practices, and seasonal recipe creation.
Nate studied under experienced chefs who emphasized local sourcing, minimal waste, and building recipes from fresh, simple ingredients.
Nate Harper is the founder and creative force behind Make, Take, Bake. Raised in the wild beauty of Oregon’s high desert, Nate grew up surrounded by family gardens, farmers’ markets, and home kitchens that celebrated the seasons.
His early love for simple, honest food evolved into a professional passion when he attended Cascade Culinary Institute, where he sharpened his skills in creating recipes that are sustainable, satisfying, and made for everyday life.
Nate’s goal is to make cooking feel accessible, free of fuss, and full of flavor. He believes a single, thoughtfully built dish can stand alone, and sometimes even steal the show.