Irresistibly Rich Giant Reeses Peanut Butter Cup Pie Recipe
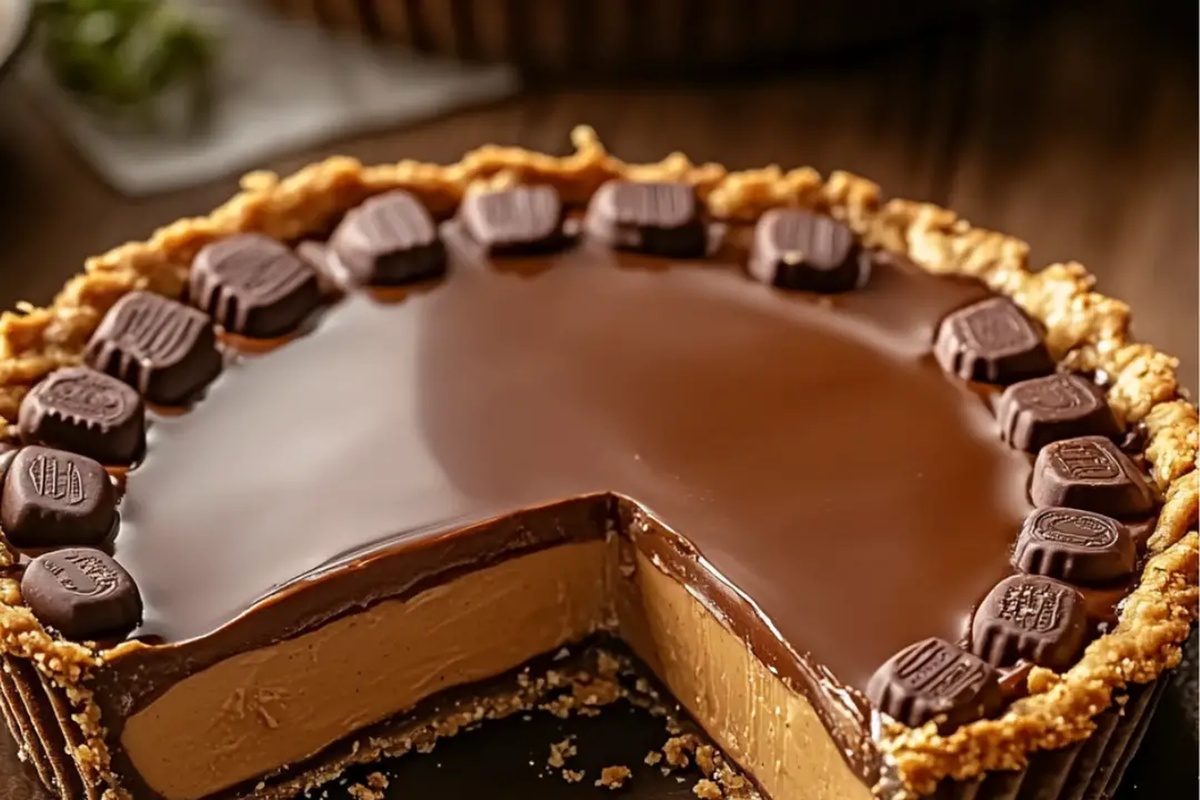
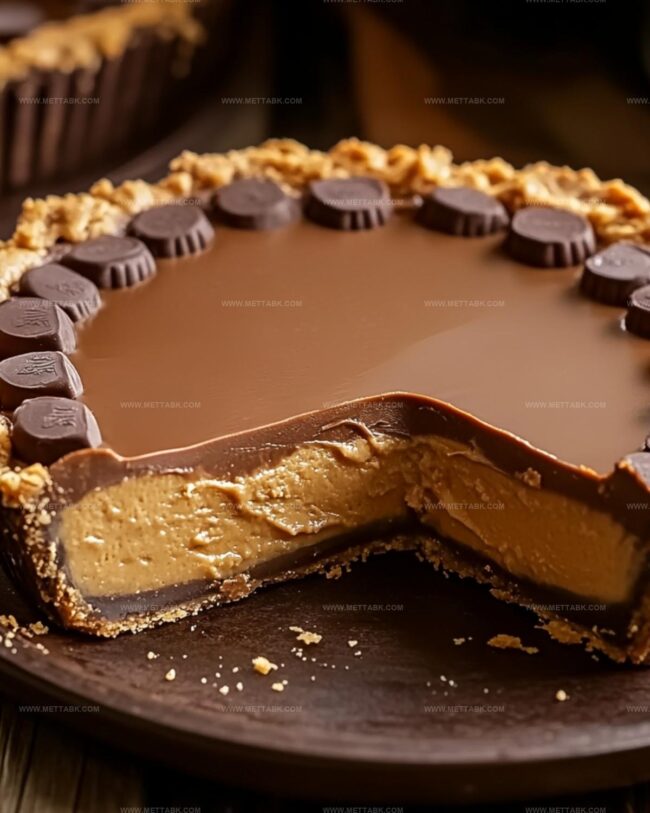
Sweet tooths go crazy for this giant reeses peanut butter cup pie that combines decadent chocolate and creamy peanut butter in one epic dessert.
Chocolate lovers will find themselves obsessed with every single bite.
Layers of smooth peanut butter filling nestled between rich chocolate create an irresistible combination.
Nobody can resist the powerful appeal of classic candy flavors transformed into a show-stopping pie.
Chocolate and peanut butter have never looked more tempting than in this stunning dessert.
Each forkful promises a perfect balance of sweet and salty notes that dance across your palate.
You are going to want to make this pie for every single celebration.
Dive into a slice of pure indulgence that will have everyone asking for seconds.
Giant Reese’s Peanut Butter Cup Pie to Swoon Over
Ingredients for Giant Reese’s Peanut Butter Cup Pie
For the Base Layer:For the Peanut Butter Filling:For the Top Layer:How to Bake Giant Reese’s Peanut Butter Cup Pie
Step 1: Crafting the Chocolate Foundation
Grab a microwave-safe bowl and combine milk chocolate chips with vegetable oil. Melt the mixture in short 30-second bursts, stirring until silky smooth.
Pour the liquid chocolate into a 9-inch pie pan, spreading it into an even layer. Place the pan in the freezer for 15 minutes to create a solid chocolate base.
Step 2: Whipping Up Peanut Butter Magic
In a mixing bowl, combine:Mix these ingredients until they form a creamy, uniform mixture. Gently spread the peanut butter filling over the chilled chocolate layer, ensuring an even distribution.
Step 3: Crowning with Chocolate Glaze
Return to the microwave and melt the remaining chocolate chips with vegetable oil. Stir the mixture until completely smooth and glossy.
Carefully pour the melted chocolate over the peanut butter layer, using a spatula to create an even, luxurious topping.
Step 4: Chilling to Perfection
Transfer the pie to the refrigerator and let it rest for a minimum of 1 hour.
This will allow all layers to set completely and develop rich, decadent flavors.
Step 5: Serving the Decadent Delight
Remove the pie from the refrigerator and let it sit at room temperature for 10 minutes.
This brief rest will make slicing easier. Cut into generous wedges and indulge in this incredible chocolate-peanut butter sensation.
Tips for Perfect Giant Reese’s Peanut Butter Cup Pie

Variations on Reese’s Peanut Butter Cup Pie

Pairings to Serve with Reese’s Peanut Butter Cup Pie
Proper Storage for Reese’s Peanut Butter Cup Pie
Store the pie in an airtight container or cover tightly with plastic wrap. Keep refrigerated for up to 5 days to maintain freshness and prevent spoilage.
Wrap the pie securely in plastic wrap and aluminum foil. Freeze for up to 2 months. Place in the refrigerator overnight to thaw before serving.
Cut remaining pie into slices, wrap each separately in plastic wrap, and store in an airtight container in the refrigerator for convenient grab-and-go treats.
Let the pie sit at room temperature for 10-15 minutes before serving. For a slightly warm experience, microwave individual slices for 10-15 seconds on low power.
FAQs
Yes, you can substitute milk chocolate with dark or semi-sweet chocolate for a different flavor profile. Just ensure the chocolate melts smoothly.
No, you can use creamy peanut butter if preferred. The recipe works well with either type, so choose what you enjoy most.
Use 30-second microwave intervals and stir between each interval. This helps distribute heat evenly and prevents chocolate from scorching.
You can melt chocolate using a double boiler method. Place chocolate in a heat-safe bowl over simmering water, stirring until smooth and fully melted.
Print
Giant Reeses Peanut Butter Cup Pie Recipe
- Total Time: 1 hour 35 minutes
- Yield: 8 1x
Description
Chocolate lovers rejoice with this Giant Reeses Peanut Butter Cup Pie, a dreamy dessert that combines rich peanut butter and smooth chocolate in one epic treat. Creamy layers meld perfectly, promising pure indulgence that will make you crave another slice.
Ingredients
Chocolate Layer:
- 2 1/2 cups milk chocolate chips
- 1 1/2 tablespoons vegetable oil
Peanut Butter Filling:
- 1 1/4 cups crunchy peanut butter
- 1 1/3 cups powdered sugar
- 1/2 cup salted sweet cream butter, melted
Crust:
- 1 cup graham cracker crumbs
Instructions
- Craft the chocolate foundation by gently melting milk chocolate chips with vegetable oil in 30-second microwave bursts, stirring until glossy and uniform. Distribute the molten chocolate across a 9-inch pie pan, ensuring complete coverage. Freeze for 15 minutes to solidify the base layer.
- Create the peanut butter filling by blending powdered sugar, graham cracker crumbs, crunchy peanut butter, and melted butter into a smooth, cohesive mixture. Carefully spread the filling over the chilled chocolate base, maintaining an even surface.
- Prepare the final chocolate layer by reheating the remaining chocolate chips with vegetable oil using 30-second microwave intervals. Stir until the chocolate transforms into a silky, pourable consistency. Gently cascade the melted chocolate over the peanut butter filling, ensuring complete and uniform coverage.
- Allow the pie to set by placing it in the refrigerator for a minimum of 1 hour, enabling all layers to firm and meld together seamlessly.
- Before serving, let the pie rest at room temperature for 10 minutes to soften slightly. Slice into decadent wedges and indulge in this luxurious chocolate-peanut butter dessert.
Notes
- Enhance chocolate melting by using a double boiler for smoother, more controlled melting and preventing chocolate from burning.
- Customize peanut butter filling by using smooth or crunchy peanut butter based on personal texture preference.
- Create gluten-free version by substituting graham cracker crumbs with almond flour or gluten-free cookie crumbs for those with dietary restrictions.
- Prevent cracking when slicing by allowing pie to sit at room temperature for exactly 10 minutes, ensuring clean, beautiful cuts without compromising texture.
- Prep Time: 20 minutes
- Cook Time: 1 hour 15 minutes
- Category: Desserts
- Method: Melting
- Cuisine: American
Nutrition
- Serving Size: 8
- Calories: 507
- Sugar: 39 g
- Sodium: 145 mg
- Fat: 34 g
- Saturated Fat: 11 g
- Unsaturated Fat: 18 g
- Trans Fat: 0.5 g
- Carbohydrates: 44 g
- Fiber: 2 g
- Protein: 8 g
- Cholesterol: 20 mg
Nate Harper
Founder & Recipe Curator
Expertise
Single-Recipe Development, Farm-to-Table Cooking, Seasonal Menu Planning, Culinary Storytelling, Home Kitchen Innovation
Education
Cascade Culinary Institute – Central Oregon Community College
Certificate in Culinary Arts
Focus: Farm-to-table cuisine, sustainable cooking practices, and seasonal recipe creation.
Nate studied under experienced chefs who emphasized local sourcing, minimal waste, and building recipes from fresh, simple ingredients.
Nate Harper is the founder and creative force behind Make, Take, Bake. Raised in the wild beauty of Oregon’s high desert, Nate grew up surrounded by family gardens, farmers’ markets, and home kitchens that celebrated the seasons.
His early love for simple, honest food evolved into a professional passion when he attended Cascade Culinary Institute, where he sharpened his skills in creating recipes that are sustainable, satisfying, and made for everyday life.
Nate’s goal is to make cooking feel accessible, free of fuss, and full of flavor. He believes a single, thoughtfully built dish can stand alone, and sometimes even steal the show.