
Heavenly Chocolate Cheesecake Trifle Recipe: Dreamy Layers of Joy
Layering delectable chocolate cheesecake trifle creates a dessert symphony that promises pure indulgence.
Rich chocolate whispers seductive tales of creamy decadence.
Silky textures intertwine with velvety cream cheese, forming delightful clouds of sweetness.
Soft graham cracker crumbles provide delicate crunch between luscious layers.
Chocolate ganache drizzles add luxurious depth to each spoonful.
Unexpected chocolate chips peek through like delightful surprises waiting to dance on your palate.
You’ll find this dessert impossible to resist – one bite promises to transport you to pure bliss.
Reasons to Try Chocolate Cheesecake Trifle Now
What You’ll Need for Cheesecake Trifle Dessert
For the Base:For the Creamy Layers:For the Chocolate Components:How to Make Chocolate Cheesecake Trifle Dessert
Step 1: Whip Up the Dreamy Cheesecake Base
In a spacious mixing bowl, grab your electric mixer and blend cream cheese until silky smooth. Add powdered sugar and vanilla extract, continuing to mix until the mixture becomes light and cloud-like.
Gently fold in whipped topping, creating a heavenly cream cheese foundation that’s both airy and rich.
Step 2: Build Your Chocolate Paradise
Grab your favorite glass serving dish and start constructing your masterpiece.
Begin by crumbling chocolate cake into the bottom, creating a decadent first layer. Spread the luscious cream cheese mixture generously over the cake crumbs, ensuring every bite will be creamy and delightful.
Step 3: Create Chocolate Layer Magic
Pour chocolate pudding over the cream cheese layer, spreading it evenly to cover the entire surface. Drizzle chocolate sauce or ganache in elegant swirls, adding an extra punch of chocolate intensity that will make taste buds dance.
Step 4: Continue the Delicious Layering
Repeat the delectable sequence of ingredients:Continue building these layers until your dish is brimming with chocolatey goodness. Finish with a final crown of whipped topping that cascades beautifully across the top.
Step 5: Add Elegant Chocolate Finishing Touches
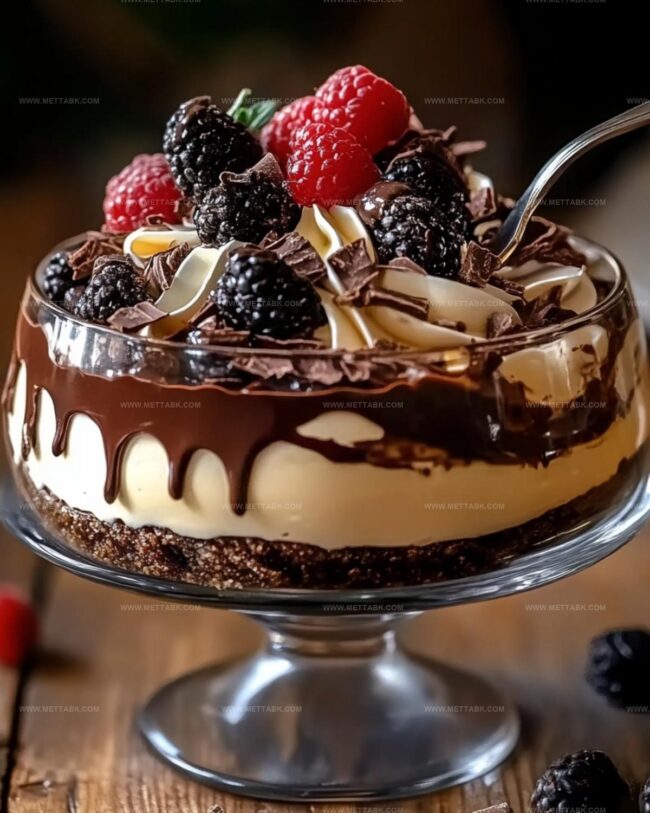
Sprinkle chocolate shavings across the surface for a professional look. Strategically place chocolate truffles or chocolate balls on top to create a stunning visual presentation that screams indulgence.
Step 6: Chill and Anticipate
Cover your creation and slide it into the refrigerator. Let it rest for at least one hour, allowing the flavors to mingle and intensify.
When ready, serve chilled and watch everyone’s eyes light up with pure dessert excitement!
Great Tips for Chocolate Cheesecake Trifle Success

Fun Styles for Cheesecake Trifle Layering

Perfect Pairings for Cheesecake Trifle Cups
How to Store Cheesecake Trifle After Serving
Store trifle in an airtight container for up to 3 days. Seal tightly to prevent absorbing other food odors and maintain its creamy texture.
Wrap individual portions in plastic wrap, then place in freezer-safe containers. Freeze for maximum 2 weeks. Thaw overnight in refrigerator before serving.
Avoid microwaving as it will destroy the delicate layers. Let trifle sit at room temperature for 15-20 minutes to soften and restore its creamy consistency.
For optimal taste and texture, consume within 2 days of preparation. Always keep refrigerated and serve chilled to preserve the dessert’s rich, decadent layers.
FAQs
Yes, this Heavenly Chocolate Cheesecake Trifle is perfect for birthdays, holidays, dinner parties, or any celebration that calls for a stunning dessert that looks impressive and tastes amazing.
Absolutely! You can prepare this trifle up to 24 hours in advance. Just keep it covered in the refrigerator, and the flavors will continue to develop, making it even more delicious.
Any rich chocolate cake works well – you can use store-bought, homemade, or even leftover cake. Chocolate sponge or devil’s food cake are excellent choices that complement the other layers perfectly.
Print
Heavenly Chocolate Cheesecake Trifle Recipe
- Total Time: 1 hour 30 minutes
- Yield: 8 1x
Description
Chocolate lovers rejoice with this indulgent Heavenly Chocolate Cheesecake Trifle that promises pure dessert bliss. Layers of rich chocolate, creamy cheesecake, and delicate crumbs create a dessert masterpiece that will sweep you into sweet paradise.
Ingredients
Main Ingredients:
- 1 package chocolate cake, baked and crumbled
- 2 cups chocolate pudding
- 1 container whipped topping (16 ounces / 453 grams), thawed
Cream Cheese Mixture:
- 1 package cream cheese (8 ounces / 226 grams), softened
- 1 cup powdered sugar
- 1 teaspoon vanilla extract
Garnish and Topping:
- 1 cup chocolate sauce or ganache
- Chocolate truffles or chocolate balls
- Chocolate shavings
Instructions
- Craft the velvety cheesecake foundation by whipping cream cheese with powdered sugar and vanilla until silky smooth, then delicately incorporate half the whipped topping to create an airy, luxurious mixture.
- Create the first architectural layer in a transparent serving vessel by crumbling chocolate cake as the foundational base, ensuring even distribution across the bottom.
- Meticulously spread the prepared cheesecake mixture over the cake crumbles, creating a uniform and creamy stratum that completely covers the chocolate base.
- Pour a rich chocolate pudding layer atop the cheesecake mixture, carefully smoothing the surface to eliminate any potential air pockets or uneven regions.
- Enhance the dessert’s decadence by drizzling chocolate sauce or ganache across the pudding layer, allowing it to create intricate patterns and add depth of flavor.
- Repeat the layering sequence of cake crumbles, cheesecake mixture, pudding, and chocolate sauce, building height and complexity with each successive stratum.
- Culminate the trifle with a crowning layer of whipped topping, ensuring complete coverage and a pristine, cloud-like appearance.
- Adorn the dessert with chocolate truffles and delicate chocolate shavings, transforming the trifle into a visually stunning culinary masterpiece.
- Refrigerate for a minimum of 1 hour at 40°F, allowing the flavors to harmonize and the textures to meld into a sublime dessert experience.
- Serve thoroughly chilled, presenting a multi-layered symphony of chocolate and cream that promises to captivate every palate.
Notes
- Use room temperature cream cheese to ensure a smooth, lump-free mixture that blends easily and creates a silky texture.
- Fold whipped topping gently to maintain the light, airy consistency of the cheesecake layer without deflating the mixture.
- Crumble the chocolate cake into small, uniform pieces for a consistent texture and better layering in the trifle.
- Refrigerate for at least 2-3 hours for optimal flavor melding and a firmer, more cohesive dessert that’s easier to serve.
- For a gluten-free version, substitute chocolate cake with gluten-free brownies or chocolate cookie crumbs.
- Lighten up the dessert by using low-fat cream cheese and sugar-free pudding mix for a slightly healthier option.
- Prep Time: 30 minutes
- Cook Time: 1 hour
- Category: Desserts
- Method: Blending
- Cuisine: American
Nutrition
- Serving Size: 8
- Calories: 430 kcal
- Sugar: 40 g
- Sodium: 210 mg
- Fat: 28 g
- Saturated Fat: 17 g
- Unsaturated Fat: 9 g
- Trans Fat: 0.5 g
- Carbohydrates: 45 g
- Fiber: 2 g
- Protein: 6 g
- Cholesterol: 65 mg
Nate Harper
Founder & Recipe Curator
Expertise
Single-Recipe Development, Farm-to-Table Cooking, Seasonal Menu Planning, Culinary Storytelling, Home Kitchen Innovation
Education
Cascade Culinary Institute – Central Oregon Community College
Certificate in Culinary Arts
Focus: Farm-to-table cuisine, sustainable cooking practices, and seasonal recipe creation.
Nate studied under experienced chefs who emphasized local sourcing, minimal waste, and building recipes from fresh, simple ingredients.
Nate Harper is the founder and creative force behind Make, Take, Bake. Raised in the wild beauty of Oregon’s high desert, Nate grew up surrounded by family gardens, farmers’ markets, and home kitchens that celebrated the seasons.
His early love for simple, honest food evolved into a professional passion when he attended Cascade Culinary Institute, where he sharpened his skills in creating recipes that are sustainable, satisfying, and made for everyday life.
Nate’s goal is to make cooking feel accessible, free of fuss, and full of flavor. He believes a single, thoughtfully built dish can stand alone, and sometimes even steal the show.