
Whip Up Magical Marshmallow Easter Eggs Recipe at Home
Sweet chocolate lovers find marshmallow easter eggs surprisingly simple to create at home.
Homemade treats beat store-bought versions any day.
Crafting these delightful confections requires minimal ingredients and basic kitchen skills.
Kids adore helping with the decorating process, making memories while mixing and shaping.
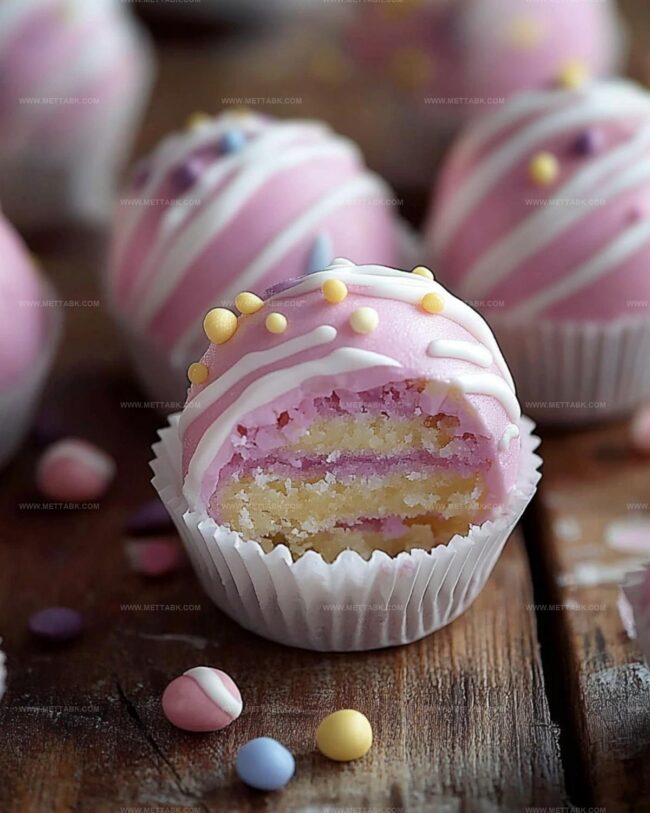
Pastel sprinkles and colorful coatings add whimsical charm to these festive delicacies.
Smooth chocolate and fluffy marshmallow centers guarantee smiles around the table.
Marshmallow Easter Eggs to Delight Kids and Adults

Ingredients for Marshmallow Easter Eggs
For the Base:For the Marshmallow:For the Coating and Decoration:Instructions to Make Marshmallow Easter Eggs
Step 1: Create Sugar Mold Surface
Line a baking sheet with parchment paper. Generously dust the surface with powdered sugar.
Use the back of a spoon to gently press shallow egg-shaped indentations into the sugar, creating perfect molds for your marshmallow treats.
Step 2: Whip Marshmallow Base
Prepare gelatin mixture by sprinkling gelatin over cold water and letting it sit.
In a saucepan, combine:Bring the mixture to a boil over medium heat, stirring occasionally. When the syrup reaches 240°F on a candy thermometer, remove from heat.
Slowly pour the hot syrup into the gelatin while beating with an electric mixer. Start on low speed, then increase to high.
Beat for 8-10 minutes until the mixture becomes thick and fluffy. Fold in vanilla extract for extra flavor.
Step 3: Mold Marshmallow Eggs
Carefully spoon the marshmallow mixture into the prepared sugar molds. Allow the eggs to rest at room temperature for 4-6 hours until they become firm and hold their shape.
Step 4: Chocolate Dipping Delight
Melt chocolate in a microwave-safe bowl, stirring every 30 seconds. If needed, add a touch of coconut oil to create a smoother chocolate coating.
Gently remove marshmallow eggs from the sugar mold, brushing off excess sugar. Use a fork to carefully dip each egg into the melted chocolate, allowing excess to drip off.
Place on a parchment-lined tray and get creative with decorations like:Let the chocolate set at room temperature or pop in the refrigerator for 15-20 minutes until completely hardened.
Tips for Perfect Marshmallow Easter Eggs

Variations to Customize Marshmallow Easter Eggs
Pairing Suggestions for Easter Eggs
Proper Storage for Marshmallow Easter Eggs
Seal marshmallow eggs in an airtight container, separating layers with parchment paper. Keep refrigerated for up to 5 days, maintaining freshness and preventing sticking.
Wrap each chocolate-coated egg individually in plastic wrap, then place in a freezer-safe container. Freeze for 2-3 months without losing texture or flavor.
Store in a cool, dry place inside a sealed container. Consume within 2-3 days to prevent sugar crystallization and maintain optimal taste.
Gently warm chocolate-coated eggs at room temperature for 10-15 minutes before serving. Avoid direct microwave heating to prevent marshmallow melting or chocolate separation.
FAQs
Use a candy thermometer to check that the syrup reaches exactly 240F (soft-ball stage). This precise temperature ensures your marshmallow mixture will set correctly and have the right texture.
While a candy thermometer is recommended for accuracy, you can test the syrup by dropping a small amount into cold water. If it forms a soft, pliable ball, it’s ready. However, this method is less reliable than using a thermometer.
Sprinkling gelatin over cold water helps it “bloom” or hydrate properly. This process prevents lumps and ensures the gelatin dissolves smoothly when mixed with the hot sugar syrup, creating a uniform marshmallow texture.
Print
Marshmallow Easter Eggs Recipe
- Total Time: 4 hours 50 minutes
- Yield: 24 1x
Description
Chocolate-dipped marshmallow Easter eggs blend creamy sweetness with festive charm, creating a delightful homemade treat that delights children and adults alike. Pastel-colored decorations and smooth chocolate coating make these handcrafted confections perfect for spring celebrations.
Ingredients
Main Ingredients:
- 1/2 cup (120 ml) cold water
- 2 1/2 tablespoons (3 packets) unflavored gelatin
- 1 cup (200 g) granulated sugar
- 1/2 cup (120 ml) light corn syrup
- 12 ounces (340 g) milk or dark chocolate
Liquid and Flavor Ingredients:
- 1/4 cup (60 ml) water
- 1/8 teaspoon salt
- 1 teaspoon vanilla extract
- 1 tablespoon coconut oil
Decoration and Coating Ingredients:
- Powdered sugar
- Sprinkles
- Crushed nuts
- Colored sugar
Instructions
- Meticulously dust a parchment-lined baking sheet with powdered sugar, creating delicate egg-shaped indentations using the back of a spoon to guide future marshmallow formations.
- Sprinkle gelatin over cold water and allow to bloom for 5 minutes. Meanwhile, combine sugar, corn syrup, water, and salt in a saucepan, heating to 240°F while stirring periodically.
- Remove syrup from heat and gradually incorporate into gelatin mixture using an electric mixer. Begin at low speed, then increase to high, whipping for 8-10 minutes until the mixture transforms into a voluminous, cloud-like texture.
- Fold in vanilla extract, ensuring even distribution throughout the marshmallow mixture.
- Carefully transfer the fluffy marshmallow mixture into the prepared sugar-dusted egg-shaped molds, allowing them to rest and solidify at room temperature for 4-6 hours.
- Melt chocolate in 30-second microwave intervals, stirring between each session. Add coconut oil if necessary to achieve a silky consistency.
- Gently extract marshmallow eggs from the sugar mold, brushing away excess powder.
- Submerge each egg in melted chocolate using a fork, allowing excess to drip back into the bowl.
- Arrange chocolate-coated eggs on a parchment-lined tray, embellishing with sprinkles, crushed nuts, or white chocolate drizzle.
- Allow eggs to set at room temperature or refrigerate for 15-20 minutes until chocolate achieves a firm, glossy finish.
Notes
- Create molds precisely by ensuring powdered sugar is evenly distributed and egg shapes are well-defined for consistent marshmallow egg formation.
- Work quickly when pouring hot syrup into gelatin mixture to prevent crystallization and maintain smooth, glossy marshmallow texture.
- Use a candy thermometer for accurate temperature monitoring during syrup preparation to achieve perfect marshmallow consistency.
- Experiment with different chocolate coatings like dark, milk, or white chocolate for varied flavor profiles and visual appeal.
- Prep Time: 20 minutes
- Cook Time: 4 hours 30 minutes
- Category: Desserts, Snacks
- Method: Boiling
- Cuisine: American
Nutrition
- Serving Size: 24
- Calories: 115
- Sugar: 14 g
- Sodium: 20 mg
- Fat: 4 g
- Saturated Fat: 2.5 g
- Unsaturated Fat: 1.3 g
- Trans Fat: 0 g
- Carbohydrates: 17 g
- Fiber: 1 g
- Protein: 1 g
- Cholesterol: 5 mg
Nate Harper
Founder & Recipe Curator
Expertise
Single-Recipe Development, Farm-to-Table Cooking, Seasonal Menu Planning, Culinary Storytelling, Home Kitchen Innovation
Education
Cascade Culinary Institute – Central Oregon Community College
Certificate in Culinary Arts
Focus: Farm-to-table cuisine, sustainable cooking practices, and seasonal recipe creation.
Nate studied under experienced chefs who emphasized local sourcing, minimal waste, and building recipes from fresh, simple ingredients.
Nate Harper is the founder and creative force behind Make, Take, Bake. Raised in the wild beauty of Oregon’s high desert, Nate grew up surrounded by family gardens, farmers’ markets, and home kitchens that celebrated the seasons.
His early love for simple, honest food evolved into a professional passion when he attended Cascade Culinary Institute, where he sharpened his skills in creating recipes that are sustainable, satisfying, and made for everyday life.
Nate’s goal is to make cooking feel accessible, free of fuss, and full of flavor. He believes a single, thoughtfully built dish can stand alone, and sometimes even steal the show.