
The Fluffiest No-Bake Victoria Sponge Mousse Slice Recipe Ever
Sweet layers of creamy victoria sponge mousse slice dance between delicate textures that promise pure indulgence.
Memories of classic british desserts whisper through each silky spoonful.
Soft vanilla cream blends with light sponge crumbles, creating a dreamy no-bake treat.
Delicate and elegant, this dessert breaks traditional baking rules with its effortless charm.
Minimal ingredients and zero oven time make this recipe a game-changer for busy kitchens.
Crumbly yet smooth, each slice brings comfort and celebration to your table.
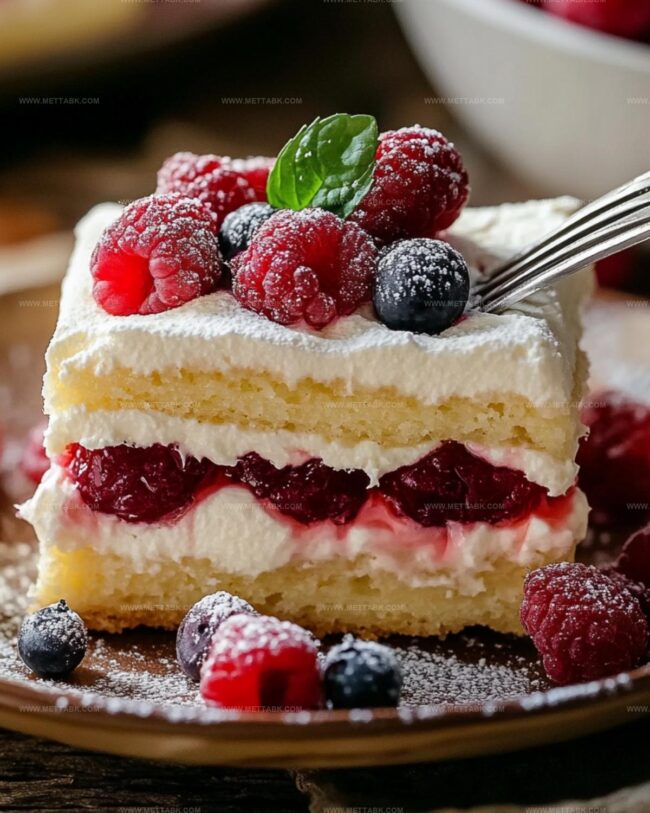
No-Bake Victoria Sponge Mousse Slice Magic

Ingredients for Light Victoria Sponge Mousse
For the Crust:For the Mousse Filling:For the Topping and Garnish:How to Make No-Bake Sponge Mousse Slice
Step 1: Craft The Crispy Base
Grab some digestive biscuits and crush them into fine crumbs. Melt butter and mix thoroughly with the crumbs.
Press this buttery mixture into a lined square dish, creating a solid foundation. Pop the dish into the refrigerator and let it chill for 15 minutes to firm up.
Step 2: Whip Up The Creamy Mousse
Grab your mixing bowls and prepare for magic. In one bowl, whip heavy cream until soft, fluffy peaks emerge.
In another bowl, blend:Whisk these ingredients until they transform into a silky smooth mixture.
Step 3: Create Dreamy Layers
Gently fold the whipped cream into the mascarpone mixture, creating a cloud-like texture.
Spread this heavenly mousse over the chilled biscuit base. Arrange fresh strawberry slices across the mousse, then cover with another layer of mousse.
Step 4: Chill And Set
Place the dish in the refrigerator for at least 4 hours. This allows the dessert to set perfectly and develop rich, creamy flavors.
Step 5: Serve With Flair
Once fully set, slice into elegant portions. Garnish with fresh mint leaves for a pop of color and refreshing touch.
Enjoy your luxurious no-bake dessert!
Tips to Keep Mousse Light and Fluffy

Variations on Victoria Sponge Mousse Slice
Pairings That Complement Mousse Slices
Storing No-Bake Victoria Sponge Mousse
Store the Victoria Sponge Mousse Slice in an airtight container for up to 3-4 days. Cover tightly with plastic wrap or lid to prevent moisture and absorbing other food odors.
Wrap individual slices in plastic wrap, then place in a freezer-safe container. Freeze for maximum 2 months. Slices maintain best texture and flavor when frozen without strawberry topping.
Remove from freezer and let slices defrost slowly in the refrigerator for 4-6 hours. Never thaw at room temperature to prevent bacterial growth and texture breakdown.
Before serving, garnish with fresh mint leaves and additional strawberry slices to restore the original presentation and boost flavor profile.
FAQs
Yes, graham crackers or shortbread cookies work perfectly as alternatives to digestive biscuits. Just ensure they’re finely crushed and mixed with melted butter to create a solid base.
While mascarpone gives a rich, creamy texture, you can substitute it with cream cheese for a similar result. The key is maintaining a smooth, thick consistency in the mousse.
When you lift the whisk or beaters, the cream should form soft peaks that gently fall back. Be careful not to overwhip, which can make the texture grainy and dense.
Print
No-Bake Victoria Sponge Mousse Slice Recipe
- Total Time: 4 hours 20 minutes
- Yield: 8 1x
Description
Delightful no-bake Victoria sponge mousse slice whisks classic British dessert into a dreamy, creamy delight. Layers of light sponge and silky mousse meld together, promising a luxurious escape with each heavenly spoonful you’ll savor.
Ingredients
Main Ingredients:
- 250g mascarpone cheese
- 300 milliliters (10.1 fluid ounces) heavy cream
- 200g digestive biscuits
- 100g unsalted butter, melted
- 100g icing sugar
Flavoring Ingredients:
- 1 teaspoon vanilla extract
Garnish Ingredients:
- Fresh strawberries
- Mint leaves
Instructions
- Create a crumbly foundation by pulverizing digestive biscuits and blending with melted butter. Press the mixture firmly into a lined square dish, ensuring an even base. Chill in the refrigerator for 15 minutes to solidify the crust.
- Whip heavy cream until it develops soft, billowy peaks that hold their shape. In a separate vessel, blend mascarpone cheese with powdered sugar and vanilla extract until achieving a silky, uniform consistency.
- Delicately incorporate the whipped cream into the mascarpone mixture, using a gentle folding technique to maintain the light, airy texture. Ensure thorough but careful integration to preserve the mousse’s delicate structure.
- Spread a luxurious layer of the mousse over the chilled biscuit base. Artfully arrange fresh strawberry slices across the surface, then generously cover with another layer of the creamy mousse.
- Transfer the dessert to the refrigerator and allow it to set completely for a minimum of 4 hours. The extended chilling time will help the mousse firm up and develop a perfect, sliceable consistency.
- Once fully set, carefully slice the dessert into elegant portions. Garnish each serving with a delicate sprig of fresh mint to add a touch of vibrant color and refreshing aroma.
Notes
- Swap biscuits for gluten-free digestive crackers to make this dessert celiac-friendly and accommodate dietary restrictions.
- Reduce sugar content by using low-fat mascarpone and natural sweeteners like stevia for a lighter, healthier version.
- Enhance flavor complexity by adding a subtle layer of homemade strawberry jam between the biscuit base and mousse for extra depth and richness.
- Elevate presentation by creating decorative strawberry rose garnishes instead of simple slices, adding an elegant touch to the final dessert.
- Prep Time: 20 minutes
- Cook Time: 4 hours
- Category: Desserts
- Method: Refrigerating
- Cuisine: British
Nutrition
- Serving Size: 8
- Calories: 363 kcal
- Sugar: 21 g
- Sodium: 82 mg
- Fat: 29 g
- Saturated Fat: 18 g
- Unsaturated Fat: 9 g
- Trans Fat: 0.5 g
- Carbohydrates: 22 g
- Fiber: 1.2 g
- Protein: 4.2 g
- Cholesterol: 75 mg
Nate Harper
Founder & Recipe Curator
Expertise
Single-Recipe Development, Farm-to-Table Cooking, Seasonal Menu Planning, Culinary Storytelling, Home Kitchen Innovation
Education
Cascade Culinary Institute – Central Oregon Community College
Certificate in Culinary Arts
Focus: Farm-to-table cuisine, sustainable cooking practices, and seasonal recipe creation.
Nate studied under experienced chefs who emphasized local sourcing, minimal waste, and building recipes from fresh, simple ingredients.
Nate Harper is the founder and creative force behind Make, Take, Bake. Raised in the wild beauty of Oregon’s high desert, Nate grew up surrounded by family gardens, farmers’ markets, and home kitchens that celebrated the seasons.
His early love for simple, honest food evolved into a professional passion when he attended Cascade Culinary Institute, where he sharpened his skills in creating recipes that are sustainable, satisfying, and made for everyday life.
Nate’s goal is to make cooking feel accessible, free of fuss, and full of flavor. He believes a single, thoughtfully built dish can stand alone, and sometimes even steal the show.