
The Most Irresistible Peanut Butter Cookies Recipe Ever Made
Crisp autumn winds whisper memories of grandma’s legendary peanut butter cookies that always made me smile.
Sweet nostalgia drifts through my kitchen whenever I mix these simple ingredients.
Soft, chewy textures promise comfort in every delightful bite.
Childhood afternoons spent watching her roll perfect dough come flooding back with each preparation.
Minimal ingredients and straightforward steps mean anyone can master this classic treat.
Chocolate chips or classic style – these cookies guarantee pure happiness waiting just moments away.
Your next baking adventure starts right here with this irresistible recipe.
Peanut Butter Cookies That Bring Sweet Comfort
Ingredients for Soft and Chewy Peanut Butter Cookies
Main Ingredients:Leavening Agents:Flavor Enhancers:How to Bake Peanut Butter Cookies Perfectly
Step 1: Fire Up the Oven
Crank the oven to a toasty 350°F and line your baking sheets with parchment paper. This creates the perfect cozy environment for your cookie adventure.
Step 2: Create the Dry Blend
Grab a mixing bowl and whisk together:Blend these ingredients until they’re perfectly combined and smooth.
Step 3: Whip the Creamy Base
In a separate large bowl, blend until super fluffy:Mix these ingredients until they transform into a creamy, dreamy mixture.
Step 4: Introduce Moisture and Richness
Fold in:Stir until everything looks harmonious and well-incorporated.
Step 5: Marry the Mixtures
Gently fold the dry ingredients into the wet mixture.
Mix just until everything comes together – no over-mixing allowed!
Step 6: Shape the Cookies
Scoop dollops of dough onto your prepared baking sheets.
Leave about two inches between each cookie to give them room to spread and dance.
Step 7: Bake to Golden Perfection
Slide the sheets into the oven and bake for 10-12 minutes.
You’re looking for golden edges with centers that still look slightly soft and tender.
Step 8: Cool and Enjoy
Let the cookies rest on the baking sheet for a few minutes, then transfer to wire racks.
These little rounds of happiness are ready to be devoured!
Tips for Flavorful Peanut Butter Cookies
Creative Variations on Peanut Butter Cookies
Pairings That Enhance Peanut Butter Cookies Enjoyment
How to Keep Peanut Butter Cookies Fresh Longer
FAQs
Yes, but expect slightly different texture. Natural peanut butter may make cookies less stable and potentially crumblier compared to processed peanut butter.
The dough should look smooth and uniform, with no visible flour streaks. When you mix, ensure all ingredients are evenly incorporated without overmixing.
Creaming helps incorporate air into the mixture, creating a lighter, softer cookie texture. It also helps sugars dissolve, resulting in a more even, smoother cookie.
Substitute the all-purpose flour with a gluten-free flour blend designed for baking. Look for blends that include xanthan gum for better texture and binding.
Print
Peanut Butter Cookies Recipe
- Total Time: 32 minutes
- Yield: 24 1x
Description
Classic peanut butter cookies blend creamy Jif with crisp edges for a nostalgic treat. Sweet and salty notes complement each other, drawing memories of childhood kitchens where baking means comfort and joy.
Ingredients
- 1 cup creamy or crunchy peanut butter
- 1/2 cup unsalted butter (softened)
- 1 large egg
- 1/2 cup granulated sugar
- 1/2 cup brown sugar
- 1 tsp vanilla extract
- 1 cup all-purpose flour
- 1/2 tsp baking soda
- 1/4 tsp salt
Instructions
- Warm the oven to 350°F and line baking sheets with parchment paper, creating a non-stick surface for perfect cookie placement.
- Sift flour, baking soda, and salt together in a medium mixing bowl, ensuring even distribution of dry ingredients.
- Using an electric mixer, blend softened butter, granulated and brown sugars, and vanilla extract until the mixture becomes light and airy.
- Incorporate egg and peanut butter into the creamed mixture, mixing until smooth and fully integrated.
- Gently fold dry ingredients into the wet mixture, stirring until just combined to maintain a tender cookie texture.
- Use a cookie scoop to drop rounded portions of dough onto prepared baking sheets, spacing each cookie approximately two inches apart.
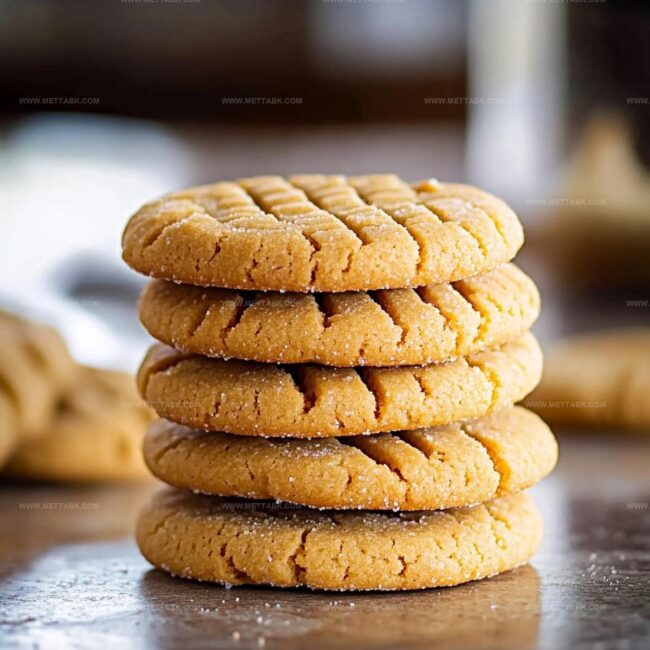
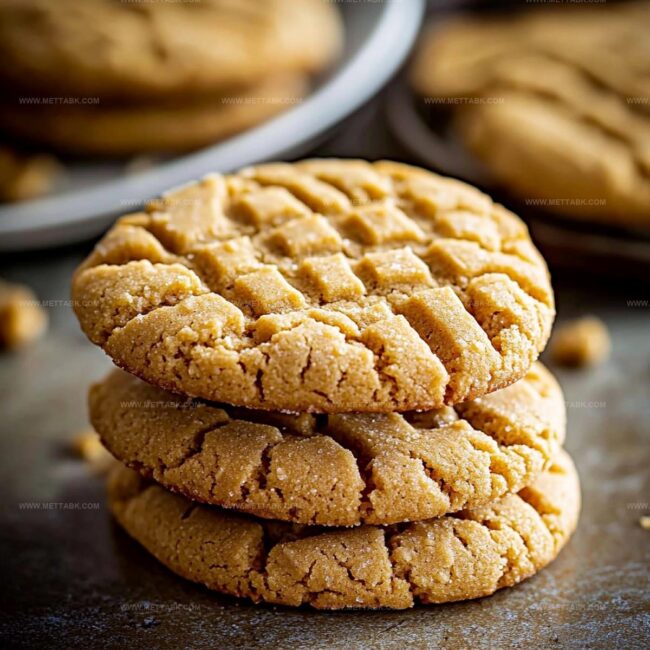
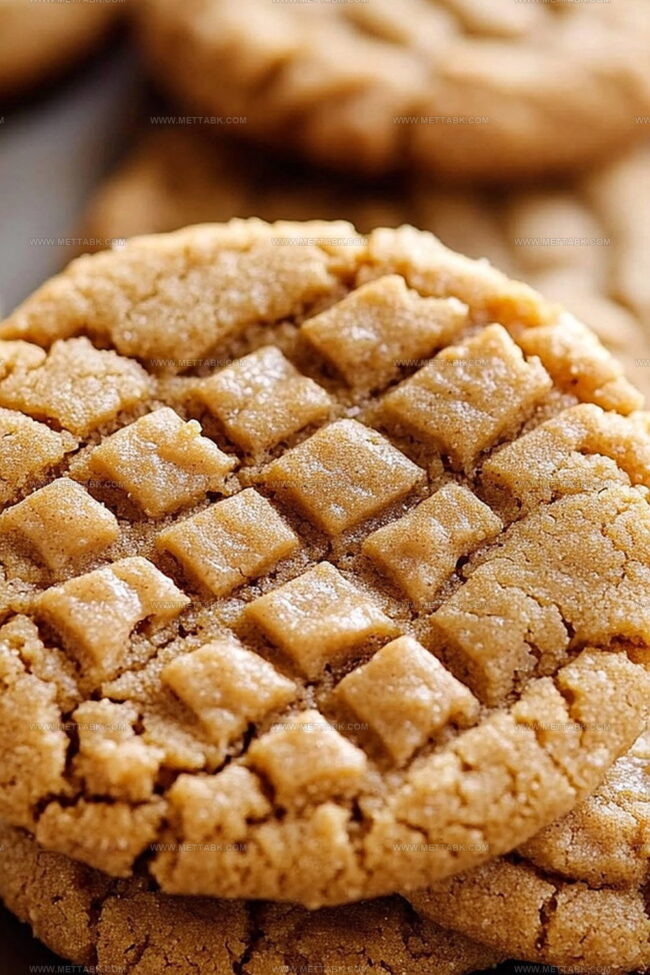
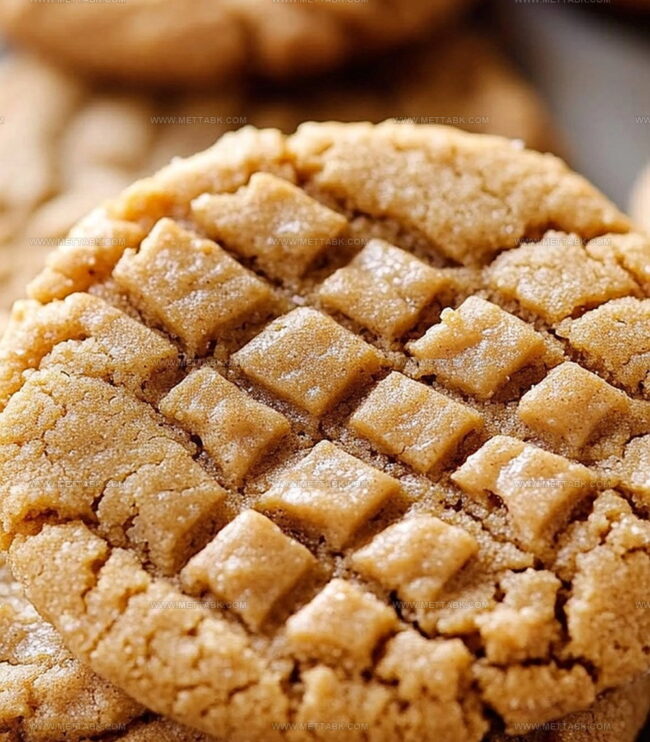
- Press a classic crisscross pattern onto each cookie using a fork, creating the traditional peanut butter cookie appearance.
- Bake for 10-12 minutes, watching for golden-brown edges while keeping centers slightly soft and chewy.
- Allow cookies to rest on the baking sheet for 3-4 minutes to set their structure, then transfer to a wire cooling rack to complete cooling.
Notes
- Enhance butter’s softness by leaving it at room temperature for 30-60 minutes before mixing to ensure smooth, creamy texture.
- Create gluten-free version by substituting all-purpose flour with almond or coconut flour for those with wheat sensitivities.
- Customize crunch levels by using chunky peanut butter instead of smooth for added texture and deeper nutty flavor profile.
- Control sweetness by reducing sugar quantity or using alternative sweeteners like honey or maple syrup for a healthier twist.
- Prep Time: 20 minutes
- Cook Time: 12 minutes
- Category: Desserts, Snacks
- Method: Baking
- Cuisine: American
Nutrition
- Serving Size: 24
- Calories: 141 kcal
- Sugar: 8 g
- Sodium: 93 mg
- Fat: 9 g
- Saturated Fat: 3 g
- Unsaturated Fat: 6 g
- Trans Fat: 0 g
- Carbohydrates: 13 g
- Fiber: 1 g
- Protein: 4 g
- Cholesterol: 17 mg
Clara Bennett
Contributing Recipe Developer & Food Writer
Expertise
Baking and Pastry Development, Gluten-Free and Allergy-Friendly Recipe Creation, Culinary Storytelling and Food Journalism, Recipe Testing and Standardization, Southern Comfort Foods and Modern Twists
Education
Sullivan University – National Center for Hospitality Studies
Associate Degree in Culinary Arts
Focus: Baking and Pastry Arts, Recipe Testing, and Culinary Journalism.
Clara specialized in crafting desserts that blend classic Southern comfort with modern techniques, while developing strong writing skills to tell the story behind every dish.
Lane Community College (Certificate Program)
Certificate in Food Writing and Photography
Focus: Culinary storytelling, recipe formatting, food styling, and visual presentation.
Clara’s love of baking started young, powered by homemade pies, biscuits, and stories passed around the family table.
After earning her degree at Sullivan University and a food writing certificate at Lane Community College, she turned her passion into a craft: sharing recipes that are simple, soulful, and always full of heart.
She’s big on bold flavors, flexible ideas, and creating sweets that fit any table (yes, even if you’re gluten-free). When she’s not baking, you’ll find her wandering farmers’ markets, styling food for the next photo shoot, or working on her ever-growing recipe journal.