
The Ultimate Peanut Butter Cup Brownies Recipe for Chocoholics
Mouthwatering peanut butter cup brownies promise a decadent chocolate experience that melts hearts instantly.
Sweet meets rich in this irresistible dessert.
Chocolate lovers understand the magic when peanut butter mingles with fudgy brownie layers.
Creamy cups nestled within dense, dark batter create a texture symphony.
Every bite delivers intense flavor combinations that dance across your palate.
Chocolate and peanut butter become culinary soulmates in this delightful treat.
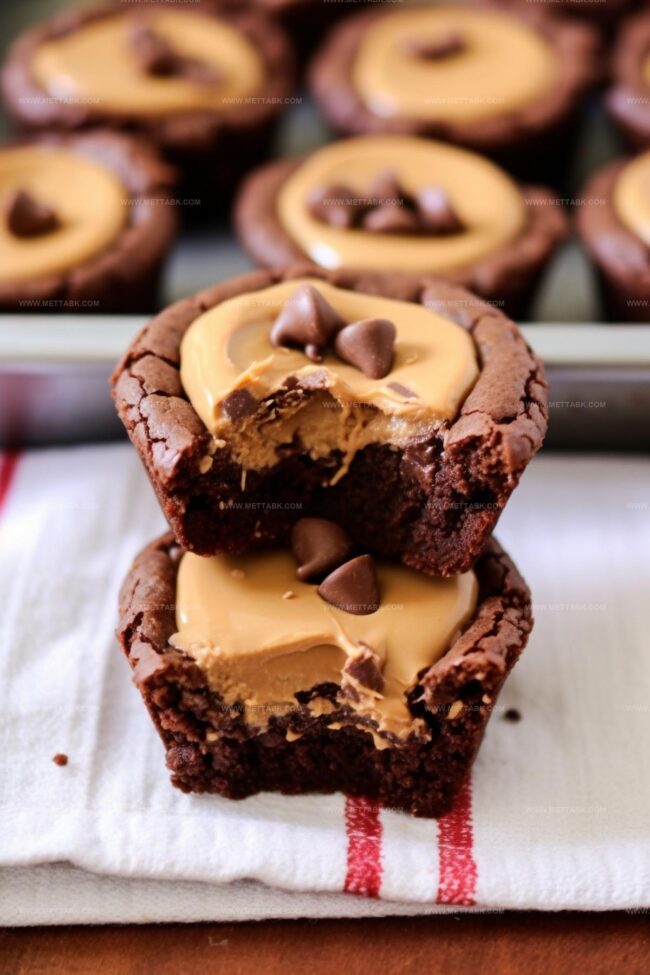
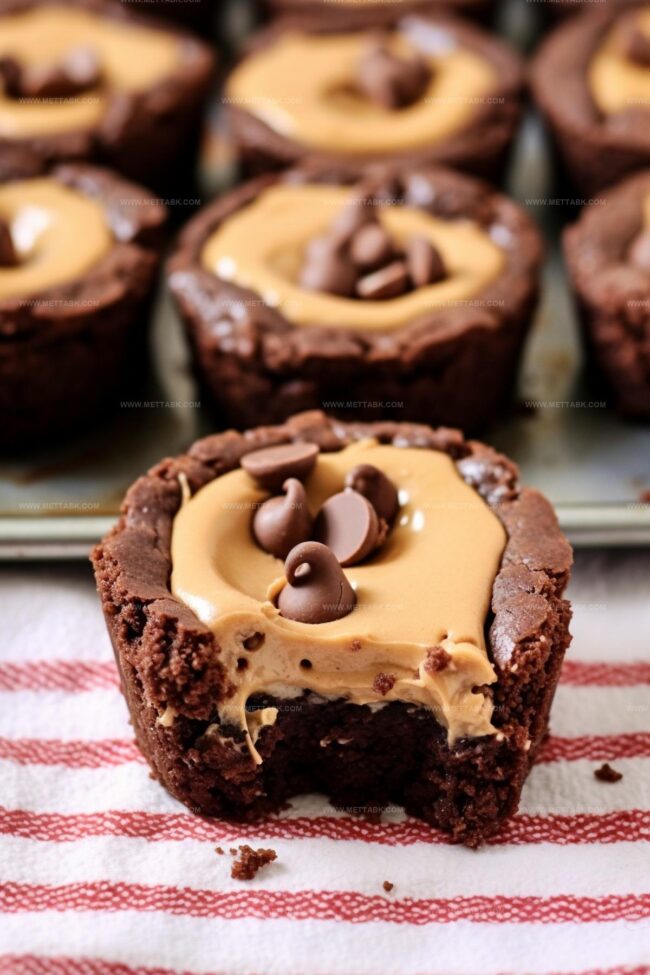
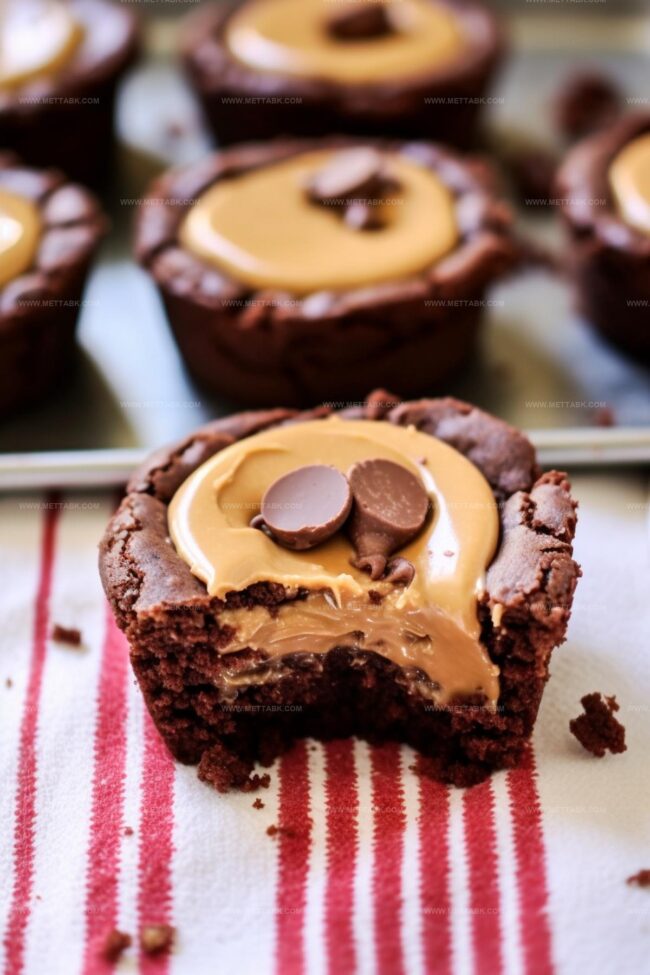
Decadent Peanut Butter Cup Brownies

Ingredients for Peanut Butter Cup Brownies
Main Ingredients:
Brownie Mix: A convenient base that provides the rich, chocolatey foundation for these delectable brownies.
Peanut Butter: A creamy, smooth ingredient that adds a luxurious nutty flavor and creates a delightful filling.
Chips and Toppings:Baking Essentials:How to Bake Peanut Butter Cup Brownies
Step 1: Fire Up the Oven
Crank the oven dial to 350 degrees Fahrenheit, getting ready for some delicious baking magic.
Step 2: Prepare the Baking Vessel
Grab your cupcake pan or mini muffin tin and give it a quick spray of cooking oil to prevent any sticky situations.
Step 3: Mix the Brownie Base
Dive into the brownie mix box and follow the package instructions. Whisk those ingredients together until smooth and creamy.
Step 4: Fill the Cups
Grab an ice cream scoop or spoon and dollop the brownie batter into each cup. Aim for equal amounts to ensure every bite is perfect.
Step 5: Bake to Perfection
Slide the pan into the hot oven and let it bake for about 20 minutes. You’ll know they’re done when a toothpick comes out with just a few moist crumbs clinging to it.
Step 6: Create Peanut Butter Wells
Once the brownies are out, let them cool for a few minutes. Then use the back of a spoon to gently press a small well into the center of each brownie.
Step 7: Melt the Peanut Butter
Pop the peanut butter into the microwave for 30 seconds. Stir until it becomes silky smooth and easy to drizzle.
Step 8: Fill the Wells
Carefully spoon the melted peanut butter into the little dips you’ve created in each brownie.
Step 9: Add the Finishing Touches
Sprinkle the top with:Step 10: Cool and Set
Let the brownies chill completely in the pan.
This helps them firm up and makes them easier to remove.
Step 11: Store or Devour
Transfer the brownies to a storage container if you’re saving them for later.
Otherwise, grab a glass of milk and enjoy immediately!
Pro Tips for Rich and Gooey Brownies
Flavor Variations on Peanut Butter Cup Brownies
Pairing Ideas for Peanut Butter Cup Brownies
Storage Tips for Peanut Butter Cup Brownies
FAQs
Yes, you can substitute boxed mix with a homemade brownie batter. Just ensure the consistency is similar to the packaged mix for best results.
The peanut butter should be smooth and easily spreadable after 30 seconds in the microwave. If it’s not completely melted, stir and heat in 10-second intervals.
Creamy, commercial peanut butter works perfectly. Avoid natural or separated peanut butter as it might not melt smoothly.
Yes, simply use a gluten-free brownie mix and ensure all other ingredients are gluten-free certified.
Print
Peanut Butter Cup Brownies Recipe
- Total Time: 35 minutes
- Yield: 9 1x
Description
Indulgent peanut butter cup brownies blend rich chocolate with creamy peanut butter for an irresistible dessert. Chocolate lovers will savor each fudgy, decadent bite of this classic American treat.
Ingredients
- 1 package (standard: 450-500g, American: 16 oz) boxed brownie mix (high-quality)
- 1/4 cup (60 ml) smooth peanut butter
- 1 cup (170 g) semi-sweet chocolate chips
- 1 cup (170 g) peanut butter morsel chips
Instructions
- Preheat the oven to 350°F and prepare a 12-cup cupcake pan or mini muffin tin with non-stick spray.
- Mix the brownie batter according to package instructions, ensuring a smooth and consistent texture.
- Evenly distribute the brownie mixture into the prepared pan using an ice cream scoop for uniform portions.
- Bake for 20 minutes, checking doneness with a cake tester that should come out with minimal crumbs.
- Remove from oven and let brownies cool for a few minutes, then gently press the center of each brownie with the back of a spoon to create a small well.
- Microwave peanut butter for 30 seconds, stirring until completely smooth and liquid.
- Carefully pour a small amount of melted peanut butter into the center indentation of each brownie.
- Sprinkle chocolate and peanut butter chips over the top of each brownie while still warm.
- Allow brownies to cool completely in the pan, which helps them set and develop a firmer texture.
- Once cooled, transfer brownies to a wire rack or storage container to maintain freshness.
Notes
- Swap regular brownie mix with gluten-free or keto-friendly alternatives for dietary restrictions.
- Use natural peanut butter with no added sugars to reduce overall sweetness and enhance healthier profile.
- Create perfect indentations by using the back of a rounded measuring spoon for consistent depth in each brownie cup.
- Experiment with dark chocolate chips for a more intense flavor and potential antioxidant benefits.
- Prep Time: 15 minutes
- Cook Time: 20 minutes
- Category: Desserts, Snacks
- Method: Baking
- Cuisine: American
Nutrition
- Serving Size: 9
- Calories: 210 kcal
- Sugar: 18 g
- Sodium: 140 mg
- Fat: 12 g
- Saturated Fat: 4 g
- Unsaturated Fat: 6 g
- Trans Fat: 0.1 g
- Carbohydrates: 25 g
- Fiber: 2 g
- Protein: 4 g
- Cholesterol: 15 mg
Clara Bennett
Contributing Recipe Developer & Food Writer
Expertise
Baking and Pastry Development, Gluten-Free and Allergy-Friendly Recipe Creation, Culinary Storytelling and Food Journalism, Recipe Testing and Standardization, Southern Comfort Foods and Modern Twists
Education
Sullivan University – National Center for Hospitality Studies
Associate Degree in Culinary Arts
Focus: Baking and Pastry Arts, Recipe Testing, and Culinary Journalism.
Clara specialized in crafting desserts that blend classic Southern comfort with modern techniques, while developing strong writing skills to tell the story behind every dish.
Lane Community College (Certificate Program)
Certificate in Food Writing and Photography
Focus: Culinary storytelling, recipe formatting, food styling, and visual presentation.
Clara’s love of baking started young, powered by homemade pies, biscuits, and stories passed around the family table.
After earning her degree at Sullivan University and a food writing certificate at Lane Community College, she turned her passion into a craft: sharing recipes that are simple, soulful, and always full of heart.
She’s big on bold flavors, flexible ideas, and creating sweets that fit any table (yes, even if you’re gluten-free). When she’s not baking, you’ll find her wandering farmers’ markets, styling food for the next photo shoot, or working on her ever-growing recipe journal.