
Heartfelt Reeses Valentines Hearts Recipe: Sweet Love Bites
Crafting delightful reeses valentines hearts brings pure joy to any celebration of love.
Sweet chocolate and peanut butter create magical combinations that melt hearts.
Romantic treats like these spark happiness in unexpected moments.
Our simple recipe transforms classic candies into adorable heart-shaped delights.
You can easily surprise someone special with homemade confections that look professional.
Each bite promises rich, creamy flavors that connect deeply with emotional memories.
These charming treats make perfect gifts for significant others or close friends.
Go ahead and spread love through delicious, handmade chocolate goodness.
Reese’s Valentines Hearts That Sweeten Every Celebration

Ingredients Needed for Reese’s Valentines Hearts Treats
Chocolate Base:Filling:Preparation:How to Make Reese’s Valentines Hearts With Love
Step 1: Melt Chocolate Base
Grab a microwave-safe bowl and combine chocolate chips with coconut oil. Heat in short bursts, stirring between each interval until the mixture transforms into a silky, glossy liquid with no lumps.
Step 2: Create Chocolate Shells
Select a heart-shaped silicone mold and lightly coat its surface with a thin layer of cooking spray. Carefully pour the melted chocolate mixture, tilting the mold to ensure complete and even coverage of the sides and bottom.
Place the mold in the freezer for 10 minutes to allow the chocolate to solidify.
Step 3: Prepare Peanut Butter Filling
In a separate mixing bowl, blend:Stir the ingredients until they form a smooth, uniform mixture that holds together easily.
Step 4: Fill Chocolate Shells
Remove the hardened chocolate shells from the freezer. Gently spoon the peanut butter mixture into each chocolate shell, leaving a small space at the top for the final chocolate layer.
Step 5: Seal and Freeze
Cover the peanut butter filling with additional melted chocolate, ensuring a complete seal. Return the mold to the freezer for 10-15 minutes until the chocolates are completely set and firm.
Step 6: Serve and Enjoy
Carefully pop the Reeses Valentines Hearts out of the silicone mold. Allow them to sit at room temperature for a few minutes before serving for the perfect texture and taste.
Tips to Nail Reese’s Valentines Hearts Every Time
Flavorful Twists on Classic Reese’s Valentines Hearts

Pairings That Enhance Reese’s Valentines Hearts Enjoyment

Best Storage Ideas for Reese’s Valentines Hearts Treats
FAQs
Yes, you can substitute milk, dark, or white chocolate based on your preference. Just ensure it melts smoothly.
A silicone heart-shaped mold is recommended, but you can also use a muffin tin or small paper cups as an alternative.
Ensure the first chocolate layer is completely firm and cold before adding the peanut butter layer. This creates a clean separation between layers.
No, the recipe contains peanut butter. For those with nut allergies, you would need to replace the peanut butter with a nut-free alternative like sunflower seed butter.
Print
Reeses Valentines Hearts Recipe
- Total Time: 40 minutes
- Yield: 12 1x
Description
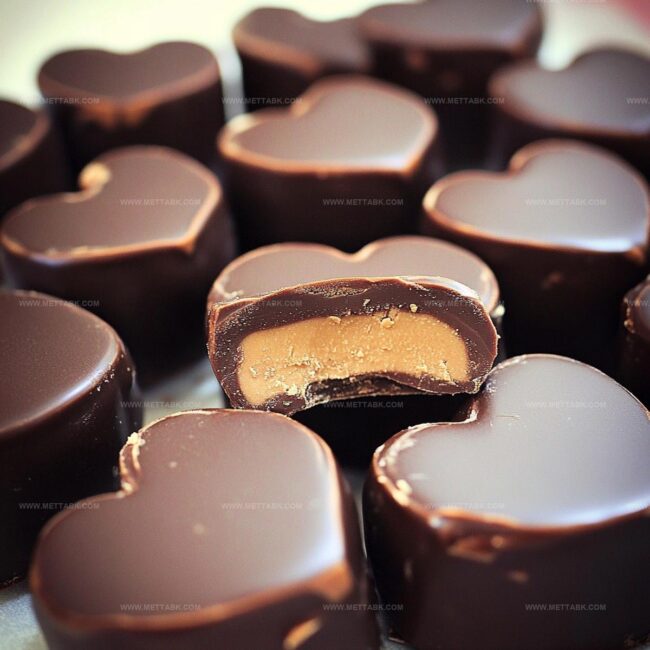
Reese’s Valentine Hearts combine creamy peanut butter and chocolate in a romantic treat perfect for celebrating love. Sweet chocolate lovers can craft these homemade confections with simple ingredients and enjoy a delightful dessert that impresses at any gathering.
Ingredients
- 2/3 cup (160 ml) creamy peanut butter
- 1/2 cup (60 g) powdered sugar
- 1 cup (170 g) semi-sweet chocolate chips
- 2 tbsps (30 ml) coconut oil
Instructions
- Gently melt chocolate and coconut oil in microwave, stirring at 30-second intervals until glossy and uniform.
- Lightly coat silicone heart molds with non-stick spray to ensure easy chocolate release.
- Carefully distribute first layer of chocolate into each heart-shaped cavity, tilting mold to create even chocolate coating. Chill in freezer for 10 minutes until completely solidified.
- Whisk peanut butter and powdered sugar in a separate bowl until smooth and creamy, creating a consistent filling texture.
- Delicately spoon peanut butter mixture into center of each chocolate shell, leaving slight margin around edges.
- Pour remaining melted chocolate over peanut butter layer, ensuring complete coverage and smooth surface.
- Return filled molds to freezer for 10-15 minutes until chocolates are fully set and firm to touch.
- Gently remove heart-shaped candies from silicone molds by carefully pressing bottom of each cavity.
- Store finished valentines hearts in refrigerator until ready to serve, maintaining their elegant shape and rich flavor.
Notes
- Use high-quality chocolate chips for a richer, more decadent flavor that elevates the entire dessert.
- Opt for room temperature peanut butter to ensure smooth, even mixing and prevent lumpy texture.
- Create dairy-free version by selecting vegan chocolate chips and plant-based peanut butter alternatives.
- Store these heart-shaped treats in an airtight container in the freezer for up to two weeks, making them perfect for advance preparation.
- Prep Time: 15 minutes
- Cook Time: 25 minutes
- Category: Desserts, Snacks
- Method: Freezing
- Cuisine: American
Nutrition
- Serving Size: 12
- Calories: 200
- Sugar: 14 g
- Sodium: 40 mg
- Fat: 16 g
- Saturated Fat: 5 g
- Unsaturated Fat: 10 g
- Trans Fat: 0 g
- Carbohydrates: 15 g
- Fiber: 1 g
- Protein: 4 g
- Cholesterol: 0 mg
Clara Bennett
Contributing Recipe Developer & Food Writer
Expertise
Baking and Pastry Development, Gluten-Free and Allergy-Friendly Recipe Creation, Culinary Storytelling and Food Journalism, Recipe Testing and Standardization, Southern Comfort Foods and Modern Twists
Education
Sullivan University – National Center for Hospitality Studies
Associate Degree in Culinary Arts
Focus: Baking and Pastry Arts, Recipe Testing, and Culinary Journalism.
Clara specialized in crafting desserts that blend classic Southern comfort with modern techniques, while developing strong writing skills to tell the story behind every dish.
Lane Community College (Certificate Program)
Certificate in Food Writing and Photography
Focus: Culinary storytelling, recipe formatting, food styling, and visual presentation.
Clara’s love of baking started young, powered by homemade pies, biscuits, and stories passed around the family table.
After earning her degree at Sullivan University and a food writing certificate at Lane Community College, she turned her passion into a craft: sharing recipes that are simple, soulful, and always full of heart.
She’s big on bold flavors, flexible ideas, and creating sweets that fit any table (yes, even if you’re gluten-free). When she’s not baking, you’ll find her wandering farmers’ markets, styling food for the next photo shoot, or working on her ever-growing recipe journal.