
Dreamy Shamrock Shake Pie Recipe: A Sweet Minty Treat
Whipping up a delightful shamrock shake pie brings pure magic to your dessert table.
Creamy mint flavors dance through a smooth, chilled filling that captures the spirit of st.
patrick’s day celebrations.
Cool peppermint notes blend seamlessly with rich vanilla undertones.
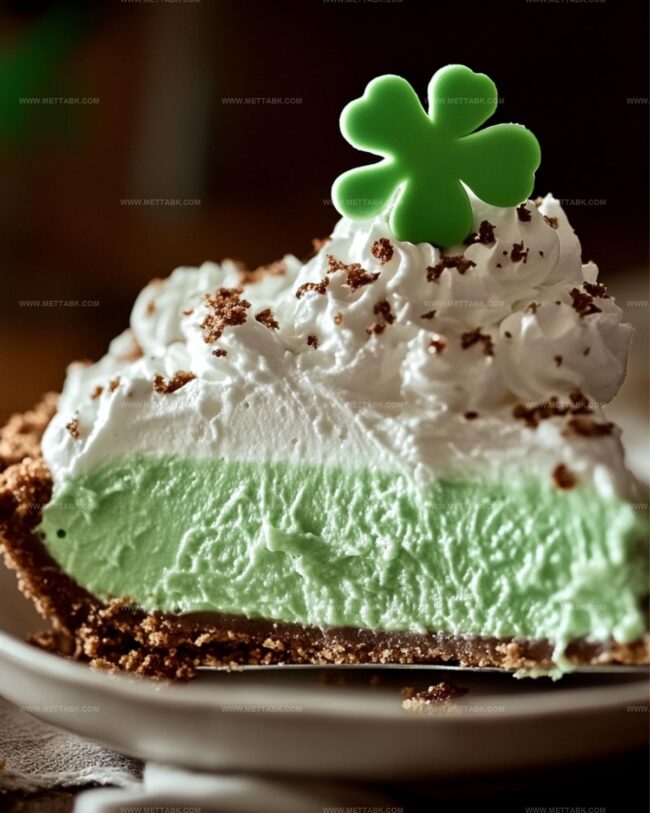
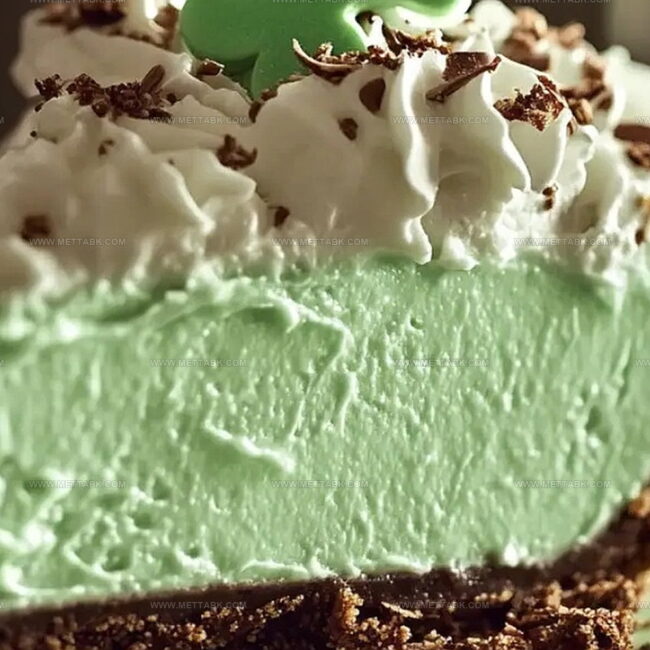
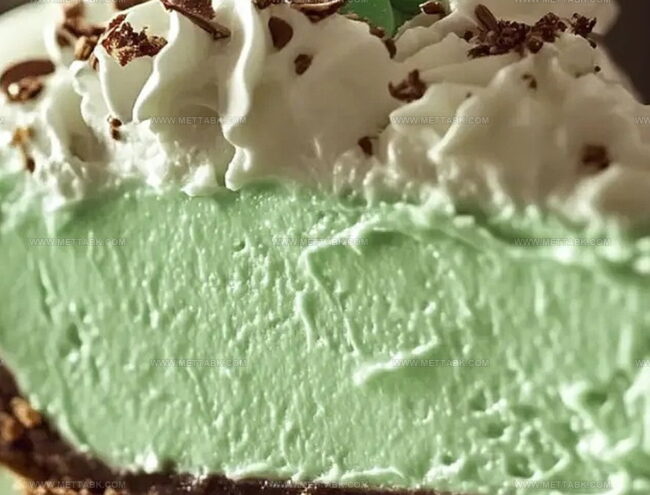
Green-tinted layers promise a festive treat that sparkles with nostalgia and playful charm.
Light and refreshing, this pie delivers a delectable twist on the classic fast-food favorite.
Each slice promises a cool, minty escape from ordinary desserts.
Shamrock Shake Pie That’s Minty and Magical
Ingredients for Refreshing Shamrock Shake Pie
For the Base:For the Filling:For the Decoration and Color:How to Make Shamrock Shake Pie Easily
Step 1: Whip the Creamy Base
In a spacious mixing bowl, grab your electric mixer and whirl the heavy cream until soft, billowy peaks start to form. The cream should look light and airy, standing up in gentle curves when you lift the beaters.
Step 2: Sweeten and Flavor the Mixture
Gradually sprinkle in the powdered sugar, then add the vanilla and peppermint extracts. Continue beating until the mixture becomes smooth and holds its shape beautifully.
The fragrance will start to smell like a dreamy dessert.
Step 3: Create a Festive Green Color
Drop in a few hints of green food coloring and gently fold through the cream.
Swirl and blend until the color becomes uniform, creating a soft mint green that looks absolutely magical.
Step 4: Prepare the Pie Crust
Take your pre-made graham cracker crust and carefully spoon the minty cream mixture into it.
Use a spatula to spread the filling evenly, making sure to reach all the edges and create a smooth, tempting surface.
Step 5: Chill and Set
Cover the pie with plastic wrap and slide it into the refrigerator.
Let it rest and firm up for at least 2 hours. This waiting time allows the flavors to mingle and the texture to become perfectly creamy.
Step 6: Add Final Touches
Just before serving, crown your pie with a layer of whipped topping. Sprinkle chocolate shavings or delicate mint leaves on top for an extra wow factor that makes the dessert look professionally stunning.
Step 7: Slice and Celebrate
Cut the pie into beautiful wedges. Each slice promises a cool, minty burst of flavor that will transport taste buds to a delightful paradise of sweetness.
Tips for Perfect Shamrock Shake Pie Every Time
Fun Twists on Shamrock Shake Pie
Best Pairings for Shamrock Shake Pie
Storage Solutions for Shamrock Shake Pie
Store the pie covered with plastic wrap or aluminum foil in the refrigerator for up to 3-4 days. Keep it flat to maintain the smooth cream texture.
Wrap the pie tightly in plastic wrap and then aluminum foil. Freeze for up to 2 weeks. Thaw in the refrigerator overnight before serving.
Place leftover slices in an airtight container with wax paper between each slice to prevent sticking. Refrigerate for 2-3 days.
Never leave the pie out for more than 2 hours, as the dairy-based filling can spoil quickly and lose its creamy consistency.
FAQs
The peppermint extract provides the classic Shamrock Shake taste, creating a cool and refreshing flavor profile reminiscent of the popular McDonald’s beverage.
Yes, the pie will taste the same without green food coloring. The color is purely decorative and doesn’t affect the overall flavor of the dessert.
You’ll only need a mixing bowl, electric mixer, and spatula. Most home cooks already have these basic kitchen tools on hand.
Absolutely! This Shamrock Shake Pie requires no baking, making it a quick and easy dessert that’s perfect for beginners or when you want a simple sweet treat.
Print
Shamrock Shake Pie Recipe
- Total Time: 2 hours 15 minutes
- Yield: 8 1x
Description
Creamy Shamrock Shake Pie brings Irish-inspired dessert magic straight to your table. Cool mint flavors and velvety texture combine in this delightful no-bake treat that delivers sweet Saint Patrick’s Day celebration right on your plate.
Ingredients
Main Ingredients:
- 1 cup heavy cream
- 1 cup powdered sugar
- 1 pre-made graham cracker crust
Flavoring Ingredients:
- 1 teaspoon vanilla extract
- 1 teaspoon peppermint extract
- 1/2 cup green food coloring (optional)
Garnish Ingredients:
- 1 cup whipped topping
- Chocolate shavings
- Mint leaves
Instructions
- Prepare a pristine mixing vessel and whip the cream until soft, billowy peaks emerge, indicating optimal texture.
- Gradually incorporate powdered sugar, vanilla essence, and peppermint extract, blending thoroughly until a harmonious mixture develops.
- Introduce a subtle hint of green through carefully added food coloring, gently folding to achieve uniform pigmentation.
- Transfer the aromatic mint-infused cream into the pre-prepared graham cracker foundation, utilizing a spatula to create a smooth, even surface.
- Encase the pie in protective wrapping and allow it to chill in the refrigerator for a minimum of 120 minutes, enabling complete solidification.
- Prior to presentation, adorn the pie’s surface with delicate whipped cream peaks and embellish with elegant chocolate curls or fresh mint leaves.
- Slice into precise wedges, revealing the creamy interior, and serve immediately to capture the pie’s optimal temperature and texture.
Notes
- Experiment with different extracts like almond or coconut to create unique flavor variations.
- Use natural green food coloring from spinach or matcha powder for a healthier alternative to artificial dyes.
- Swap graham cracker crust with gluten-free cookie crust to accommodate dietary restrictions.
- Freeze individual slices for a cool summer dessert that can be enjoyed anytime.
- Prep Time: 15 minutes
- Cook Time: 2 hours
- Category: Desserts, Milkshake
- Method: Chilling
- Cuisine: American
Nutrition
- Serving Size: 8
- Calories: 245 kcal
- Sugar: 23 g
- Sodium: 85 mg
- Fat: 18 g
- Saturated Fat: 11 g
- Unsaturated Fat: 6 g
- Trans Fat: 0.3 g
- Carbohydrates: 22 g
- Fiber: 0.5 g
- Protein: 1.5 g
- Cholesterol: 70 mg
Nate Harper
Founder & Recipe Curator
Expertise
Single-Recipe Development, Farm-to-Table Cooking, Seasonal Menu Planning, Culinary Storytelling, Home Kitchen Innovation
Education
Cascade Culinary Institute – Central Oregon Community College
Certificate in Culinary Arts
Focus: Farm-to-table cuisine, sustainable cooking practices, and seasonal recipe creation.
Nate studied under experienced chefs who emphasized local sourcing, minimal waste, and building recipes from fresh, simple ingredients.
Nate Harper is the founder and creative force behind Make, Take, Bake. Raised in the wild beauty of Oregon’s high desert, Nate grew up surrounded by family gardens, farmers’ markets, and home kitchens that celebrated the seasons.
His early love for simple, honest food evolved into a professional passion when he attended Cascade Culinary Institute, where he sharpened his skills in creating recipes that are sustainable, satisfying, and made for everyday life.
Nate’s goal is to make cooking feel accessible, free of fuss, and full of flavor. He believes a single, thoughtfully built dish can stand alone, and sometimes even steal the show.