Easy Homemade Soft Pretzels Recipe: Tasty Golden Twists
Crafting homemade soft pretzels brings pure culinary magic into your kitchen!
Twisted dough shapes have fascinated bakers for generations across different cultures.
German immigrants originally introduced these delightful treats to american communities long ago.
Salt-sprinkled golden curves promise incredible comfort and warmth with every bite.
Knotted dough requires simple ingredients and minimal technical skills to master.
Preparing these delectable twists becomes a delightful adventure you’ll absolutely love.
Dive into this straightforward recipe and create restaurant-quality soft pretzels that will impress everyone at your table.
Reasons You’ll Crave These Homemade Soft Pretzels
Ingredient Essentials for Homemade Soft Pretzels
For the Dough Base:For the Boiling Solution:For the Finishing Touches:Shaping and Baking These Pretzels Step-by-Step
Step 1: Awaken the Yeast
Combine warm water, yeast, and sugar in a spacious mixing bowl. Allow the mixture to rest for 5 minutes until it transforms into a frothy, bubbly concoction that signals the yeast is alive and ready to work its magic.
Step 2: Blend the Dough Base
Mix in:Stir the ingredients into the yeast mixture. Knead the dough vigorously on a clean surface until it becomes smooth, elastic, and feels silky to the touch.
Step 3: Let the Dough Develop
Cover the dough with a clean kitchen towel and let it rest in a warm, draft-free spot. Allow it to rise and expand for approximately 1 hour, or until the volume doubles dramatically.
Step 4: Prepare the Baking Station
Heat the oven to 450F (230C). Line a baking sheet with parchment paper to prevent sticking and ensure easy removal.
Step 5: Shape the Pretzels
Divide the dough into 8 equal portions. Roll each piece into a long, slender rope about 18 inches long.
Twist each rope into the classic pretzel shape by forming a U, crossing the ends, and pressing them onto the bottom of the curve.
Step 6: Create the Signature Pretzel Crust
Bring a large pot of water to a rolling boil.
Add baking soda to create the distinctive pretzel exterior. Gently dip each shaped pretzel into the boiling water for 30 seconds, then carefully transfer to the prepared baking sheet.
Step 7: Add the Golden Finish
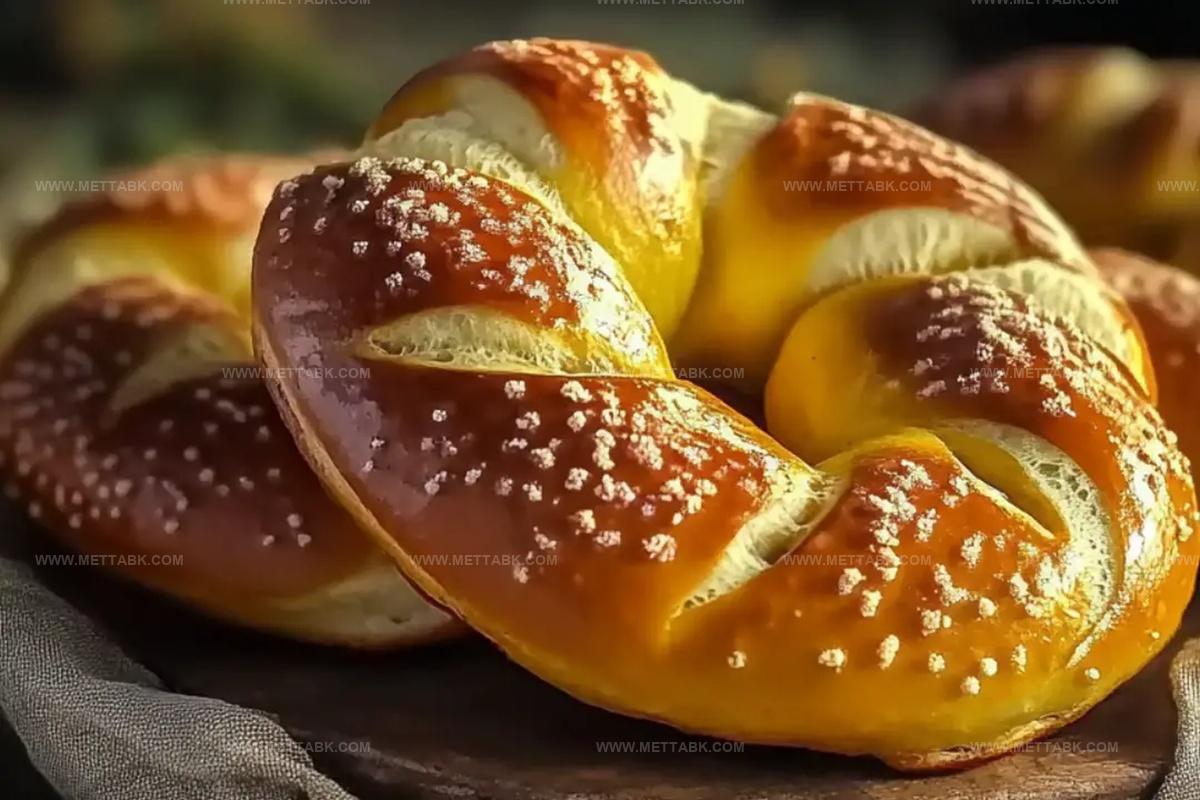
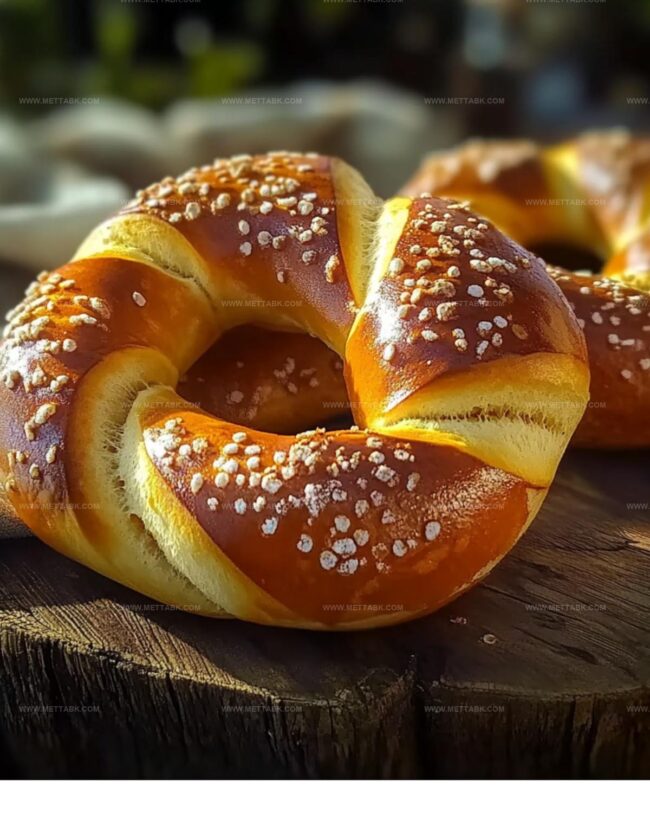
Generously brush each pretzel with beaten egg. Sprinkle coarse salt over the top to create a crunchy, flavorful exterior.
Step 8: Bake to Perfection
Place the baking sheet in the preheated oven. Bake for 12-15 minutes, watching for a deep golden-brown color and crispy edges that promise a delightful crunch.
Step 9: Cool and Savor
Remove pretzels from the oven and let them rest for a few minutes. Serve warm and enjoy the fruits of your baking adventure with your favorite dipping sauce or simply on their own.
Soft Pretzel Tips to Nail the Texture

Fun Ways to Change Up These Pretzels

Perfect Pairings for Warm Homemade Pretzels
Store Soft Pretzels to Keep Them Fresh
Store cooled pretzels in an airtight container for up to 3 days. Wrap each pretzel individually in plastic wrap to prevent moisture and maintain texture.
Place pretzels in a freezer-safe bag or container. Freeze for up to 2 months. Separate layers with parchment paper to prevent sticking.
Thaw frozen pretzels at room temperature. Preheat oven to 350F. Wrap pretzels in aluminum foil and warm for 5-7 minutes until heated through.
Warm individual pretzels for 10-15 seconds. Avoid overheating to prevent hardening. Brush with melted butter after reheating to restore softness.
FAQs
The baking soda creates an alkaline environment that gives pretzels their signature dark, shiny crust and distinctive flavor. It helps the outside of the pretzel caramelize and develop that classic golden-brown color.
When you mix yeast with warm water and sugar, it should become foamy and bubbly within 5 minutes. If the mixture doesn’t foam, your yeast might be old or the water was too hot or cold, which means you’ll need to start over with fresh yeast.
Yes, you can prepare the dough and let it rise in the refrigerator overnight. This slow fermentation can actually enhance the flavor of your pretzels.
Print
Soft Pretzels Recipe
- Total Time: 1 hour 25 minutes
- Yield: 8 1x
Description
Warm, twisted German Soft Pretzels emerge as a delightful snack that bridges comfort and tradition. Crisp exterior and chewy interior invite you to savor each golden-brown bite of homemade goodness.
Ingredients
Main Ingredients:
- 4 cups all-purpose flour
- 1 1/2 cups warm water
- 2 1/4 teaspoons instant yeast
Binding and Flavor Ingredients:
- 1 tablespoon sugar
- 1 teaspoon salt
- 2 tablespoons melted butter
- 1 egg, beaten
Finishing Ingredients:
- 1/2 cup baking soda (for water bath)
- Coarse salt (for topping)
Instructions
- Awaken the yeast by combining warm water, active dry yeast, and sugar in a mixing bowl. Allow the mixture to rest for 5 minutes until it becomes frothy and bubbling.
- Incorporate salt, melted butter, and flour into the activated yeast mixture. Knead the dough thoroughly until it transforms into a smooth, elastic consistency that springs back when touched.
- Create a cozy environment for the dough by covering it with a damp cloth. Let it rise in a warm spot for approximately 60 minutes, or until the volume doubles and becomes puffy.
- Prepare the oven by heating to 450F (230C). Line a baking sheet with parchment paper to prevent sticking.
- Divide the risen dough into 8 equal portions. Roll each segment into a long, slender rope, then artfully twist each into a classic pretzel shape with curved arms.
- Bring a large pot of water to a rolling boil and add baking soda, which will give the pretzels their signature golden-brown exterior. Quickly submerge each pretzel for 30 seconds, then transfer to the prepared baking sheet.
- Generously brush each pretzel with beaten egg for a glossy finish. Sprinkle coarse salt across the top to enhance flavor and provide a delightful crunch.
- Slide the baking sheet into the preheated oven. Bake for 12-15 minutes, watching for a deep golden-brown color and crispy exterior.
- Remove from the oven and allow pretzels to cool slightly on a wire rack. Serve warm for the most satisfying texture and flavor experience.
Notes
- Choose warm water between 100-110°F to perfectly activate the yeast without killing it.
- Knead the dough thoroughly for 5-7 minutes to develop gluten and create a chewy texture.
- Use room temperature ingredients to ensure consistent dough rising and better integration.
- Experiment with different toppings like everything bagel seasoning, cinnamon sugar, or herbs for flavor variations.
- Prep Time: 1 hour 10 minutes
- Cook Time: 15 minutes
- Category: Snacks, Appetizer
- Method: Baking
- Cuisine: German
Nutrition
- Serving Size: 8
- Calories: 190 kcal
- Sugar: 2 g
- Sodium: 350 mg
- Fat: 3 g
- Saturated Fat: 1.5 g
- Unsaturated Fat: 1.2 g
- Trans Fat: 0 g
- Carbohydrates: 36 g
- Fiber: 1 g
- Protein: 6 g
- Cholesterol: 20 mg
Clara Bennett
Contributing Recipe Developer & Food Writer
Expertise
Baking and Pastry Development, Gluten-Free and Allergy-Friendly Recipe Creation, Culinary Storytelling and Food Journalism, Recipe Testing and Standardization, Southern Comfort Foods and Modern Twists
Education
Sullivan University – National Center for Hospitality Studies
Associate Degree in Culinary Arts
Focus: Baking and Pastry Arts, Recipe Testing, and Culinary Journalism.
Clara specialized in crafting desserts that blend classic Southern comfort with modern techniques, while developing strong writing skills to tell the story behind every dish.
Lane Community College (Certificate Program)
Certificate in Food Writing and Photography
Focus: Culinary storytelling, recipe formatting, food styling, and visual presentation.
Clara’s love of baking started young, powered by homemade pies, biscuits, and stories passed around the family table.
After earning her degree at Sullivan University and a food writing certificate at Lane Community College, she turned her passion into a craft: sharing recipes that are simple, soulful, and always full of heart.
She’s big on bold flavors, flexible ideas, and creating sweets that fit any table (yes, even if you’re gluten-free). When she’s not baking, you’ll find her wandering farmers’ markets, styling food for the next photo shoot, or working on her ever-growing recipe journal.