
Sweet Symphony: Irresistible Banana Pudding Cheesecake Recipe
Creamy banana pudding meets decadent cheesecake in a dessert that breaks all the traditional rules.
Southern comfort takes an unexpected twist with this crowd-pleasing mashup.
Layers of velvety cream cheese blend seamlessly with sweet banana notes.
Crushed vanilla wafers create a nostalgic crunch that adds texture and depth to every bite.
Smooth and rich, this dessert combines classic flavors in a way that surprises and delights.
Home cooks can easily master this impressive treat with just a few simple ingredients.
Prepare to wow everyone at your next gathering with this irresistible fusion of classic desserts.
What Makes Banana Cheesecake Extra Special
Ingredients in Banana Pudding Cheesecake
For the Crust:For the Cheesecake Base:For the Banana Pudding and Topping:Simple Steps for Banana Cheesecake
Step 1: Craft the Crumbly Base
Preheat your oven to a toasty 325°F. Grab your food processor and pulverize those Nilla wafers into fine, sandy crumbs.
Stash aside a handful of crumbs for later decoration. In a mixing bowl, combine the cookie crumbs with melted butter until they stick together like best friends.
Press this mixture firmly into a 9-inch springform pan, covering the bottom and climbing halfway up the sides. Set this delicious foundation aside.
Step 2: Whip Up the Creamy Cheesecake Filling
Fire up your stand mixer and beat cream cheese with sugar until silky smooth. Splash in vanilla extract, then gently introduce eggs one by one, mixing just until they’re incorporated.
Fold in sour cream until velvety, then tenderly mix in mashed bananas. Pour this luscious batter into your prepared crust.
Wrap the pan’s exterior with two layers of foil like a protective blanket. Nestle the pan into a large roasting pan and surround with boiling water halfway up the sides.
Step 3: Bake to Perfection
Slide the pan into the oven and bake for 50-60 minutes. You’ll know it’s ready when the edges look set but the center still does a little wiggle dance.
Turn off the oven, crack the door open, and let the cheesecake cool leisurely for an hour. Remove from the water bath and allow to reach room temperature completely.
Step 4: Create the Silky Banana Pudding
In a saucepan, whisk together:Add eggs and blend until smooth. Slowly pour in milk and heavy cream, whisking constantly.
Cook over medium heat, stirring continuously until the mixture thickens and bubbles gently. Remove from heat and stir in butter and vanilla.
Let the pudding cool for 15 minutes.
Step 5: Assemble Your Dreamy Dessert
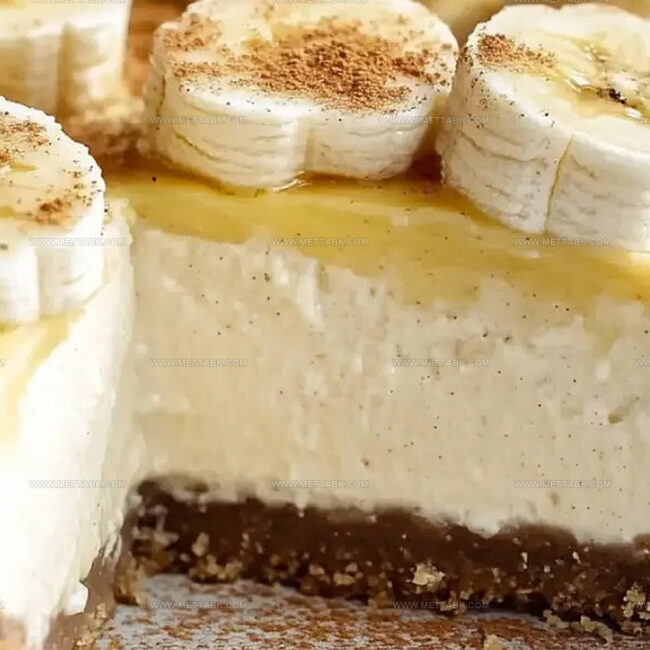
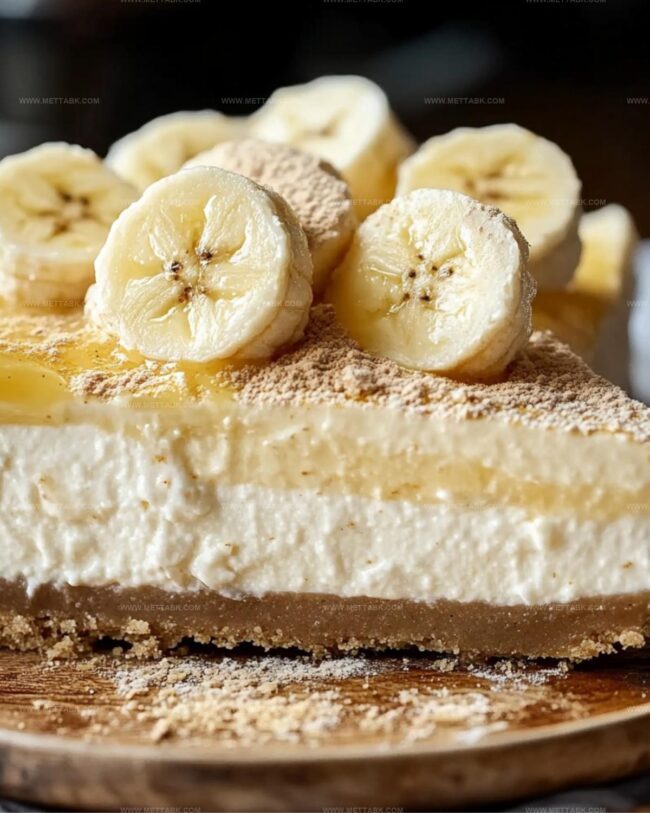
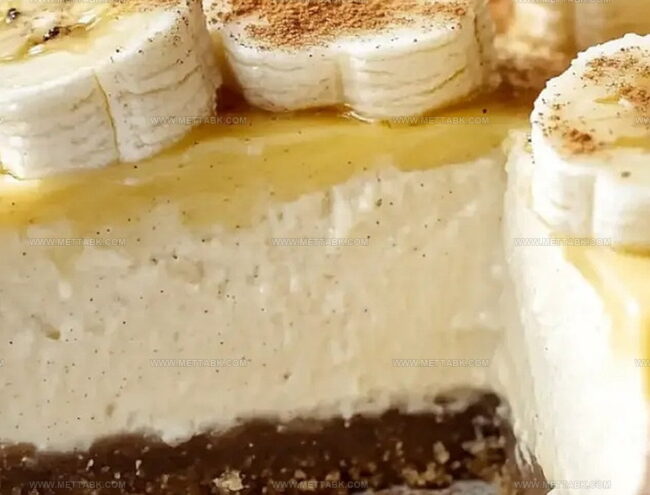
Slice fresh bananas and create a golden layer across the cooled cheesecake.
Generously pour the banana pudding over the fruit. Chill in the refrigerator for at least 4 hours or overnight for maximum flavor development.
Step 6: Garnish and Serve
Before serving, crown your masterpiece with:Slice, serve, and watch everyone swoon!
Tips to Help With Banana Cheesecake Success
Banana Cheesecake Takes to Try Next Time
Banana Cheesecake Matches You Might Enjoy
Storing Banana Cheesecake the Right Way
Transfer leftover cheesecake to an airtight container or wrap tightly with plastic wrap. Keep refrigerated for up to 4-5 days, maintaining its creamy texture and preventing moisture loss.
Slice cheesecake into individual portions, wrap each piece securely in plastic wrap, then place in a freezer-safe container. Freeze for up to 2-3 months without losing quality or flavor.
Remove cheesecake from the refrigerator 15-20 minutes before serving to soften slightly. Let it sit at room temperature to restore its smooth, creamy consistency.
Move frozen cheesecake to the refrigerator overnight. Allow it to thaw gradually, preventing condensation and maintaining its original texture and taste.
FAQs
Yes, graham crackers or shortbread cookies work well as alternatives to Nilla wafers. Just ensure they’re finely crushed and mixed with melted butter.
Use a water bath, avoid overmixing the batter, and let the cheesecake cool slowly in the oven with the door cracked open to prevent sudden temperature changes.
A springform pan is ideal for cheesecakes as it allows easy removal without damaging the cake. If you don’t have one, use a deep cake pan and line it with parchment paper for easier removal.
Print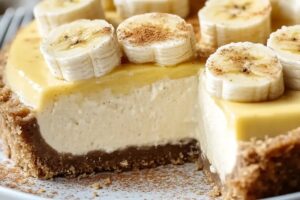
The Banana Pudding Cheesecake Recipe
- Total Time: 1 hour 30 minutes
- Yield: 12 1x
Description
Creamy banana pudding cheesecake combines Southern comfort with luxurious dessert indulgence. Silky layers of banana-infused cheesecake and classic pudding create a nostalgic treat you’ll savor with pure delight.
Ingredients
Main Ingredients:
- 24 ounces (680g) cream cheese
- 1 cup (240g) mashed ripe bananas
- 1 cup (240ml) whole milk
- 1 cup (240ml) heavy cream
- 1 11-ounce box (312g) Nilla wafers
- 4 large eggs
- 3 large eggs
Sugars and Sweeteners:
- 1 cup (200g) granulated sugar
- 3/4 cup (150g) granulated sugar
Supplementary Ingredients:
- 5 tablespoons (70g) unsalted butter
- 3 tablespoons (42g) unsalted butter
- 3 tablespoons (23g) all-purpose flour
- 1/4 cup (30g) all-purpose flour
- 1 teaspoon (5ml) pure vanilla extract
- 1 teaspoon (5ml) pure vanilla extract
- 1/4 cup (60g) sour cream
- 1/2 teaspoon salt
- 1/2 bananas, sliced
Garnish (Optional):
- Whipped cream
- Nilla wafers
- Banana slices
Instructions
- Craft the Foundation
Ignite the oven to 325°F (160°C). Pulverize Nilla wafers into delicate crumbs using a food processor. Extract and preserve a half-cup of crumbs for final decoration. Combine remaining crumbs with melted butter, creating a cohesive mixture. Press this blend firmly into a 9-inch springform pan, covering bottom and partial sides.
- Construct the Creamy Core
Utilize a stand mixer to whip cream cheese and sugar until silky smooth. Incorporate vanilla extract. Introduce eggs individually, mixing minimally after each addition. Blend in sour cream until uniform. Gently fold mashed bananas into the batter. Transfer mixture into prepared crust.
- Prepare for Water Bath Baking
Encase springform pan with double aluminum foil layers, preventing water infiltration. Position pan inside a larger roasting dish. Pour boiling water halfway up springform pan’s exterior. Bake 50-60 minutes until edges stabilize and center remains slightly jiggly.
- Cooling Protocol
Switch off oven, partially open door. Allow cheesecake to rest inside for one hour. Extract from water bath, permitting complete room temperature cooling.
- Develop Pudding Layer
In a saucepan, combine sugar, flour, and salt. Whisk eggs until seamless. Gradually introduce milk and cream, stirring continuously. Cook over medium heat, monitoring until mixture thickens and gently bubbles. Remove from heat, fold in butter and vanilla. Allow 15-minute cooling period.
- Final Assembly
Arrange fresh banana slices across cooled cheesecake surface. Cascade prepared pudding over banana layer. Refrigerate minimum 4 hours or overnight for optimal texture.
- Presentation
Before serving, adorn with whipped cream, reserved Nilla wafer crumbs, and additional banana slices.
Notes
- Choose ripe, spotty bananas for maximum sweetness and deeper banana flavor in the pudding and cheesecake.
- Prevent cheesecake cracking by avoiding overmixing eggs and using a water bath during baking.
- Add a pinch of ground cinnamon to the crust or pudding for a warm, subtle spice that complements banana’s natural sweetness.
- For a gluten-free version, substitute Nilla wafers with gluten-free graham crackers or almond flour-based cookie crumbs.
- Prep Time: 30 minutes
- Cook Time: 1 hour
- Category: Desserts
- Method: Baking
- Cuisine: American
Nutrition
- Serving Size: 12
- Calories: 400 kcal
- Sugar: 32 g
- Sodium: 180 mg
- Fat: 25 g
- Saturated Fat: 15 g
- Unsaturated Fat: 9 g
- Trans Fat: 0.5 g
- Carbohydrates: 38 g
- Fiber: 2 g
- Protein: 6 g
- Cholesterol: 110 mg
Clara Bennett
Contributing Recipe Developer & Food Writer
Expertise
Baking and Pastry Development, Gluten-Free and Allergy-Friendly Recipe Creation, Culinary Storytelling and Food Journalism, Recipe Testing and Standardization, Southern Comfort Foods and Modern Twists
Education
Sullivan University – National Center for Hospitality Studies
Associate Degree in Culinary Arts
Focus: Baking and Pastry Arts, Recipe Testing, and Culinary Journalism.
Clara specialized in crafting desserts that blend classic Southern comfort with modern techniques, while developing strong writing skills to tell the story behind every dish.
Lane Community College (Certificate Program)
Certificate in Food Writing and Photography
Focus: Culinary storytelling, recipe formatting, food styling, and visual presentation.
Clara’s love of baking started young, powered by homemade pies, biscuits, and stories passed around the family table.
After earning her degree at Sullivan University and a food writing certificate at Lane Community College, she turned her passion into a craft: sharing recipes that are simple, soulful, and always full of heart.
She’s big on bold flavors, flexible ideas, and creating sweets that fit any table (yes, even if you’re gluten-free). When she’s not baking, you’ll find her wandering farmers’ markets, styling food for the next photo shoot, or working on her ever-growing recipe journal.