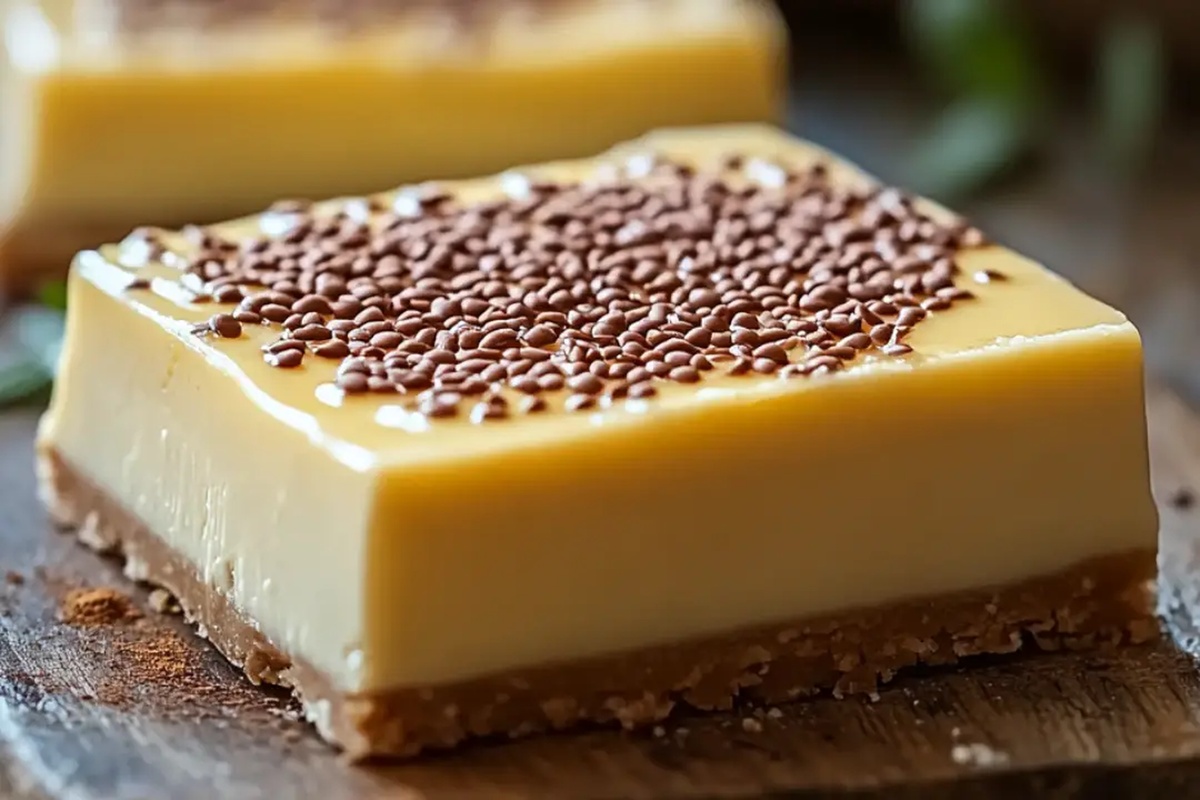
The Dreamy No-Bake Custard Cream Delight Recipe
Creamy and luxurious, this no-bake custard cream delight promises a silky smooth escape from traditional desserts.
Soft peaks of rich filling whisper decadent promises for every sweet tooth.
Summer afternoons call for effortless treats that cool and comfort.
Minimal ingredients dance together without complicated techniques or lengthy preparations.
Chilling becomes your secret weapon in crafting this elegant dessert.
Clusters of delicate flavors melt gently across your palate, creating pure indulgence.
Make this recipe and watch magic unfold with each delectable spoonful.
No-Bake Custard Cream Treat You’ll Love
Ingredients for Smooth Custard Cream Delight
For the Custard Base:For the Sweeteners and Flavors:For the Thickening and Stabilizing Agents:How to Whip Up No-Bake Custard Cream

Step 1: Prepare Your Mixing Station
Grab a medium saucepan and a large mixing bowl. Make sure your workspace is clean and you have all your tools ready.
This will help you create a smooth, luxurious custard without any stress.
Step 2: Blend Liquid Ingredients
In the saucepan, combine:Whisk these ingredients together until they’re perfectly blended and create a silky smooth mixture.
Step 3: Create Flavor Base
Add to the liquid mixture:Stir continuously over medium heat until the mixture starts to thicken and becomes glossy. You’ll notice it transforming from a liquid to a rich, creamy consistency.
Step 4: Cool Down The Custard
Remove the pan from heat and keep stirring for a few minutes. This prevents any lumps from forming and ensures a velvety texture.
Transfer the custard to your mixing bowl and let it cool completely at room temperature.
Step 5: Chill And Set
Cover the custard with plastic wrap, making sure the wrap touches the surface to prevent a skin from forming.
Refrigerate for at least 2 hours or overnight for the best flavor development.
Step 6: Serve With Flair
Spoon the chilled custard into elegant serving glasses.
Optional garnishes include:Enjoy your decadent no-bake custard creation!
Tips for Perfectly Creamy Custard Treats
Variations to Try with Custard Cream Delight
Pairings That Enhance Custard Cream Desserts
Storing Custard Cream Desserts Safely
Store leftovers in a sealed container for up to 3-4 days, keeping the custard cream fresh and preventing absorption of other food odors.
Wrap tightly in plastic wrap and place in a freezer-safe container, preserving the dessert for up to 2 weeks without losing its creamy texture.
Thaw overnight in the refrigerator, then let sit at room temperature for 15-20 minutes before serving to restore its smooth consistency.
Direct microwave heating can break down the delicate custard structure, causing separation and losing its original silky quality.
FAQs
Heavy cream and condensed milk create the rich, smooth base that ensures a velvety consistency without baking.
Yes, preparing it the day before allows the flavors to meld and set perfectly, making it an ideal make-ahead dessert for gatherings.
Whisk the ingredients slowly and continuously over low heat, ensuring you stir constantly to maintain a smooth, lump-free texture.
Absolutely! The no-bake method is straightforward and requires minimal cooking skills, making it an easy and foolproof dessert for anyone to master.
Print
The No-Bake Custard Cream Delight Recipe
- Total Time: 22 minutes
- Yield: 8 1x
Description
Silky no-bake custard cream delight invites dessert enthusiasts on a smooth culinary journey through creamy layers of pure indulgence. Sweet comfort meets elegant simplicity, promising delightful moments of bliss you’ll savor with each delectable spoonful.
Ingredients
Base Layer:
- 200 grams (7.05 ounces) digestive biscuits, crushed
- 113 grams (4 ounces) unsalted butter, melted
Custard Cream Layer:
- 480 milliliters (16.2 fluid ounces) whole milk
- 120 milliliters (4 fluid ounces) heavy cream
- 67 grams (2.36 ounces) sugar
- 25 grams (0.88 ounces) cornstarch
- 10 milliliters (0.34 fluid ounces) vanilla extract
- 2 egg yolks
Topping Layer:
- 360 milliliters (12.17 fluid ounces) heavy whipping cream
- 25 grams (0.88 ounces) powdered sugar
- 5 milliliters (0.17 fluid ounces) vanilla extract
- 30 grams (1.06 ounces) crushed biscuits
- 8 grams (0.28 ounces) powdered sugar
Instructions
- Whisk milk, egg yolks, sugar, and cornstarch in a medium saucepan until smooth and well-blended, eliminating any potential lumps.
- Position the saucepan over medium heat, continuously stirring the mixture to prevent scorching and ensure even heating.
- Cook the custard for approximately 5-7 minutes, maintaining constant movement, until the mixture thickens and begins to bubble gently.
- Remove from heat immediately and incorporate butter and vanilla extract, stirring until completely integrated and creating a silky, glossy texture.
- Transfer the hot custard through a fine-mesh strainer to guarantee an ultra-smooth consistency, eliminating any potential cooked egg fragments.
- Pour the strained custard into individual serving dishes or a large decorative container, ensuring an even distribution.
- Cover the surface directly with plastic wrap to prevent a skin from forming during cooling, pressing gently to create an airtight seal.
- Refrigerate for minimum 2 hours or overnight, allowing the custard to set completely and develop rich, harmonious flavors.
- Before serving, optionally garnish with caramel drizzle, fresh berries, or a light dusting of ground cinnamon for an elegant presentation.
- Serve chilled, enjoying the creamy, luxurious texture of this delightful dessert.
Notes
- Swap dairy ingredients with coconut cream and plant-based milk for a delicious vegan-friendly alternative.
- Prepare the dessert a day ahead to enhance flavor complexity and allow the custard to set perfectly.
- Elevate the presentation by drizzling rich caramel sauce or sprinkling toasted nuts on top for added texture and visual appeal.
- Experiment with different extract flavors like almond or orange to customize the custard’s taste profile and surprise your guests.
- Prep Time: 15 minutes
- Cook Time: 7 minutes
- Category: Desserts
- Method: Blending
- Cuisine: American
Nutrition
- Serving Size: 8
- Calories: 275 kcal
- Sugar: 18 g
- Sodium: 60 mg
- Fat: 16 g
- Saturated Fat: 10 g
- Unsaturated Fat: 5 g
- Trans Fat: 0.2 g
- Carbohydrates: 27 g
- Fiber: 1.5 g
- Protein: 3.5 g
- Cholesterol: 65 mg
Nate Harper
Founder & Recipe Curator
Expertise
Single-Recipe Development, Farm-to-Table Cooking, Seasonal Menu Planning, Culinary Storytelling, Home Kitchen Innovation
Education
Cascade Culinary Institute – Central Oregon Community College
Certificate in Culinary Arts
Focus: Farm-to-table cuisine, sustainable cooking practices, and seasonal recipe creation.
Nate studied under experienced chefs who emphasized local sourcing, minimal waste, and building recipes from fresh, simple ingredients.
Nate Harper is the founder and creative force behind Make, Take, Bake. Raised in the wild beauty of Oregon’s high desert, Nate grew up surrounded by family gardens, farmers’ markets, and home kitchens that celebrated the seasons.
His early love for simple, honest food evolved into a professional passion when he attended Cascade Culinary Institute, where he sharpened his skills in creating recipes that are sustainable, satisfying, and made for everyday life.
Nate’s goal is to make cooking feel accessible, free of fuss, and full of flavor. He believes a single, thoughtfully built dish can stand alone, and sometimes even steal the show.