
Festive Peppermint Ice Cream Cake Recipe: A Sweet Holiday Joy
Cold winter nights meet their match with this ultimate festive peppermint ice cream cake that promises pure magic.
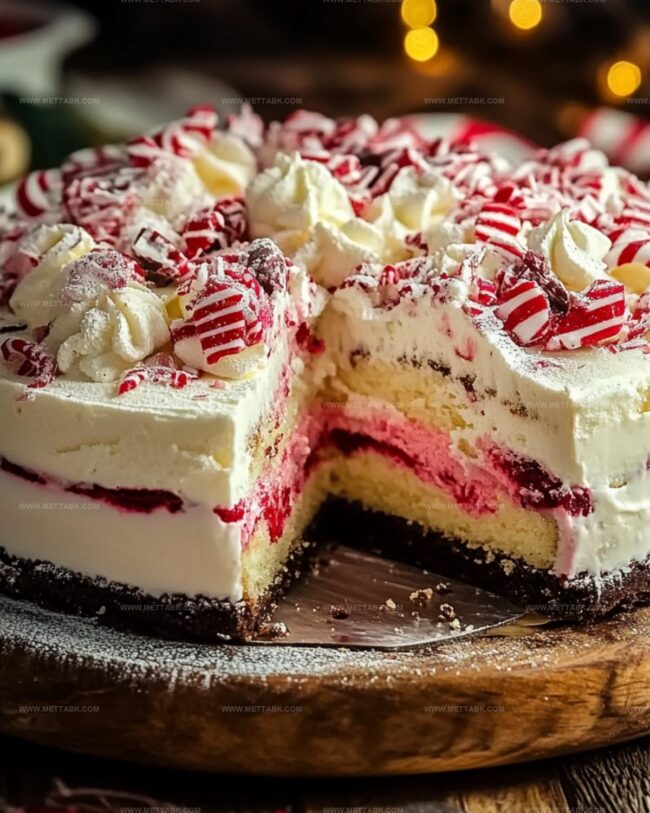
Layers of creamy, minty goodness dance between delicate cake crumbs for an unforgettable dessert experience.
Sweet peppermint swirls create a delightful symphony of flavors perfect for holiday celebrations.
Chilled and decadent, each slice brings a burst of festive cheer to your table.
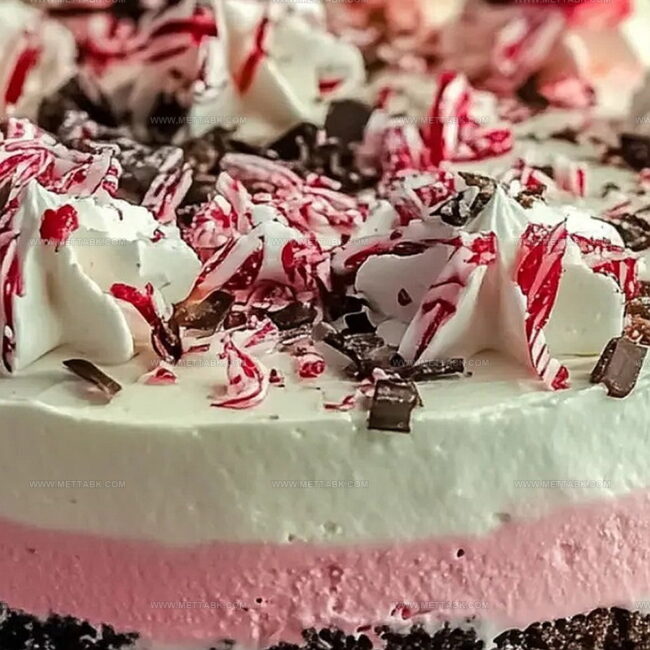
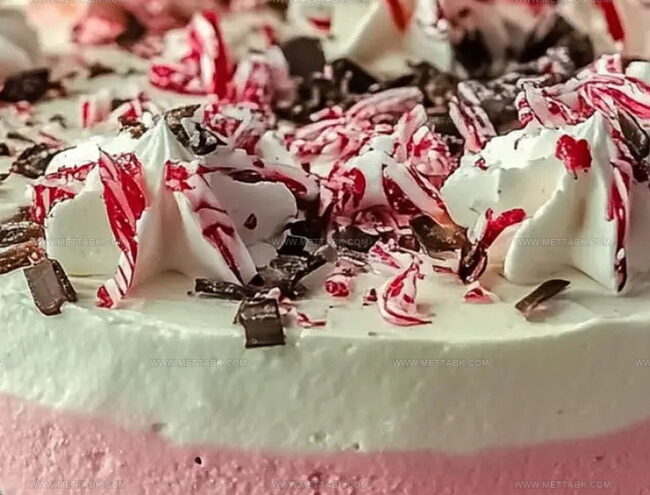
Chocolate shavings and crushed candy canes add a playful crunch that makes this treat irresistible.
Memories of cozy gatherings and joyful moments come alive with every delectable bite.
Whip up this show-stopping dessert and watch faces light up with pure delight.
Reasons Ultimate Festive Peppermint Ice Cream Cake Shines
Ingredients for Ultimate Festive Peppermint Ice Cream Cake
For the Crust:For the Ice Cream Layer:For the Whipped Topping and Garnishes:Instructions for Making Festive Peppermint Ice Cream Cake
Step 1: Create Chocolate Cookie Base
Grab a springform pan and line it with parchment paper. Crush chocolate cookies into fine crumbs and mix thoroughly with melted butter.
Press the mixture firmly and evenly across the pan’s bottom, creating a solid foundation. Pop the pan into the freezer for 15 minutes to help the base set perfectly.
Step 2: Layer Peppermint Ice Cream
Remove the pan from the freezer and spread softened peppermint ice cream across the cookie base. Sprinkle crushed peppermint candies over the ice cream, adding delightful crunch and festive flair.
Cover the pan with plastic wrap and return to the freezer for 4 hours until the ice cream becomes completely solid.
Step 3: Whip Creamy Topping
Pull out a chilled mixing bowl and combine heavy cream with powdered sugar and vanilla extract.
Whip the mixture vigorously until it transforms into fluffy, stiff peaks that hold their shape beautifully.
Step 4: Decorate and Finish
Carefully spread the whipped cream topping over the frozen ice cream layer.
Decorate with:Freeze the cake for one additional hour to help the topping set completely.
Step 5: Slice and Celebrate
Remove the cake from the freezer and slice into delectable portions.
Serve immediately for a refreshing, festive dessert that will delight everyone at your holiday gathering.
Helpful Tips for Ultimate Festive Peppermint Ice Cream Cake
Flavor Variations for Festive Peppermint Ice Cream Cake
Best Pairings for Ultimate Peppermint Ice Cream Cake
Proper Storage for Ultimate Peppermint Ice Cream Cake
Store the cake in an airtight container or wrap tightly with plastic wrap. Keep in the freezer for up to 1 week to maintain its creamy texture and prevent freezer burn.
Cut the cake into portions before freezing. Wrap each slice separately in plastic wrap, then place in a freezer-safe bag for easy individual servings that last up to 2 weeks.
Remove the cake from the freezer and let it sit in the refrigerator for 10-15 minutes before serving. This gentle thawing method helps preserve the cake’s smooth consistency and prevents ice crystals.
For immediate enjoyment, use a knife dipped in hot water to slice clean, smooth pieces. Wipe the knife between cuts to ensure neat, picture-perfect servings.
FAQs
You can substitute store-bought whipped cream, but homemade whipped cream will provide a fresher taste and better texture that elevates the entire dessert.
The cake can be stored in the freezer for up to 5-7 days if properly wrapped in plastic wrap or placed in an airtight container to prevent freezer burn.
This specific recipe doesn’t contain nuts, but always check ingredient labels of cookies, ice cream, and candy canes to ensure they are nut-free and produced in a nut-free facility.
Print
Ultimate Festive Peppermint Ice Cream Cake Recipe
- Total Time: 5 hours 20 minutes
- Yield: 12 1x
Description
Creamy peppermint ice cream cake delivers winter holiday magic in one delightful dessert. Chocolate cookie crust and cool mint layers promise sweet celebration with each indulgent spoonful you’ll savor.
Ingredients
Main Ingredients:
- 1 1/2 quarts (1.4 liters) peppermint ice cream
- 2 cups (200g) chocolate cookie crumbs
- 2 cups (480ml) heavy whipping cream
Crust and Binding Ingredients:
- 6 tablespoons (85g) unsalted butter, melted
- 3 tablespoons powdered sugar
- 1/2 teaspoon vanilla extract
Decorative and Flavor Enhancing Ingredients:
- 1/2 cup (50g) crushed peppermint candies or candy canes
- Crushed candy canes or peppermint candies (for garnish)
- Chocolate shavings or mini chocolate chips (for garnish)
Instructions
- Prepare a 9-inch springform pan by lightly greasing or lining with parchment paper to ensure easy cake removal.
- Combine chocolate cookie crumbs with melted butter, creating a uniform mixture that will form the cake’s foundation.
- Press the crumb mixture firmly and evenly into the pan’s bottom, creating a compact base layer.
- Chill the crust in the freezer for approximately 15 minutes to help it set and maintain its structure.
- Remove the peppermint ice cream from the freezer and allow it to soften slightly for easier spreading.
- Carefully spread the softened peppermint ice cream across the chilled crust, ensuring an even, smooth layer.
- Sprinkle crushed peppermint candies or candy canes over the ice cream, distributing them for consistent texture and flavor.
- Cover the pan with plastic wrap and return to the freezer for 4 hours or until the ice cream becomes completely firm.
- Prepare the whipped topping by chilling a mixing bowl beforehand to help achieve optimal cream volume.
- Whip heavy cream, powdered sugar, and vanilla extract together until stiff, glossy peaks form, indicating proper consistency.
- Gently spread the whipped topping across the frozen ice cream layer, creating a uniform and elegant surface.
- Decorate the cake with additional crushed candy canes, peppermint candies, chocolate shavings, or mini chocolate chips.
- Return the cake to the freezer for one final hour to set the whipped topping and ensure a perfect presentation.
- When ready to serve, remove the cake from the freezer and slice immediately for the most refreshing holiday dessert experience.
Notes
- Chill your mixing bowl and whisk before whipping cream to achieve perfect, stable peaks that hold their shape beautifully.
- Use full-fat cream for a richer, more luxurious whipped topping that won’t deflate quickly during freezing.
- Crush peppermint candies just before adding to prevent moisture from making them sticky and maintain their delightful crunch.
- For a gluten-free version, swap chocolate cookie crumbs with gluten-free graham crackers or almond flour-based cookies to create an equally delicious crust.
- Prep Time: 20 minutes
- Cook Time: 5 hours
- Category: Desserts
- Method: Freezing
- Cuisine: American
Nutrition
- Serving Size: 12
- Calories: 252 kcal
- Sugar: 19 g
- Sodium: 45 mg
- Fat: 16 g
- Saturated Fat: 9 g
- Unsaturated Fat: 6 g
- Trans Fat: 0.2 g
- Carbohydrates: 25 g
- Fiber: 1 g
- Protein: 3 g
- Cholesterol: 55 mg
Nate Harper
Founder & Recipe Curator
Expertise
Single-Recipe Development, Farm-to-Table Cooking, Seasonal Menu Planning, Culinary Storytelling, Home Kitchen Innovation
Education
Cascade Culinary Institute – Central Oregon Community College
Certificate in Culinary Arts
Focus: Farm-to-table cuisine, sustainable cooking practices, and seasonal recipe creation.
Nate studied under experienced chefs who emphasized local sourcing, minimal waste, and building recipes from fresh, simple ingredients.
Nate Harper is the founder and creative force behind Make, Take, Bake. Raised in the wild beauty of Oregon’s high desert, Nate grew up surrounded by family gardens, farmers’ markets, and home kitchens that celebrated the seasons.
His early love for simple, honest food evolved into a professional passion when he attended Cascade Culinary Institute, where he sharpened his skills in creating recipes that are sustainable, satisfying, and made for everyday life.
Nate’s goal is to make cooking feel accessible, free of fuss, and full of flavor. He believes a single, thoughtfully built dish can stand alone, and sometimes even steal the show.