Best Vanilla Chocolate Cheesecake Recipe for Sweet Indulgence
Sweet dreams come alive with a vanilla chocolate cheesecake that promises pure indulgence.
Creamy layers melt together in a symphony of rich flavors.
Decadent chocolate swirls dance through silky vanilla custard, creating a dessert that whispers elegance.
Each slice tells a story of comfort and celebration.
Luxurious ingredients blend seamlessly, turning an ordinary moment into something magical.
You’ll fall in love with every single bite of this irresistible treat.
Grab a fork and let the culinary adventure begin!
Why Vanilla Chocolate Cheesecake Is a Dessert Dream
What You’ll Need for Vanilla Chocolate Cheesecake
For the Crust:For the Cheesecake Filling:For the Garnish:How to Bake a Chocolate Vanilla Cheesecake Layer
Step 1: Craft the Chocolatey Base
Warm up your oven to a cozy 325F (160C). Grab a mixing bowl and combine these delightful ingredients:Press this tempting mixture firmly into the bottom of a 9-inch springform pan.
Pop it in the oven and bake for 10 minutes, then let it cool down and get ready for the next delicious phase.
Step 2: Whip Up the Creamy Filling
Take your cream cheese and sugar on a smooth dancing journey with your mixer.
Gently introduce eggs one by one, letting each one blend in perfectly. Fold in these wonderful ingredients:Pour this silky batter over your cooled chocolatey crust, creating a dreamy layer of deliciousness.
Step 3: Create the Perfect Water Bath Bake
Wrap the pan’s bottom with foil like a protective blanket. Place it in a larger baking dish and surround it with hot water, filling halfway up the sides.
This magical water bath will help your cheesecake bake evenly and stay super creamy.
Slide it into the 325F (160C) oven and bake for 55-65 minutes.
You’ll know it’s ready when the center has a gentle jiggle but looks mostly set. Once done, turn off the oven, crack the door open, and let your cheesecake rest for an hour.
Step 4: Chill and Dress Up Your Masterpiece
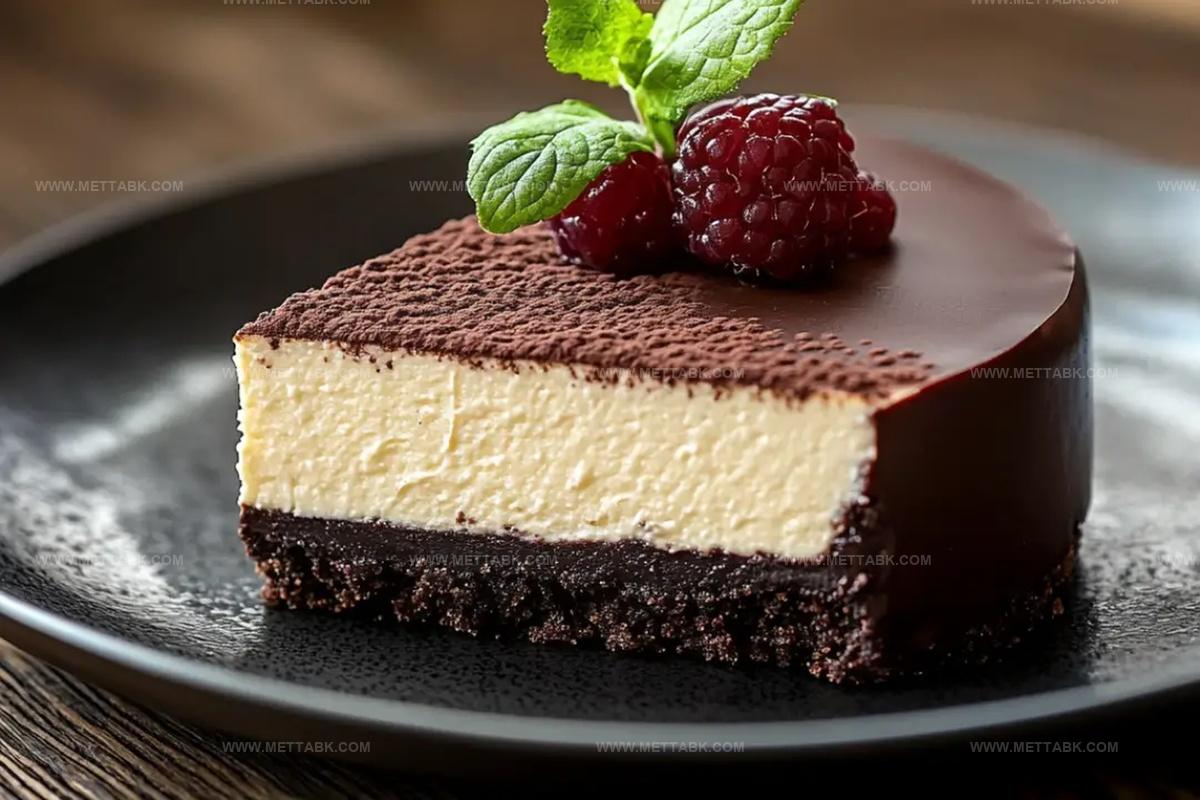
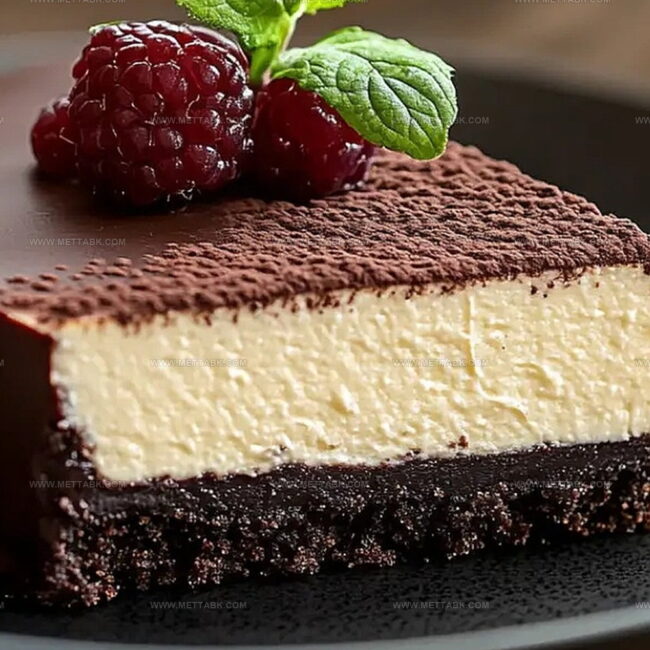
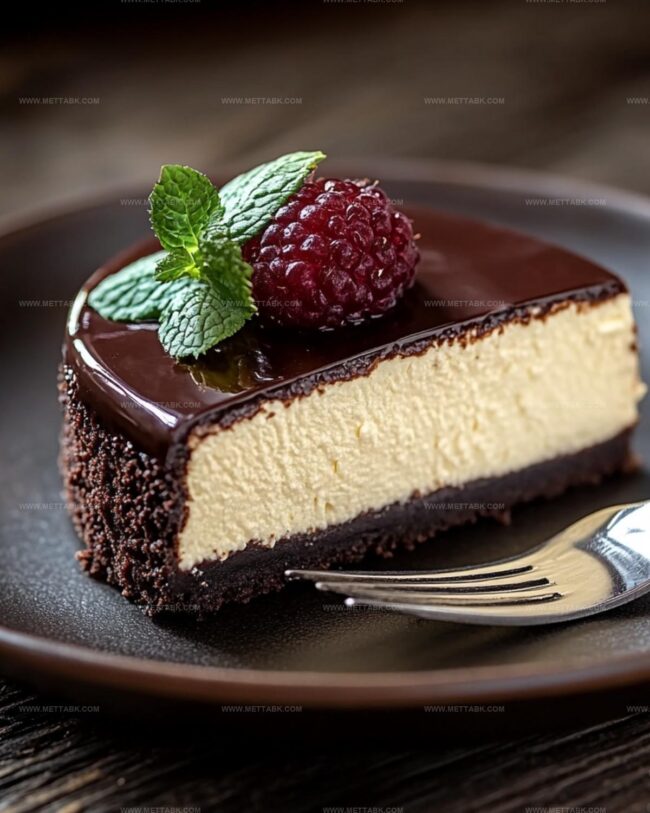
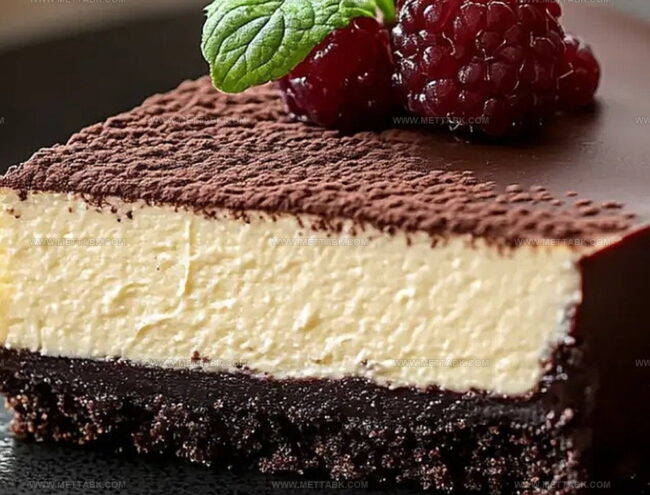
Refrigerate your creation for at least 4 hours (overnight is even better for maximum flavor development). When ready to serve, sprinkle with a dusting of powdered sugar and add some gorgeous toppings:Step 5: Indulge and Celebrate
Slice, serve, and savor every single bite of your homemade vanilla chocolate cheesecake!
Tips for Creamy Vanilla Chocolate Cheesecake Success
Different Takes on Chocolate Vanilla Cheesecake Style
What to Serve With Vanilla Chocolate Cheesecake
Best Storage for Vanilla Chocolate Cheesecake Leftovers
FAQs
Yes, you can substitute graham crackers for chocolate cookie crumbs. The texture and flavor will be slightly different, but the crust will still work well with the cheesecake.
Use a water bath, avoid overmixing the batter, and don’t overbake. Let the cheesecake cool gradually in the oven with the door cracked to prevent sudden temperature changes.
A springform pan is recommended because it allows easy removal of the cheesecake without damaging its delicate structure. If you don’t have one, use a deep cake pan lined with parchment paper.
Print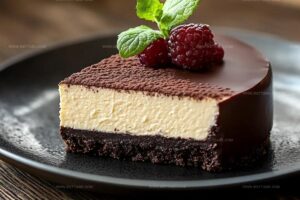
Vanilla Chocolate Cheesecake Recipe
- Total Time: 1 hour 25 minutes
- Yield: 12 1x
Description
Indulgent vanilla chocolate cheesecake marries creamy richness with deep cocoa notes, creating a dessert that whispers pure elegance. Chocolate lovers will savor each silky bite, discovering a perfect balance of sweet sophistication that lingers delightfully on their palate.
Ingredients
Main Ingredients:
- 3 (8 ounces) packages cream cheese, softened
- 3 large eggs
- 1 cup (200 grams) granulated sugar
- 1 1/2 cups (180 grams) crushed chocolate cookies
Dairy and Binding Ingredients:
- 1 cup (240 milliliters) sour cream or heavy cream
- 1/4 cup (60 grams) melted butter
- 2 tablespoons granulated sugar
- 2 tablespoons all-purpose flour
Finishing and Garnish:
- 1 tablespoon vanilla extract
- Powdered sugar
- Fresh raspberries
- Whipped cream
- Chocolate chunks
- Mint leaves
Instructions
- Craft a rich chocolate cookie foundation by combining cookie crumbs, melted butter, and sugar. Press the mixture compactly into a 9-inch springform pan, creating an even base layer.
- Preheat the oven to 325F and briefly toast the crust for 10 minutes, allowing it to set and develop a deeper flavor profile.
- In a large mixing bowl, whip cream cheese and sugar until achieving a silky, lump-free consistency.
- Incorporate eggs individually, gently folding each one to maintain a smooth batter texture.
- Delicately blend sour cream, vanilla extract, and flour into the mixture, ensuring thorough but careful integration.
- Transfer the luxurious cheesecake batter over the cooled chocolate cookie crust, spreading evenly.
- Encase the springform pan’s exterior with aluminum foil to prevent water infiltration.
- Position the pan within a larger baking vessel and surround with hot water, creating a gentle steam bath that ensures uniform heat distribution.
- Bake at 325F for approximately 55-65 minutes, watching for a slightly trembling center that indicates perfect doneness.
- After baking, switch off the oven and leave the door slightly ajar, allowing the cheesecake to gradually cool for one hour.
- Refrigerate for a minimum of 4 hours, preferably overnight, to achieve optimal setting and flavor melding.
- Enhance presentation by dusting with powdered sugar and adorning with fresh raspberries, whipped cream, chocolate chunks, or mint leaves before serving.
Notes
- Use room temperature ingredients and avoid overmixing to create a smooth, crack-free cheesecake surface.
- Carefully wrap the springform pan in multiple layers of aluminum foil to prevent water from seeping into the crust during baking.
- Experiment with different cookie crumb bases like Oreo, graham crackers, or add a hint of espresso powder to enhance the chocolate notes.
- Swap regular cream cheese with dairy-free alternatives and use gluten-free cookies for a vegan and gluten-sensitive version of the cheesecake.
- Prep Time: 20 minutes
- Cook Time: 1 hour 5 minutes
- Category: Desserts
- Method: Baking
- Cuisine: American
Nutrition
- Serving Size: 12
- Calories: 330 kcal
- Sugar: 20 g
- Sodium: 200 mg
- Fat: 25 g
- Saturated Fat: 15 g
- Unsaturated Fat: 8 g
- Trans Fat: 0.5 g
- Carbohydrates: 22 g
- Fiber: 1 g
- Protein: 6 g
- Cholesterol: 85 mg
Nate Harper
Founder & Recipe Curator
Expertise
Single-Recipe Development, Farm-to-Table Cooking, Seasonal Menu Planning, Culinary Storytelling, Home Kitchen Innovation
Education
Cascade Culinary Institute – Central Oregon Community College
Certificate in Culinary Arts
Focus: Farm-to-table cuisine, sustainable cooking practices, and seasonal recipe creation.
Nate studied under experienced chefs who emphasized local sourcing, minimal waste, and building recipes from fresh, simple ingredients.
Nate Harper is the founder and creative force behind Make, Take, Bake. Raised in the wild beauty of Oregon’s high desert, Nate grew up surrounded by family gardens, farmers’ markets, and home kitchens that celebrated the seasons.
His early love for simple, honest food evolved into a professional passion when he attended Cascade Culinary Institute, where he sharpened his skills in creating recipes that are sustainable, satisfying, and made for everyday life.
Nate’s goal is to make cooking feel accessible, free of fuss, and full of flavor. He believes a single, thoughtfully built dish can stand alone, and sometimes even steal the show.