
Make School Days Brighter: Easy Mini Lunchbox Pizzas Recipe
Crafting delightful mini lunchbox pizzas can turn an ordinary midday meal into a playful culinary adventure.
Small hands love these bite-sized treats that pack big flavor in compact portions.
Kids and adults alike appreciate the simplicity of assembling these adorable mini pizzas.
Perfectly portioned and endlessly customizable, these little delights make lunch something to eagerly anticipate.
Crispy bases topped with classic ingredients create a satisfying experience that feels both nostalgic and fresh.
Colorful vegetables and melted cheese transform basic ingredients into something magical.
Let’s make lunch exciting and delicious with these irresistible mini pizzas that you’ll want to enjoy again and again.
Easy Mini Lunchbox Pizzas Kids Will Crave
Ingredients for Easy Mini Lunchbox Pizzas
For the Dough Base:For the Pizza Topping:For the Preparation:Step-by-Step Guide to Mini Lunchbox Pizzas
Step 1: Create Pizza Dough
Gather self-raising flour and Greek yogurt in a spacious mixing bowl. Blend ingredients using a spoon until they form large crumbly flakes.
Switch to hand kneading, working the mixture until a smooth, soft dough develops. This process should take around 10-12 minutes.
Step 2: Shape Pizza Bases
Dust a clean countertop with flour. Roll out the dough to approximately half-inch thickness.
Use a large mug or circular cookie cutter to create round pizza bases. Gather and re-roll remaining dough scraps to maximize usage.
Step 3: Prepare Pizza Toppings
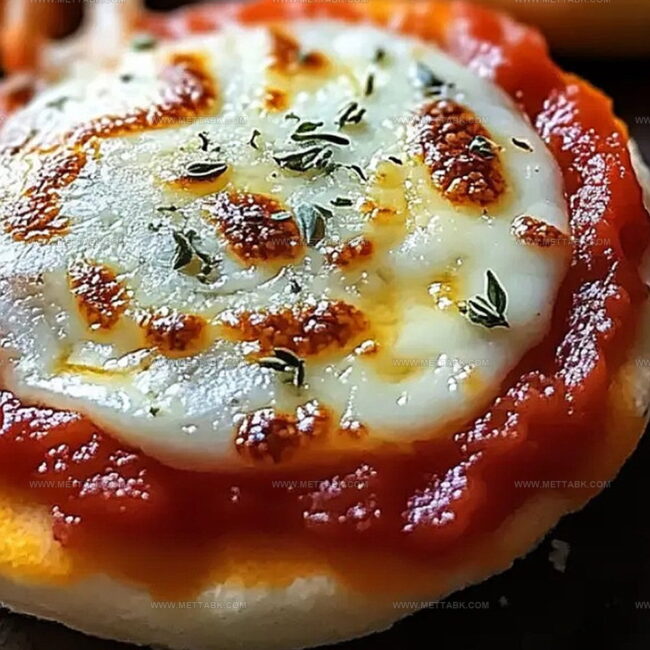
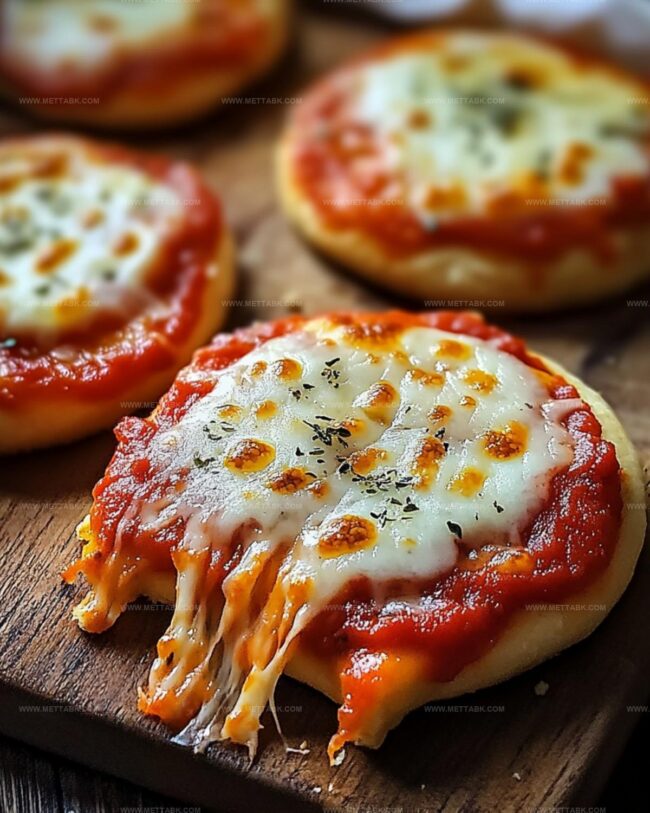
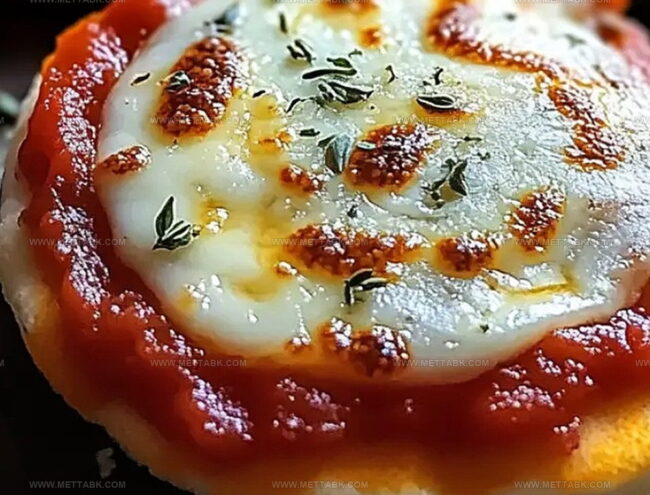
Arrange pizza bases on a parchment-lined baking sheet. Spread a thin layer of tomato paste across each round.
Top pizzas with:Step 4: Bake Mini Pizzas
Place baking tray in a preheated oven at 400°F (or 350°F for fan-forced). Bake for 12-14 minutes until pizza bases turn golden and cheese melts completely.
Remove from oven and let cool briefly on the tray before serving.
Tips for Perfect Mini Pizzas
Fun Variations for Mini Lunchbox Pizzas
Best Pairings with Mini Lunchbox Pizzas
How to Store Mini Lunchbox Pizzas
Store leftover mini pizzas in an airtight container in the refrigerator for up to 3 days. Separate layers with parchment paper to prevent sticking.
Wrap individual pizzas tightly in plastic wrap, then place in a freezer-safe bag. Freeze for up to 1 month for best quality and taste.
Warm refrigerated pizzas at 180C (350F) for 5-7 minutes until heated through. For frozen pizzas, thaw in refrigerator overnight before reheating.
Reheat refrigerated pizzas on a microwave-safe plate for 30-45 seconds. Note that microwave heating may slightly soften the crust compared to oven reheating.
FAQs
This recipe is super easy and beginner-friendly. With just two main ingredients for the dough and simple toppings, anyone can make these mini pizzas quickly, even if you’re not an experienced cook.
Absolutely! You can swap pepperoni for ham, cooked chicken, vegetables like bell peppers, or keep them plain with just cheese. The dough is versatile and works well with different toppings.
No special equipment is needed. You just need a mixing bowl, a spoon, a rolling pin (or a clean bottle), a baking tray, and something circular to cut out the dough rounds like a large mug or cookie cutter.
Print
Easy Mini Lunchbox Pizzas Recipe
- Total Time: 34 minutes
- Yield: 4 1x
Description
Homemade mini lunchbox pizzas deliver delightful flavor combinations that kids and adults adore. Crispy mini crusts topped with classic marinara, melted cheese, and personalized toppings create perfect portable lunch companions you’ll crave.
Ingredients
Main Ingredients:
- 2 cups (300g) self-raising flour
- 1 cup (250g) full-fat plain Greek yoghurt
- 1 cup (125g) freshly shredded mozzarella
Sauce:
- 1/3 cup (90g) tomato paste
Protein Topping:
- 1/2 cup (80g) pepperoni
Instructions
- Warm the oven to 200C (400F) or 180C (350F) for fan-forced ovens. Cover a baking sheet with parchment paper to prevent sticking.
- Blend self-raising flour and Greek yogurt in a mixing bowl. Initially use a spoon to create flaky texture, then knead with hands until a cohesive, smooth dough emerges. The kneading process should take approximately 12 minutes.
- Dust a clean countertop with flour. Roll out the dough to a consistent 1 cm thickness. Use a large mug or circular cookie cutter to create round bases. Collect and re-roll remaining dough scraps to maximize usage.
- Transfer dough rounds onto the prepared baking sheet. Spread a thin layer of tomato paste across each round, ensuring even coverage. Generously sprinkle shredded mozzarella cheese over the tomato paste. Arrange pepperoni slices evenly on top of the cheese.
- Slide the baking sheet into the preheated oven. Bake for 12-14 minutes, monitoring until the dough turns golden brown and the cheese melts completely. Remove from oven and let the mini pizzas rest on the tray for a few minutes before serving to allow cooling and setting.
Notes
- Use room temperature yogurt for easier dough mixing and smoother texture.
- For a crispier base, pre-bake the dough rounds for 3-4 minutes before adding toppings.
- Swap pepperoni with ham, vegetables, or chicken for dietary variations and kid-friendly options.
- Ensure dough is evenly rolled to guarantee consistent cooking and prevent uneven browning.
- Prep Time: 20 minutes
- Cook Time: 14 minutes
- Category: Lunch, Dinner, Snacks
- Method: Baking
- Cuisine: Italian
Nutrition
- Serving Size: 4
- Calories: 463 kcal
- Sugar: 5 g
- Sodium: 870 mg
- Fat: 27 g
- Saturated Fat: 13 g
- Unsaturated Fat: 10 g
- Trans Fat: 0.3 g
- Carbohydrates: 38 g
- Fiber: 2 g
- Protein: 27 g
- Cholesterol: 60 mg
Nate Harper
Founder & Recipe Curator
Expertise
Single-Recipe Development, Farm-to-Table Cooking, Seasonal Menu Planning, Culinary Storytelling, Home Kitchen Innovation
Education
Cascade Culinary Institute – Central Oregon Community College
Certificate in Culinary Arts
Focus: Farm-to-table cuisine, sustainable cooking practices, and seasonal recipe creation.
Nate studied under experienced chefs who emphasized local sourcing, minimal waste, and building recipes from fresh, simple ingredients.
Nate Harper is the founder and creative force behind Make, Take, Bake. Raised in the wild beauty of Oregon’s high desert, Nate grew up surrounded by family gardens, farmers’ markets, and home kitchens that celebrated the seasons.
His early love for simple, honest food evolved into a professional passion when he attended Cascade Culinary Institute, where he sharpened his skills in creating recipes that are sustainable, satisfying, and made for everyday life.
Nate’s goal is to make cooking feel accessible, free of fuss, and full of flavor. He believes a single, thoughtfully built dish can stand alone, and sometimes even steal the show.