
Sweet & Playful Homemade 3 Musketeers Bars Recipe
Sweet chocolate lovers find pure bliss in this homemade 3 musketeers bars adventure that promises delectable nostalgia.
Childhood memories flood back with each delicate, airy bite of chocolatey goodness.
Crafting these treats feels like culinary magic happening right in your kitchen.
Simple ingredients combine to create something extraordinary and irresistibly smooth.
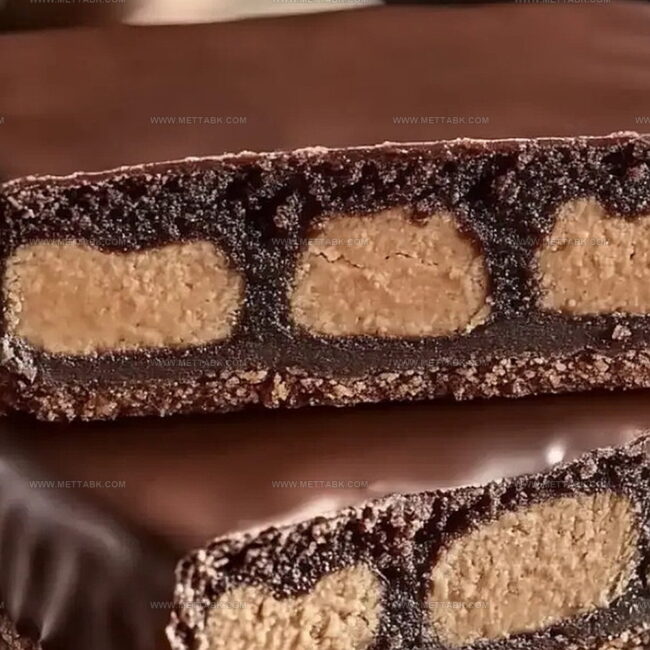
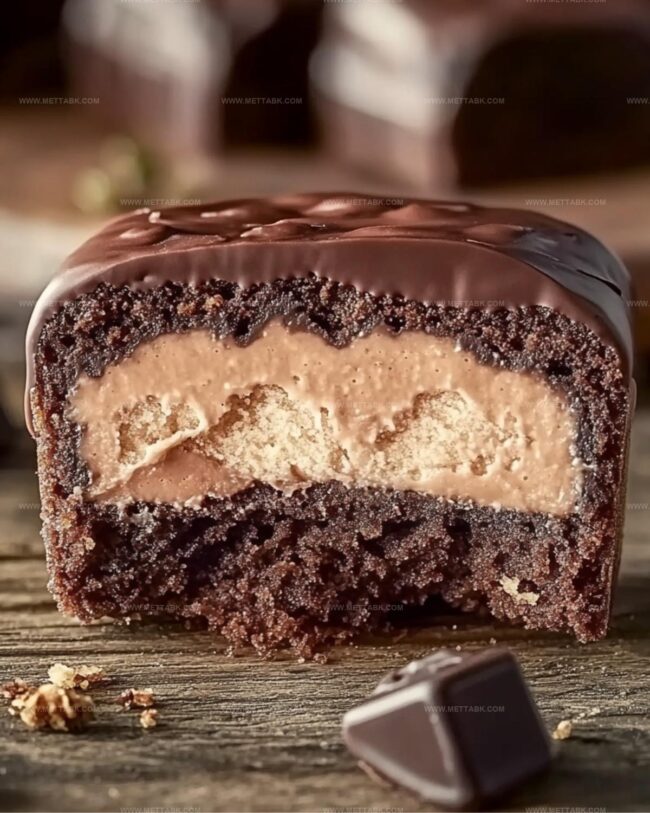
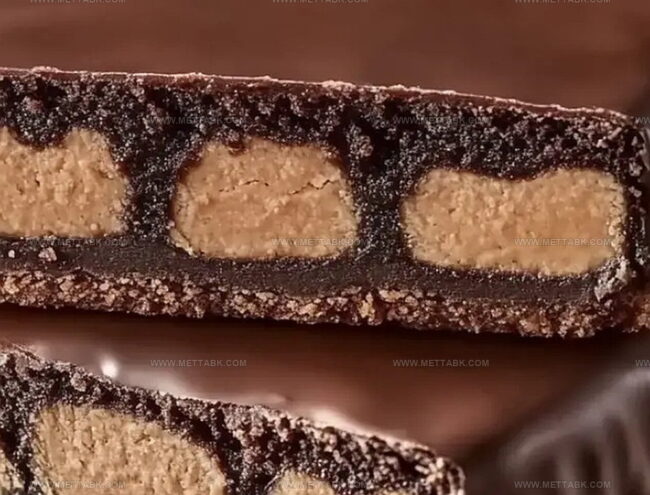
Layers of rich chocolate melt together, forming a confection that rivals any store-bought candy bar.
Soft, fluffy centers promise an indulgent experience that connects you with classic dessert joy.
Grab your mixing bowl and prepare for a delightful chocolate journey that will impress everyone around you.
What Makes Homemade 3 Musketeers Bars So Tasty
Ingredients Needed for Homemade 3 Musketeers Bars
For the Main Ingredients:For the Pan and Preparation:For the Optional Extras:How to Make Homemade 3 Musketeers Bars Properly
Step 1: Prepare Your Workspace
Line an 8×8-inch baking pan with parchment paper, ensuring some overhang for easy removal. Set up a large baking sheet with parchment paper nearby for later use.
Step 2: Transform Chocolate Into Liquid Gold
Break semi-sweet chocolate bars into a large mixing bowl. Microwave in stages:Step 3: Create Fluffy Chocolate Mixture
Fold thawed whipped topping into melted chocolate.
Use a handheld mixer on medium speed, blending for 1-2 minutes until mixture becomes silky and uniform.
Step 4: Shape Your Candy Base
Pour the chocolate mixture into prepared pan.
Smooth surface evenly using an offset spatula. Cover with parchment paper overhang.
Step 5: Freeze And Solidify
Place pan in freezer for one hour, allowing filling to become firm and set.
Step 6: Cut Into Bite-Sized Treasures
Remove frozen filling from pan.
Slice into:Clean knife with hot water between cuts to maintain precision.
Step 7: Prepare Chocolate Coating
Melt chocolate almond bark in microwave:Step 8: Dip And Coat
Use a fork to:Step 9: Final Chill
Refrigerate coated candies for 15 minutes, allowing chocolate to completely set and harden.
Helpful Tips for Homemade 3 Musketeers Bars Success
Flavor Variations for Homemade 3 Musketeers Bars
Best Pairings for Homemade 3 Musketeers Bars
How to Store Homemade 3 Musketeers Bars Safely
Store homemade 3 Musketeers bars in an airtight container between parchment paper layers. Keep refrigerated for up to 5 days to maintain texture and prevent chocolate from melting.
Wrap individual bars tightly in plastic wrap, then place in freezer-safe container. Freeze for maximum 2 months. Prevent freezer burn by removing excess air from packaging.
Remove bars from freezer and let sit at room temperature for 10-15 minutes before enjoying. Avoid microwaving to prevent chocolate coating from becoming soft or separating.
When transferring from freezer to refrigerator, keep bars wrapped to prevent moisture buildup. Allow gradual temperature adjustment to maintain crisp chocolate coating.
FAQs
This homemade 3 Musketeers bar recipe is beginner-friendly. With basic kitchen tools and simple steps, anyone can create these delicious chocolate treats. The process involves melting chocolate, mixing ingredients, and coating candies.
You’ll need a microwave, 8×8-inch baking pan, parchment paper, handheld mixer, fork, large baking sheet, and a knife. Basic kitchen tools make this recipe easy to follow.
Yes, you can experiment with milk chocolate or dark chocolate instead of semi-sweet baking bars. Just ensure the chocolate melts smoothly and has good quality for the best results.
Print
Homemade 3 Musketeers Bars Recipe
- Total Time: 1 hour 35 minutes
- Yield: 12 1x
Description
Chocolate lovers rejoice with this homemade 3 Musketeers bars recipe, a delightful twist on the classic candy. Silky chocolate mousse enrobed in rich chocolate coating creates a sweet indulgence you’ll crave again and again.
Ingredients
Chocolate Base:
- 12 ounces (340 grams) semi-sweet baking chocolate bars, broken into small pieces
- 24 ounces (680 grams) chocolate almond bark, also known as candy coating
Filling:
- 8 ounces (227 grams) tub frozen whipped topping, thawed
Coating:
- 24 ounces (680 grams) chocolate almond bark, also known as candy coating
Instructions
- Prepare the workspace by lining an 8-inch square pan with parchment paper, ensuring excess hangs over the edges for easy removal. Set up a parchment-lined baking sheet nearby.
- Chop semi-sweet chocolate bars into smaller pieces and place in a microwave-safe bowl. Heat at 50% power for 1-minute intervals, stirring between each cycle until completely melted and glossy.
- Gently fold thawed whipped topping into the melted chocolate using a handheld mixer. Blend on medium speed for 1-2 minutes until the mixture becomes uniform and silky.
- Transfer the chocolate-whipped topping mixture into the prepared pan. Use an offset spatula to create an even surface, then cover with overhanging parchment paper.
- Freeze the filling for approximately 60 minutes until it becomes firm and structured.
- Remove the chilled filling from the freezer. Using the parchment paper, lift out the entire block and slice into precise rectangular sections. Cut each section into smaller bite-sized pieces, cleaning the knife with hot water between cuts to maintain clean edges.
- Melt chocolate almond bark in a microwave-safe bowl, using 30-second intervals at 50% power. Stir thoroughly between heating cycles until completely smooth and liquid.
- Carefully dip each candy piece into the melted chocolate using a fork. Allow excess chocolate to drip off, then place on the prepared baking sheet. Tap the fork gently to ensure uniform coating.
- Refrigerate the chocolate-coated candies for 15 minutes to set the chocolate and create a crisp exterior before serving.
Notes
- Keep chocolate at consistent melting temperature to prevent seizing or burning, stirring frequently during microwave intervals.
- Use room temperature whipped topping for smoother blending with melted chocolate, ensuring no lumps form during mixing.
- Wipe knife with hot water between cuts to achieve clean, precise candy squares without sticky residue.
- For dietary modifications, substitute dairy-free chocolate and vegan whipped topping to create allergen-friendly version of the classic candy bar.
- Prep Time: 20 minutes
- Cook Time: 1 hour 15 minutes
- Category: Desserts, Snacks
- Method: Blending
- Cuisine: American
Nutrition
- Serving Size: 12
- Calories: 204
- Sugar: 19 g
- Sodium: 25 mg
- Fat: 13 g
- Saturated Fat: 9 g
- Unsaturated Fat: 3 g
- Trans Fat: 0.1 g
- Carbohydrates: 22 g
- Fiber: 1 g
- Protein: 1 g
- Cholesterol: 5 mg
Clara Bennett
Contributing Recipe Developer & Food Writer
Expertise
Baking and Pastry Development, Gluten-Free and Allergy-Friendly Recipe Creation, Culinary Storytelling and Food Journalism, Recipe Testing and Standardization, Southern Comfort Foods and Modern Twists
Education
Sullivan University – National Center for Hospitality Studies
Associate Degree in Culinary Arts
Focus: Baking and Pastry Arts, Recipe Testing, and Culinary Journalism.
Clara specialized in crafting desserts that blend classic Southern comfort with modern techniques, while developing strong writing skills to tell the story behind every dish.
Lane Community College (Certificate Program)
Certificate in Food Writing and Photography
Focus: Culinary storytelling, recipe formatting, food styling, and visual presentation.
Clara’s love of baking started young, powered by homemade pies, biscuits, and stories passed around the family table.
After earning her degree at Sullivan University and a food writing certificate at Lane Community College, she turned her passion into a craft: sharing recipes that are simple, soulful, and always full of heart.
She’s big on bold flavors, flexible ideas, and creating sweets that fit any table (yes, even if you’re gluten-free). When she’s not baking, you’ll find her wandering farmers’ markets, styling food for the next photo shoot, or working on her ever-growing recipe journal.